Why CNN?
A CNN can successfully store the Spatial and Temporal domain in an image through relevant filters. It performs a better fitting of the image due to the reduced number of features and the reusability of weights, which means the network can be trained to understand the image's fineness better.
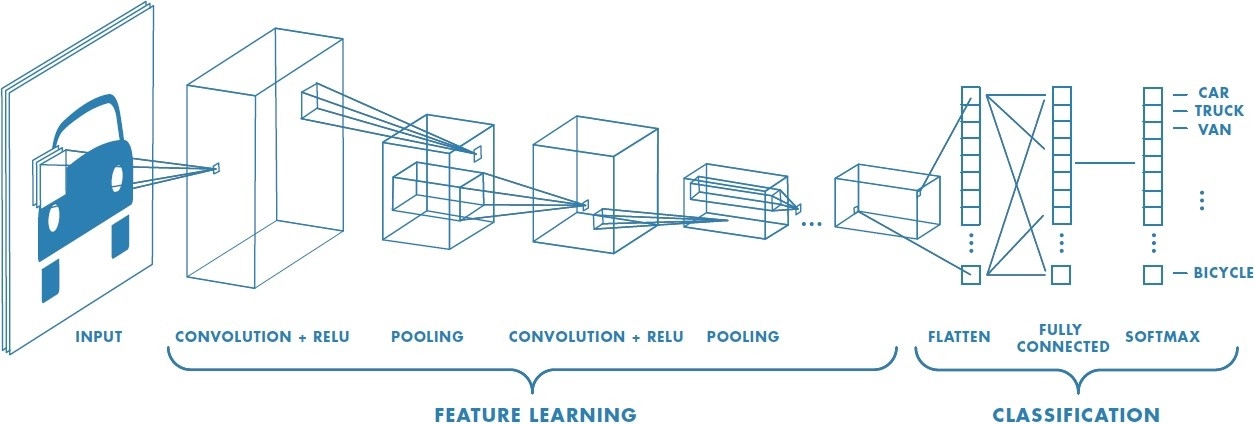
How does CNN work?
Source: Link
CNN is different from other neural networks by its superior performance with image, speech, and audio signal inputs. It has four types of layers, which are:
- Convolutional layer
- Pooling layer
- Flattening
- Fully-connected (FC) layer
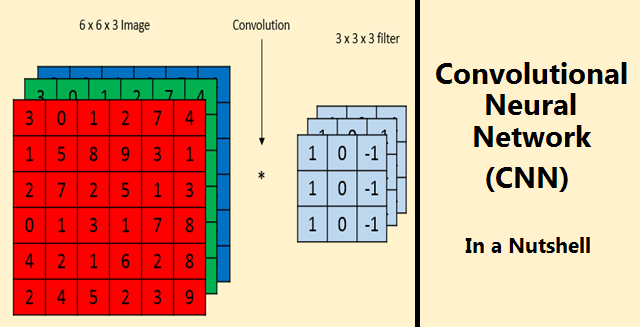
Convolution Layer
The Convolution Layer is the initial layer to pull out features from an input image. It preserves the relationship between pixels by learning image features using a small sequence of input data.
Source: Link
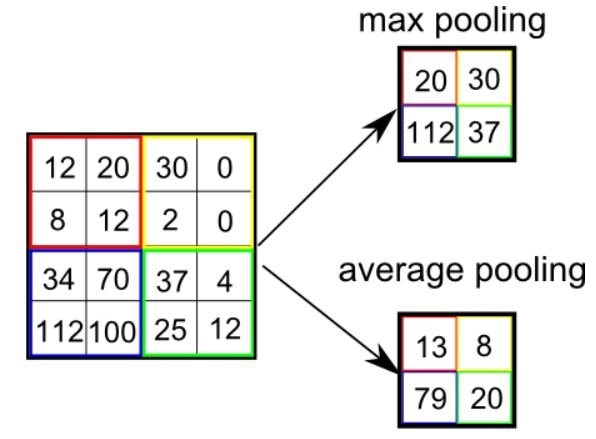
Pooling Layer
The pooling layer is another building block of a CNN and plays a vital role in pre-processing an image. This layer lessens the number of parameters when the image is too large.
Source: Link
Flattening
After pooling, the next layer is flattening. As the name suggests, in this layer our pooling result is flattened. The pooling matrix that is created after the pooling layer is converted into a 1-D matrix, all the values are put together in columns one by one.

Source: Link
This is done because we want to put this layer into the neural network for further processing.

Source: Link
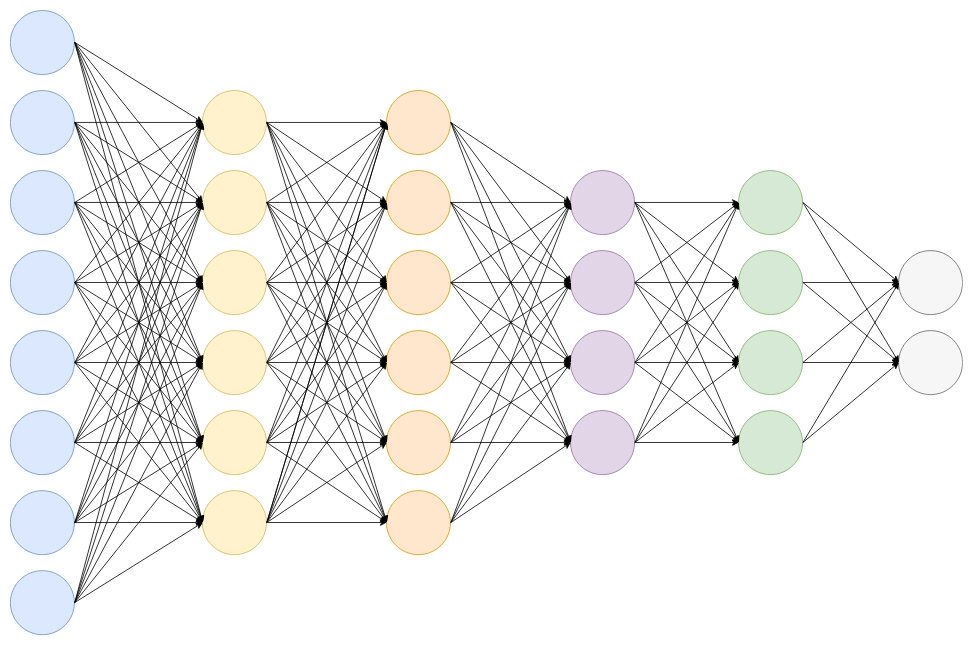
Fully Connected Layer
The value of the pixel of the input image is not directly connected to the output layer. However, in the fully-connected layer, each neuron in the output layer connects directly to a node in the previous layer. Further, the layer performs the task of classification based on the features extracted through the earlier layers and their different filters.
Source: Link
As you can see in the above image, each neuron is connected to the last neuron in a fully connected layer.
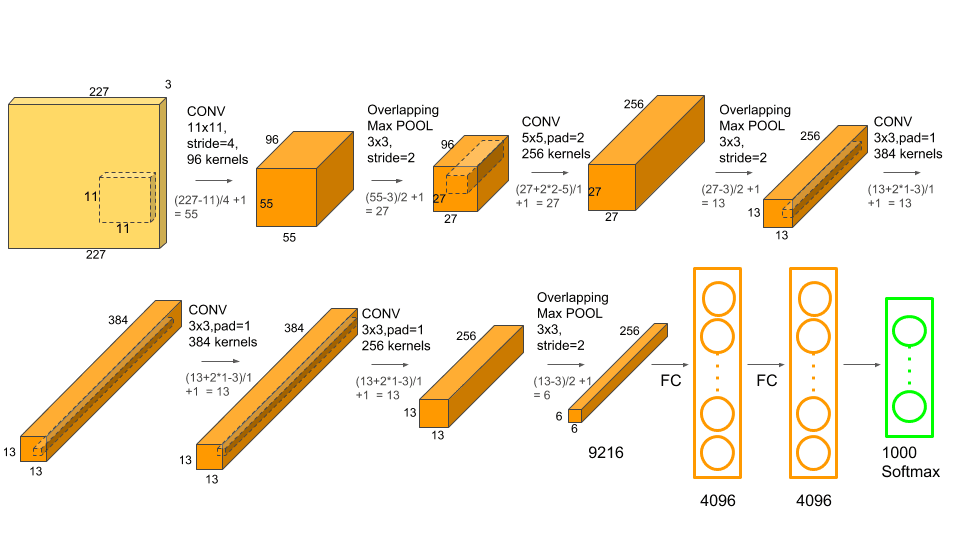
AlexNet image classification
Source: Link
AlexNet is an image classification Convolution neural network designed by Alex Krizhevsky that won the ImageNet award in 2012. Although this network is similar to LeNet architecture, it has filters and a deeper network. The image shows that it has 11x11, 5x5, and 3x3 layers of convolution, max pooling, strides, data augmentation, Relu activation. It is built in two pipelines because it was trained for six days.
To know more detailed information about the layers of CNN, check out this article.
Practical implementation of CNN
#importing the necessary libraries
import torch
import matplotlib.pyplot as plt
import numpy as np
import torch.nn.functional as func
import PIL.ImageOps
from torch import nn
from torchvision import datasets,transforms
#Transforming and Training the inbuilt dataset MNIST to perform CNN classification
transform1=transforms.Compose([transforms.Resize((28,28)),transforms.ToTensor(),transforms.Normalize((0.5,),(0.5,))])
training_dataset=datasets.MNIST(root='./data',train=True,download=True,transform=transform1)
training_loader=torch.utils.data.DataLoader(dataset=training_dataset,batch_size=50,shuffle=True)
#Function to change the image back to array, so that we can plot it.
def convert_image(tensor):
    image=tensor.clone().detach().numpy()
    image=image.transpose(1,2,0)
    print(image.shape)
    image=image*(np.array((1,1,1))+np.array((1,1,1)))
    image=image.clip(0,1)
    return image
#Wraping the train loader to create an object which allows us to go through the alterable training loader one element at a time.
dataiter=iter(training_loader)
images,labels=dataiter.next()
fig=plt.figure(figsize=(50,30))
for idx in np.arange(20):
    ax=fig.add_subplot(5,20,idx+1)
    plt.imshow(convert_image(images[idx]))
    ax.set_title([labels[idx].item()])
class model(nn.Module):
        def __init__(self):
            super().__init__()
            self.conv1=nn.Conv2d(1,20,5,1)  #Defining the next convolution layer which will adjust the parameters on its own
            self.conv2=nn.Conv2d(20,50,5,1)
            self.fully1=nn.Linear(4*4*50,100)
            self.fully2=nn.Linear(500,10)
        def forward_pass(self,x):  #This function will do the forward feed.
            x=func.relu(self.conv1(x))
            x=func.max_pool2d(x,2,2)
            x=func.relu(self.conv2(x))
            x=func.max_pool2d(x,2,2)
            x=x.view(-1,4*4*50) #Reshaping the output into desired shape
            x=func.relu(self.fully1(x)) #Applying relu activation function to our first fully connected layer
            x=self.fully2(x)    #We will not apply activation function here because we are dealing with multiclass dataset
            return x
model=model()

You can also try this code with Online Python Compiler
Output
This code will generate an output of random number, but one such output is as follows:

Architects of CNN
There are various architectures in the field of Convolutional Networks that are most commonly used.
- LeNet: It is used to detect handwritten cheques by banks.
- AlexNet: It is used for any object-detection task.
- ZF Net: It is used in a diagnostic role.
- GoogLeNet: It is used for face detection and recognition.
- VGGNet: It is used for image recognition.
- ResNet: It is used to train intense neural networks.
Applications of CNN
Some typical applications of CNN can be seen in:
- Marketing: By the face detection method, social media platforms provide suggestions about who might be in a photograph making it easier to tag friends in photo albums.
- Healthcare: With the help of CNN, doctors can identify cancerous tumors that have been incorporated into radiology technology, enabling doctors to identify healthy anatomy better.
- Retail: Some platforms have included image searching options allowing brands to recommend items.
- Automotive: As technology grows, driverless cars are trained features like lane line detection to improve driver and passenger safety.
Check out this article - Padding In Convolutional Neural Network
Also see, Artificial Intelligence in Education
Frequently Asked Questions
-
What is the difference between neural networks and convolution neural networks?
CNN has a different design than regular neural networks. Neural networks transform an input by putting it through a series of hidden layers. In CNN, every layer comprises a set of neurons where each layer is fully connected to all neurons in the previous layer.
-
Why is CNN used for image classification?
CNN is used for image classification and recognition because of its high accuracy. The CNN follows a hierarchical model that builds a network, like a funnel, and finally gives out a fully-connected layer where all the neurons are connected, and the output is processed.
-
Why is CNN preferred over other algorithms?
The main reason that CNN is preferred over other algorithms is that it automatically detects the necessary features without any human supervision. For example, if it is given many pictures of cats and dogs, it learns distinctive features for each class by itself. CNN is also computationally efficient.
Key Takeaways
CNN is the most commonly used algorithm for image classification; it detects the essential features in an image without any human intervention. This article gave a detailed description of Convolution Neural Networks. It explains what CNN is, how it works, the various architectures which are practically being implemented. Also learned a practical implementation of CNN code. If you're interested in going deeper, Check out our industry-oriented machine learning course curated by our faculty from Stanford University and Industry experts.


 8+ registered

