Userforms and Range
You can set different ranges in your userform according to your requirement. Here we will set ranges on color. Follow the steps given below to insert the range.
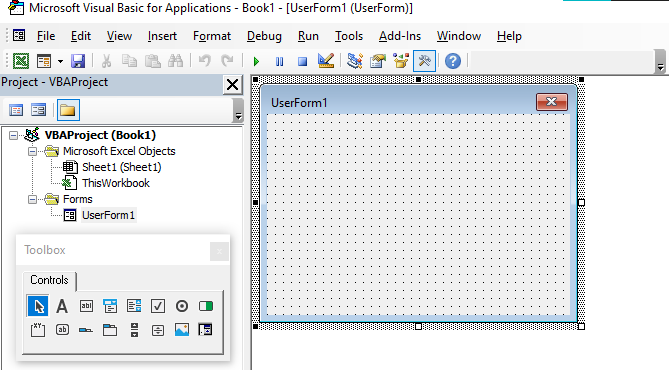
- Open Visual Basic Editor.
-
Click and insert a new userform. Now your screen will look like this:
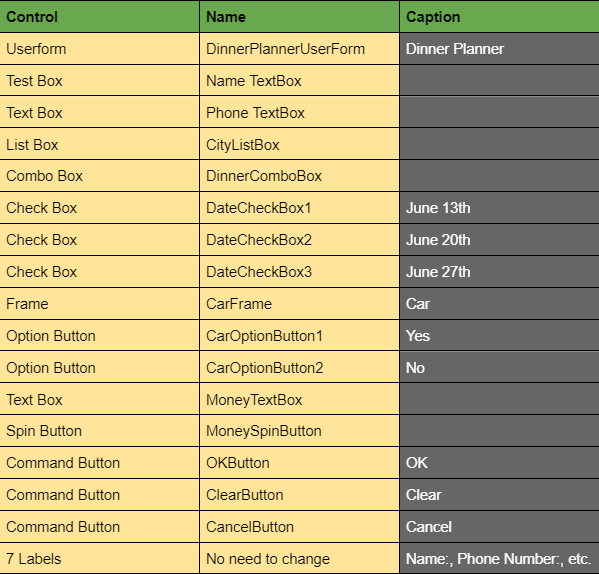
- Add the label, as well as the RefEdit control and command buttons. The output should look like the Userform image you saw before when you're done. Create a RefEdit control, for example, by selecting RefEdit from the Toolbox. Then, on the Userform, drag a RefEdit control.
- The names and captions of the controls may be changed. In the Excel VBA code, names are utilized. The captions that display on your screen are called captions. It is recommended that the names of the controls be changed, but this is not essential in this case since there are just a few controls. Click View, Properties Window, and then click on each control to edit the caption of the Userform, label, and command buttons.
- To present/show a userform, place a command button on the worksheet and write the following code:
Private Sub CommandButton1_Click()


UserForm1.Show


End Sub
- Now we will make a sub userform_initialize for that open Visual Basic Editor.
- Now click on userform1 and open view code, select initialize from the right list and userform from the left list and write the following code:
Private Sub UserForm_Initialize()


Sheet1.Cells.Font.Color = vbBlack
UserForm1.RefEdit1.Text = Selection.Address


End Sub
- Click twice on userform1, then on the go button and after that, add the following code:
Private Sub CommandButton1_Click()


Dim addr As String, rng, cell As a range, minimum As Double


addr = RefEdit1.Value
Set rng = Range(addr)
minimum = WorksheetFunction.Min(rng)


For Each cell In rng
    If cell.Value = minimum Then cell.Font.Color = vbRed
Next cell


End Sub
- Click twice on the excel button and then write the following code:
Private Sub CommandButton2_Click()


Unload Me


End Sub

Various Programs using Userform
Here we will create different programs and projects using userform from scratch step by step.
Progress Indicator
The progress indicator is a bar that will show the current progress. Here we will see the code to create progress indicators in excel VBA.
- Open Visual Basic Editor.
-
Click and insert a new userform. Now your screen will be looking like this:
- Add the frame control to the mix. You can do so by clicking on Frame from the Toolbox. Then, on the Userform, drag a frame control. This frame control's attributes need to be changed. Right-click the frame control and choose Properties from the drop-down menu. Set the Width to 204 and Height to 204 in the Caption field.
- Insert the first label control inside the Frame control. Click the label control with the right mouse button, then choose Properties. Change the name to Bar, the BackColor to Highlight, the Caption field to empty, and the Height and Width to 20 and 10, respectively.
- Add a second label control above the Frame control and position it there. Right-click the label control, then choose Properties from the drop-down menu. Change the caption to '0 percent Completed' and change the name to Text.
- To present/show a userform, place a command button on the worksheet and write the following code.
Private Sub CommandButton1_Click()


UserForm1.Show


End Sub
- Now open Visual Basic Editor.
- Select userform1 from the project explorer.
- Choose activate from the right list and userform from the left list and add the following code:
Private Sub UserForm_Activate()


code


End Sub
- Put the code in a module with the same name as the sub-named code (In the Visual Basic Editor, click Insert, Module). This is only an illustration. When you wish to utilize this progress indicator in your macro, here is the spot to put your own code. The following is the code.
Sub code()


Dim I As Integer, j As Integer, pctCompl As Single


Sheet1.Cells.Clear


For i = 1 To 100
    For j = 1 To 1000
        Cells(i, 1).Value = j
    Next j
    pctCompl = i
    progress pctCompl
Next i


End Sub
- We will add another progress named sub, and its code will look like this:
Sub progress(pctCompl As Single)


UserForm1.Text.Caption = pctCompl & "% Completed"
UserForm1.Bar.Width = pctCompl * 2


DoEvents


End Sub
-
Now leave the Visual Basic Editor. The result will look like this on the excel sheet.

Currency Converter
Here we will write a program that acts as a currency converter. Follow the steps given below to make a currency converter.
- Open Visual Basic Editor.
-
Click and insert a new userform. Now your screen will look like this:
- Labels, list boxes (first on the left, second on the right), text boxes (first on the left, second on the right), and a command button should all be included. When you're done, the output should look like the Userform image you saw before. Create a list box control, for example, by selecting ListBox from the Toolbox. After that, drag a list box onto the Userform.
- The names and captions of the controls may be changed. In the Excel VBA code, names are utilized. The captions that display on your screen are called captions. It is recommended that the names of the controls be changed, but this is not essential in this case since there are just a few controls. Click View, Properties Window, and then click on each control to edit the caption of the Userform, command button, and labels.
- To present/show a userform, place a command button on the worksheet and write the following code.
Private Sub CommandButton1_Click()


UserForm1.Show


End Sub
- Now we will create a userform initialize and, for that, open Visual Basic Editor.
- Click on userform one and select initialize from the right lit and userform from the left list. After that, write the following code:
Private Sub UserForm_Initialize()


With ListBox1
    .AddItem "Euro"
    .AddItem "Us Dollar"
    .AddItem "British Pound"
End With


With ListBox2
    .AddItem "Euro"
    .AddItem "Us Dollar"
    .AddItem "British Pound"
End With


ListBox1.ListIndex = 1
ListBox2.ListIndex = 0


TextBox1.Value = 1
TextBox2.Value = 0.722152


End Sub
- Click twice on the userform and then twice on the go button and add the following lines to it.
Private Sub CommandButton1_Click()


Dim rates(0 To 2, 0 To 2) As Double, I As Integer, j As Integer


rates(0, 0) = 1
rates(0, 1) = 1.38475
rates(0, 2) = 0.87452


rates(1, 0) = 0.722152
rates(1, 1) = 1
rates(1, 2) = 0.63161


rates(2, 0) = 1.143484
rates(2, 1) = 1.583255
rates(2, 2) = 1


For i = 0 To 2
    For j = 0 To 2
        If ListBox1.ListIndex = i And ListBox2.ListIndex = j Then TextBox2.Value = TextBox1.Value * rates(i, j)
    Next j
Next i


End Sub
-
Now close the Visual Basic Editor, and after that, your excel sheet will look like this.

Interactive Userform
Here we will create an interactive userform that will take some input to perform operations according to the user and gives the corresponding result.
- Open Visual Basic Editor.
-
Click and insert a new userform. Now your screen will be looking like this.
- Labels, text boxes (first at the top, second below the first, etc.), and command buttons should all be included. When you're done, the output should look like the Userform image you saw before. Create a text box control, for example, by selecting TextBox from the Toolbox. After that, drag a text box onto the Userform.
- The names and captions of the controls may be changed. In the Excel VBA code, names are utilized. The captions that display on your screen are called captions. It is recommended that the names of the controls be changed, but this is not essential in this case since there are just a few controls. Click View, Properties Window, and then click on each control to alter the caption of the labels, text fields, and command buttons.
- To present/show a userform, place a command button on the worksheet and write the following code.
Private Sub CommandButton1_Click()


UserForm1.Show


End Sub
- Open Visual Basic Editor and click on userform1 after selecting. After selecting, choose to initialize from the right list and userform from the left list and write the following code:
Private Sub UserForm_Initialize()


TextBox1.SetFocus


End Sub
- Right-click UserForm1 in Project Explorer and choose View Code. Select TextBox1 from the drop-down menu on the left. From the right drop-down menu, choose Change. Add the following line to your code:
Private Sub TextBox1_Change()


GetData


End Sub
- Click twice on userform1 and edit the command. After that, add the following code:
Private Sub CommandButton1_Click()


EditAdd


End Sub
- Click twice on the clear command and after that, add the following code:
Private Sub CommandButton2_Click()


ClearForm


End Sub
- Click twice on the close command button, and after that, add the following lines of code:
Private Sub CommandButton3_Click()


Unload Me


End Sub
- Declare three variables of type Integer and one of type Boolean first. In the General Declarations section, declare the variables (at the top of the module). You'll only have to define the variables once, and you'll be able to utilize them across several subs.
Dim id As Integer, j As Integer, i As Integer, flag As Boolean
Sub GetData()


If IsNumeric(UserForm1.TextBox1.Value) Then
    flag = False
    i = 0
    id = UserForm1.TextBox1.Value


    Do While Cells(i + 1, 1).Value <> ""


        If Cells(i + 1, 1).Value = id Then
            flag = True
            For j = 2 To 3
                UserForm1.Controls("TextBox" & j).Value = Cells(i + 1, j).Value
            Next j
        End If


        i = i + 1


    Loop


    If flag = False Then
        For j = 2 To 3
            UserForm1.Controls("TextBox" & j).Value = ""
        Next j
    End If


Else
    ClearForm
End If


End Sub
- Now we will add clearform sub
Sub ClearForm()


For j = 1 To 3
    UserForm1.Controls("TextBox" & j).Value = ""
Next j


End Sub
- At last, we will add the EditAdd sub:
Sub EditAdd()


Dim emptyRow As Long


If UserForm1.TextBox1.Value <> "" Then
    flag = False
    i = 0
    id = UserForm1.TextBox1.Value
    emptyRow = WorksheetFunction.CountA(Range("A:A")) + 1


    Do While Cells(i + 1, 1).Value <> ""


        If Cells(i + 1, 1).Value = id Then
            flag = True
            For j = 2 To 3
                Cells(i + 1, j).Value = UserForm1.Controls("TextBox" & j).Value
            Next j
        End If


        i = i + 1


    Loop


    If flag = False Then
        For j = 1 To 3
            Cells(emptyRow, j).Value = UserForm1.Controls("TextBox" & j).Value
        Next j
    End If


End If


End Sub
-
Now close the Visual Basic Editor, and your excel sheet will look like this:

FAQs
-
Name some of the data types available in the VBA.
Some of the data types available in VBA are boolean, bytes, currency, date, variant, long, single, and user-defined data types.
-
What do you mean by VBA?
VBA means Visual Basic for Application. It is the programming language used for almost all operations in excel.
-
What do you understand by the object in VBA?
As VBA is an object-oriented programming language, the object refers to the worksheet referred to in the code.
-
Can we write macro in the code window?
Yes, we can write the macro in the code window.
Key Takeaways
In this article, we have extensively discussed Userforms in Excel VBA. Along with that, we have also discussed ranges in userforms and different projects we can make using userforms with their codes and pictorial representation, and at last, we have discussed an interactive userform with its step-by-step explanation.
We hope that this blog has helped you enhance your knowledge of excel. If you are interested in learning about ActiveX controls, you must refer to this blog. Here, we have discussed Different ActiveX Controls like a list box, combo box, scroll bar, option buttons, command buttons, and many more from scratch and also learned how to control their working with writing code in VBA. If you would like to learn more, check out our articles on Code studio. Do upvote our blog to help other ninjas grow.
“Happy Coding!”


 9+ registered

