


Introduction
In this article, we will read how to use version control in Postman. In Postman, we always work with our "personal workspace". Instead of a personal workspace, imagine when we are working with a team. In a team, two or three people use the same collection or API endpoints to build the request. When we come to the team workspaces, we might see a member creating some collections. Suppose we want to make changes to that collection. Even if we want to, we are not expected to go to the collection directly and make some changes. This is because it can cause some problems. So if something went wrong, we would be fully responsible for that. So for that, what we can do is we can fork those collections. Then we can apply those changes to someone to review. Version control in Postman lets us create a pull request or approve the changes and match the changes to the original collection. With the new update, we can now do this in Postman itself.
Version Control
To see the version control features, we will go to Postman now. When we look at our postman window, we can see the collections API and environment variables and marks over monitors History Etc. Below we can see that.
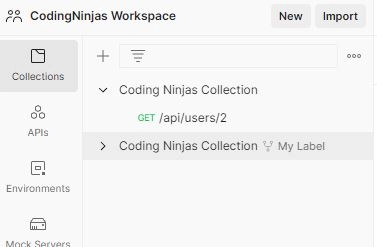
Here we can see a collection. For our ease, we have created a collection beforehand. Under this, we have also added some requests. So let us assume this one is created by someone else or a team member. We now want to make changes to this. However, as our changes might cause collection problems, we will create a fork.
Creating Fork
We can see that we have a team workspace with only one member. In a team workspace, we can name anything and add team members. Whenever we want team members, we can add them, or if we want to invite them, we can invite them via email or a link. That is when we can work in team collaboration. If two or three people are working in the same workspace, they can make some changes upload them, save and measure them.
So now we have created this collection previously and want to fork it.
Besides the folder icon we see here, we find a three-dot icon. Once we click on this one, we will see the option called create the fork. When we do this, it asks for some fork label. We will name it "my label". So when we click on the create collection, we can see one more collection folder by the same name. So we are clicking on the fork collection. Now we can see the fork created.

Here we can see that one more collection folder will be created.
Now let us assume we have our original collection and do not want to make changes to this. So what will we do? We will come to the fork we have created. Then we will make the changes I want to make to the fork. Now we will add some test cases again.
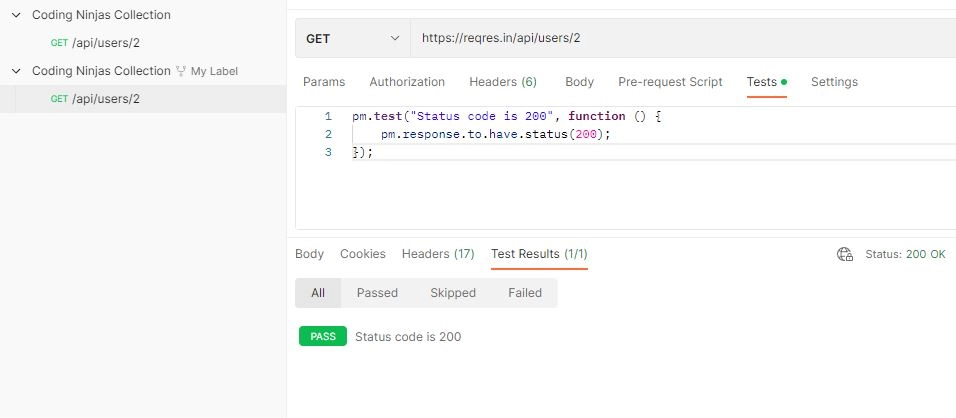
We will navigate the status code. When we go to the test result, we can see that the status code is coming as "200". Now we have made some changes to this duplicate collection. Alternatively, we can say another version of a collection we made through the fork. However, we should also see no change in the main collection file.
Pull Request
So we want to match this collection to our original collection. What we have to do is, once the forking is done, we can go for the create a pull request.
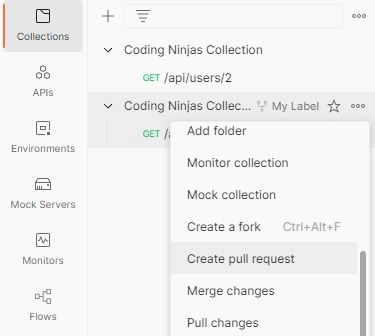
So once we have made some changes, someone has to review or approve our changes. So when we work as a team, our senior has to review, and they have to approve. That is the reason we have to go for this and create a pull request.
We have to give a title stating the changes made. We can give some descriptions and add some reviewers. Along we can select more people. So for this case. We do not have any other users because we work in our workspace with only one member. When we go for a team, we can select the senior above us for approval. For now, we will add ourselves here. We can select up to fifty people.
Approving Pull Request
Now let us see how the approval to Pull Requests works. Here we have selected our own name and are clicking on the create a pull request. Our pull request has been made. We can see the approve button because we gave our name as the approver. That is the reason we see the approve button.
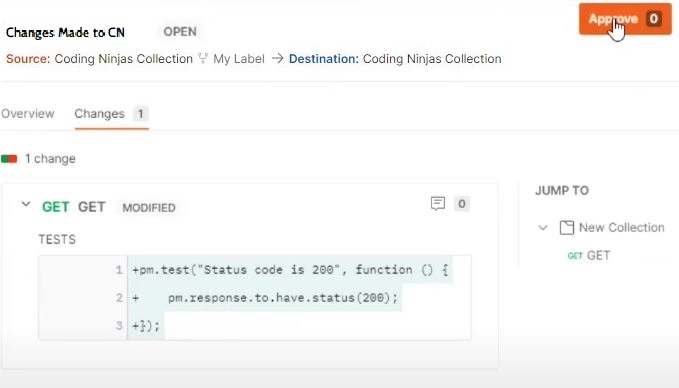
So what we will do now is we will click on this approval. Before that, we can see the changes. So once we click on approve, it will be approved. We can see a successful upgrade message, and the status changes to approved.
Merging Changes
So now we can go to the same collection again and go for the merge changes. So we have made some changes and requested a pull request. And seek approval. After that, we have to go for merging changes. Once this approval is done, we can go for a merge. When we go to merge, it asks for the merge of all changes. These are the changes we have made. We have added this postman test. So we have written one test from our fork collection, and now we have to merge all changes. We have to make these changes to our fork collections and base collection. We can see all the options when we click on merge all changes.

Selecting the first option, "merge changes", is where the destination will be updated with the changes. We can select the second option also, merge changes and update the source. The source is the fork collection, so if we select this one, which will merge the changes and delete the source.
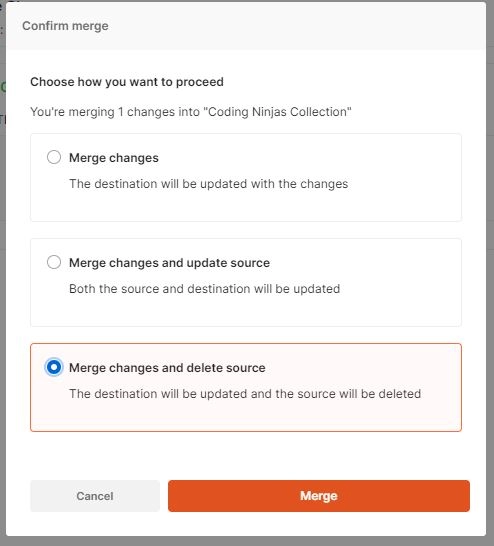
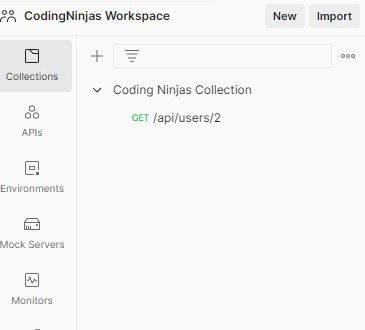
We can see below that it will be updated to the original collection when we click on the selected option. The source will be deleted, and now we can see after clicking on the merge button that the second new collection will disappear from our postman workplace. We can see it is gone. The changes we make in the merge section gets reflected in the collection section.


 8+ registered

