Do you think IIT Guwahati certified course can help you in your career?
Introduction
In this blog, we will learn about the critical three components of Blender, which are vertices, faces, and edges in Blender. Further, we will learn to select edges, faces, and vertices.
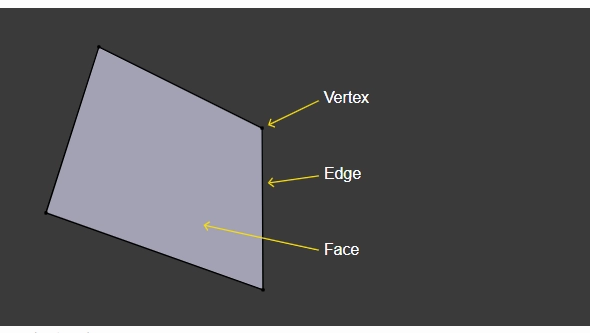
As we all know, these three elements appear in every 3D model: vertices, edges, and faces. A vertex is a spatial point. You can make an edge by connecting two vertices, making a face by connecting three or more vertices in a closed loop. A face is a polygon in its most basic form.
Vertices in Blender
A mesh's vertex is a necessary component. In three-dimensional space, it is a single point or position. In the 3D Viewport, vertices show as tiny dots in Edit Mode. An array of coordinates are maintained to store vertices. You can use Instance Vertices to duplicate child objects at every vertex of the parent object.
Vertex Normal
A vertex normal at a polyhedron vertex is a directional vector linked with a vertex intended to replace the surface's genuine geometric normal. It's customary to use the normalized sum of the normals of the faces that make up that vertex.
Steps Align to Vertex Normal
All instanced objects are rotated according to the parent mesh's associated vertex normals.
Select the child object and alter the Tracking Axis to change the direction axis of the instanced objects.
In Blender, vertices are essential for adding detail to 3D objects. In Blender, there are various techniques for adding a new vertex, each with its purpose. After adding vertices, you can merge them to create smooth connections between two objects or edges.
Steps to add a Vertex
Adding by Right-Clicking
In Blender, the most straightforward approach for creating a new vertex is to start in Edit mode. Locate the pointer and hold Ctrl and press the right mouse button while selecting another vertex to add a vertex. Select an existing one, hold Ctrl, and click the right mouse button in the desired spot to make a new edge.
Adding vertices to existing geometry is an efficient approach to increase the level of detail. Subdividing geometry allows you to alter geometry into far more precise shapes.
Merging Edges with a Vertex
Non-manifold geometry, n-gons, and strange artifacts can result from disconnected geometry within a single object. You can always use Boolean operations to link meshes together, but this occasionally provides surprising results. Merging edges by adding and connecting vertices in certain areas is more precise.
Adding a New Vertex as an Object
Using the "Extra Objects" approach, you can create a new object from a single vertex. Blender contains add-ons installed, but you'll need to activate them. To do so, go to the Edit menu and select "Preferences" from the drop-down menu. Doing this will bring up a flyout window where you may search through all of the available add-ons to customize your Blender version. Type "Extra Objects" in the top right search bar, check the box next to "Add Mesh: Extra Objects," and dismiss the flyout. You may now pick "Add" (or Shift + A) in object mode and then go to "Mesh > Single Vert > Add Single Vert." By default, this adds a vertex at the origin, but the sub-menu options allow you to adjust the destination location.
Edges in Blender
A face's edge is the point where two faces meet. For example, a cube has 12 edges, a cylinder two, and a spherical none. An edge is a straight line that links two vertices. When you look at a mesh in wireframe view, the edges are the "wires." On the rendered image, they are usually invisible. The implementation of edges creates facial features.
There are various ways to choose elements, and which selection tools are available depends on whatever Mesh Select Mode you're working on. Like vertices and faces, Edges can be selected by Right Mouse Button-clicking them while Edge Select Mode is turned on. Shifting while clicking adds or subtracts from the current selection.
Steps to add Edges
The primary step is to add any missing edges that our outline will require. The following are the steps for creating new edges:
Click the Vertex Select icon in Edit Mode, then right-click on the first vertex of your new edge. Right-click on the second vertex while holding down the Shift key.
To make a new edge, press F on the keyboard. You could also use the Mesh | Faces | Make Edge/Face option in the menu.
By pressing F, two vertices will contain an edge between them.
A mesh is a set of vertices, edges, and faces that describe a 3D object's geometry. A face is a flat surface enclosed by edges. A cube, for example, has six faces, a cylinder three, and a spherical only one. Creating Faces is a context-sensitive tool that fills in the selection with geometry. An edge is generated when just two vertices are selected; otherwise, faces are made.
The most common scenario is to choose vertices and press F, but Blender also allows you to create faces from other selections to help you quickly build up geometry.
When it comes to designing new geometry, constructing Faces is crucial. It lets you make parallelepipeds out of rectangles and cylinders out of circles and tree limbs. The axis along which faces are extruded can be changed in real-time. The most common scenario is to choose vertices and press F, but Blender also allows you to create faces from other selections to help you quickly build up geometry.
Steps to add Faces
Activate the Face Select Mode in edit mods by pressing Ctrl-Tab to spawn a menu.
To select parts of a mesh face-wise, you have to switch to Face Select Mode.
The selection works as usual with Right Mouse Key; to add/remove an existing section, press Shift.
The face indicators, commonly represented by little pixel squares in the middle of each face, must be intersected by the Border, Circle, and Lasso Selection Tools.
Selecting Vertices, Edges, and Faces in Blender
There are various ways to choose elements, and which selection tools are available depends on whatever Mesh Select Mode you're in. We will go through these modes, and after that, a look is taken at basic selection tools.
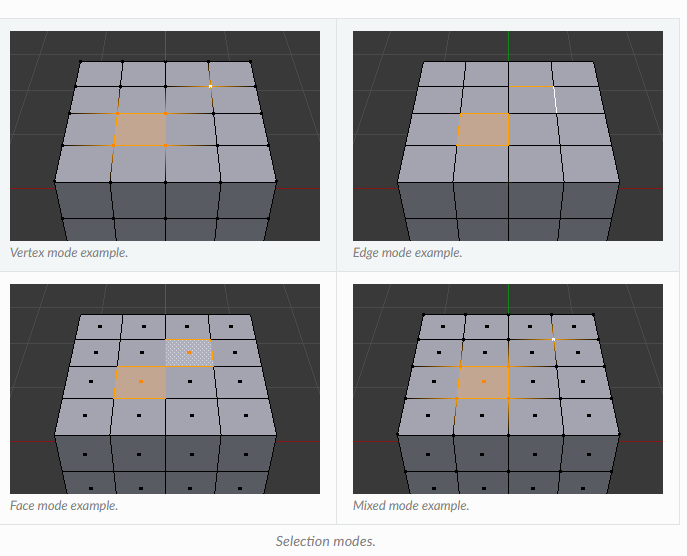
Selection Modes
There are three main selecting modes in Edit Mode. Select one of the three buttons in the header to switch between the different modes.
Vertices Vertices are represented as points in this mode. Selected vertices are highlighted in orange, unselected vertices are highlighted in black, and the active or last selected vertice is highlighted in white.
Edges The vertices are hidden in this mode. Instead, the active or last selected edge is displayed in white, with the selected edges in orange, the unselected edges in black, and the active or last selected edge in orange.
Faces Faces are displayed with a selection point in the middle, used to pick a face in this mode. Selected faces and their selection point are shown in orange, unselected faces are shown in black, and the active or most chosen faces are shown in white.
Multiple Selection Modes
Hold Shift-Left Mouse Button to enable several selection modes at once when selecting a selection mode. Doing so eliminates switching modes to choose Vertices/Edges/Faces.
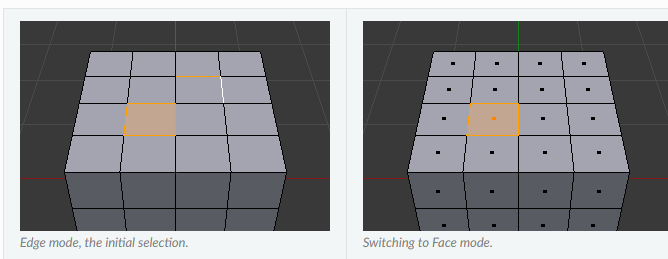
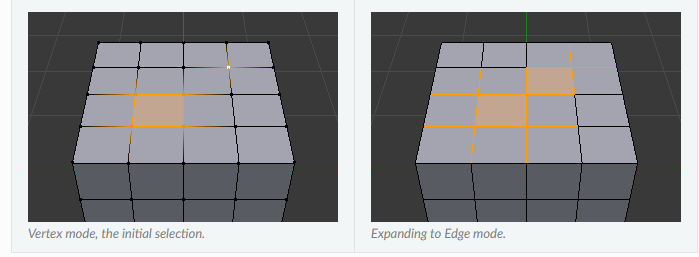
When transitioning from Vertices to Edges and Edges to Faces in an "ascendant" manner, the selected components will remain selected if they constitute a whole element in the new mode. Switching from Edges mode to Faces mode, for example, will maintain a face chosen if all four edges are selected. All selected components that do not form a complete set will be unselected in the new mode.
When you select a higher selection mode while holding Ctrl, all components that contact the current selection are added, even if the selection does not form a complete higher element.
When switching to a lower setting, you can also contract the selection.
The vertex is an essential component of a mesh. It is a single point or position in a three-dimensional space. In Edit Mode, vertices appear as tiny dots in the 3D Viewport. An object's vertices are kept as an array of coordinates. You can use Instance Vertices to duplicate child objects at every vertex of the parent object.
What are Edges in Blender?
A face's edge is the point where two faces meet. For example, a cube has 12 edges, a cylinder two, and a spherical none. An edge is a straight line that links two vertices. When you look at a mesh in wireframe view, the edges are the "wires." On the rendered image, they are usually invisible. They are employed in the creation of facial features.
What are Faces in Blender?
A mesh is a set of vertices, edges, and faces that describe a 3D object's geometry. A face is a flat surface enclosed by edges. A face is a flat or curved surface on a three-dimensional object. A cube, for example, has six faces, a cylinder three, and a spherical only one. Creating Faces is a context-sensitive tool that fills in the selection with geometry. An edge is created when just two vertices are picked; otherwise, faces are created.
Conclusion
This article briefly discussed Vertices, Edges, and Faces. We have examined the procedure to add Vertices, Edges, and Faces. I hope you have gained some insight into this topic of Vertices, Faces, and edges in Blender, and by now, you must have developed a clear understanding of them. You can learn more about such topics on our platform Coding Ninjas Studio.
If you want to learn how we can make games using AR and VR, then you must give this a read: Passion for AR & VR leads to Snake Snack Game.
You can refer to our guided paths on Coding Ninjas Studio to learn more about DSA, Competitive Programming, JavaScript, System Design, SQLproblems, etc. Enroll in our courses and refer to the mock test and problems available, interview puzzles, look at the interview experiences, and interview bundles for placement preparations.
Thank you for reading.
Live masterclass
Prompt Engineering: Must-have GenAI Skill for 30L+ Roles at Amazon
by Anubhav Sinha
16 Jul, 2026
12:30 PM
Using Netflix Data to Master Power BI
by Ashwin Goyal
13 Jul, 2026
12:30 PM
Top GenAI Skills to crack 30L+ CTC at Amazon & Google
by Sumit Shukla
14 Jul, 2026
11:30 AM
JioHotstar Sports Analytics using IPL Dataset
by Prerita Agarwal
15 Jul, 2026
12:30 PM
Prompt Engineering: Must-have GenAI Skill for 30L+ Roles at Amazon


 9+ registered

