Table of contents
1.
Introduction
2.
What is VGG-16 Architecture?
3.
VGG-16 Architecture
4.
Implementation of VGG-16
4.1.
Importing the required libraries
4.2.
Building  the VGG-16 model
5.
Working of VGG-16 on a pre-trained model 
5.1.
Importing the libraries
5.2.
Setting up the path of the test images
5.3.
Loading the images
5.4.
Function to predict the images using the model
5.5.
Getting the predictions
6.
Frequently Asked Questions
6.1.
In VGG, what is the difference between features?
6.2.
Why does vgg16 require fewer epochs than ResNet?
6.3.
What is transfer learning?
7.
Conclusion
Last Updated: Sep 9, 2024
Easy

VGG-16 - CNN Model

Author Md Yawar
0 upvote
Career growth poll
Do you think IIT Guwahati certified course can help you in your career?

Introduction

Deep learning has demonstrated great success in various computer vision applications. Convolutional neural networks are the state of the art deep learning models used for image recognition and classification. It has made many computer vision tasks such as driverless cars a possibility. Different methods are continuously developed to improve the accuracy of deep learning models. VGG16 is a CNN that shows great accuracy and won the ILSVR 2014.

source

Also Read, Resnet 50 Architecture

What is VGG-16 Architecture?

VGG16 is a CNN (Convolutional Neural Network) architecture that is widely considered to be one of the best computer vision models available today. The designers of this model examined the networks and improved the depth using a compact (3 × 3) convolution filter architecture that substantially exceeded previous-art settings. The 16 in VGG16 refers to that it has 16 layers that have weight. It is a very large network with 138 million parameters.
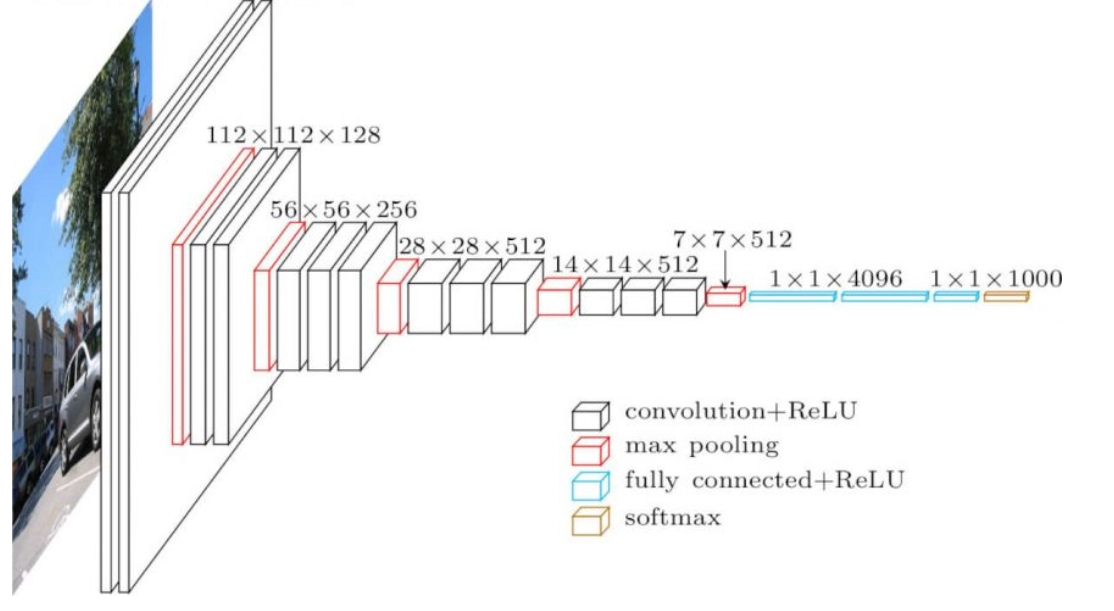
VGG-16 Architecture

VGG-16 is a type of VGG Net. The input to VGG-16 is a fixed size 244X244 RGB image. Each pixel in a picture is deducted from its mean RGB value in a pre-processing phase.

The pictures are then fed through a stack of convolutional layers with tiny receptive-field filters of size (33) once the pre-processing is completed. The filter size is set to (1 1) in a few setups, indicating that the input channels have been transformed linearly (followed by non-linearity).

The convolution operation's stride is set at 1 by default. Five max-pooling layers, which come after numerous convolutional layers, are used to do spatial pooling.

source

The max-pooling is done with a (2 2) pixel window and a stride size of 2.The setup for fully-connected layers is always the same: the first two layers each have 4096 channels, the third layer conducts 1000-way ILSVRC classification (and so has 1000 channels, one for each class), and the softmax layer is the last layer. The ReLu activation function is used to activate all of the VGG network's hidden layers.

source

Implementation of VGG-16

Importing the required libraries

from tensorflow.keras.layers import Input, Conv2D, MaxPooling2D
from tensorflow.keras.layers import Dense, Flatten
from tensorflow.keras.models import Model

_input = Input((224,224,1))  #INPUT IMAGE SHAPE
You can also try this code with Online Python Compiler
Run Code

Building  the VGG-16 model

#adding the convolutional layers
conv1  = Conv2D(filters=64, kernel_size=(3,3), padding="same", activation="relu")(_input)
conv2  = Conv2D(filters=64, kernel_size=(3,3), padding="same", activation="relu")(conv1)

#adding the maxpool layer
pool1  = MaxPooling2D((2, 2))(conv2)

#adding the convolutional layers
conv3  = Conv2D(filters=128, kernel_size=(3,3), padding="same", activation="relu")(pool1)
conv4  = Conv2D(filters=128, kernel_size=(3,3), padding="same", activation="relu")(conv3)
pool2  = MaxPooling2D((2, 2))(conv4)

#adding the convolutional layers
conv5  = Conv2D(filters=256, kernel_size=(3,3), padding="same", activation="relu")(pool2)
conv6  = Conv2D(filters=256, kernel_size=(3,3), padding="same", activation="relu")(conv5)
conv7  = Conv2D(filters=256, kernel_size=(3,3), padding="same", activation="relu")(conv6)

#adding the maxpool layer
pool3  = MaxPooling2D((2, 2))(conv7)

#adding the convolutional layers
conv8  = Conv2D(filters=512, kernel_size=(3,3), padding="same", activation="relu")(pool3)
conv9  = Conv2D(filters=512, kernel_size=(3,3), padding="same", activation="relu")(conv8)
conv10 = Conv2D(filters=512, kernel_size=(3,3), padding="same", activation="relu")(conv9)

#adding the maxpool layer
pool4  = MaxPooling2D((2, 2))(conv10)

#adding the convolutional layers
conv11 = Conv2D(filters=512, kernel_size=(3,3), padding="same", activation="relu")(pool4)
conv12 = Conv2D(filters=512, kernel_size=(3,3), padding="same", activation="relu")(conv11)
conv13 = Conv2D(filters=512, kernel_size=(3,3), padding="same", activation="relu")(conv12)

#adding the maxpool layer
pool5  = MaxPooling2D((2, 2))(conv13)
flat   = Flatten()(pool5)

#adding the dense layers
dense1 = Dense(4096, activation="relu")(flat)
dense2 = Dense(4096, activation="relu")(dense1)
output = Dense(1000, activation="softmax")(dense2)
vgg16_model  = Model(inputs=_input, outputs=output)
You can also try this code with Online Python Compiler
Run Code

Working of VGG-16 on a pre-trained model 

Importing the libraries

from keras.applications.vgg16 import decode_predictions
from keras.applications.vgg16 import preprocess_input
from keras.preprocessing import image
import matplotlib.pyplot as plt 
from PIL import Image 
import seaborn as sns
import pandas as pd 
import numpy as np 
import os 
You can also try this code with Online Python Compiler
Run Code


Setting up the path of the test images

img1 = "../input/flowers-recognition/flowers/tulip/10094729603_eeca3f2cb6.jpg"
img2 = "../input/flowers-recognition/flowers/dandelion/10477378514_9ffbcec4cf_m.jpg"
img3 = "../input/flowers-recognition/flowers/sunflower/10386540696_0a95ee53a8_n.jpg"
img4 = "../input/flowers-recognition/flowers/rose/10090824183_d02c613f10_m.jpg"
imgs = [img1, img2, img3, img4]
You can also try this code with Online Python Compiler
Run Code


Loading the images

def _load_image(img_path):
    img = image.load_img(img_path, target_size=(224, 224))
    img = image.img_to_array(img)
    img = np.expand_dims(img, axis=0)
    img = preprocess_input(img)
    return img 
You can also try this code with Online Python Compiler
Run Code


Function to predict the images using the model

def _get_predictions(_model):
    f, ax = plt.subplots(1, 4)
    f.set_size_inches(80, 40)
    for i in range(4):
        ax[i].imshow(Image.open(imgs[i]).resize((200, 200), Image.ANTIALIAS))
    plt.show()
    
    f, axes = plt.subplots(1, 4)
    f.set_size_inches(80, 20)
    for i,img_path in enumerate(imgs):
        img = _load_image(img_path)
        preds  = decode_predictions(_model.predict(img), top=3)[0]
        b = sns.barplot(y=[c[1] for c in preds], x=[c[2] for c in preds], color="gray", ax=axes[i])
        b.tick_params(labelsize=55)
        f.tight_layout()
You can also try this code with Online Python Compiler
Run Code


Getting the predictions

from keras.applications.vgg16 import VGG16
vgg16_weights = '../input/vgg16/vgg16_weights_tf_dim_ordering_tf_kernels.h5'
vgg16_model = VGG16(weights=vgg16_weights)
_get_predictions(vgg16_model)
You can also try this code with Online Python Compiler
Run Code


Output:

Frequently Asked Questions

In VGG, what is the difference between features?

If you extract the features from the two last layers or from the last layer, the computations of the features map will be different, and this will have an impact if you apply it in another model.

Why does vgg16 require fewer epochs than ResNet?

VGG is said to be more suited for cifar10 for some reason (due to kernel sizes etc.).

What is transfer learning?

Transfer learning is a machine learning research subject that focuses on storing and transferring information learned while addressing one problem to a different but related problem.

Conclusion

VGG is a cutting-edge object-recognition model with up to 19 layers. VGG, which was built as a deep CNN, outperforms baselines on a variety of tasks and datasets outside of ImageNet. VGG is one of the most widely used image-recognition models today.If you don't have a lot of data, you can use Transfer Learning instead of starting from scratch.

Recommended Reading: Instruction Format in Computer Architecture

Refer to our Guided Path on Coding Ninjas Studio to upskill yourself in Data Structures and AlgorithmsCompetitive ProgrammingJavaScriptSystem DesignMachine learning, and many more! If you want to test your competency in coding, you may check out the mock test series and participate in the contests hosted on Coding Ninjas Studio! But if you have just started your learning process and are looking for questions asked by tech giants like Amazon, Microsoft, Uber, etc; you must look at the problemsinterview experiences, and interview bundle for placement preparations.

Nevertheless, you may consider our paid courses to give your career an edge over others!

Live masterclass