Authenticating to the Video Intelligence API
Before moving forward, the user should ensure they have enabled the Video Intelligence API.
Now, we are good to go!
Let us see how to Create a Service Account in Console step by step.
-
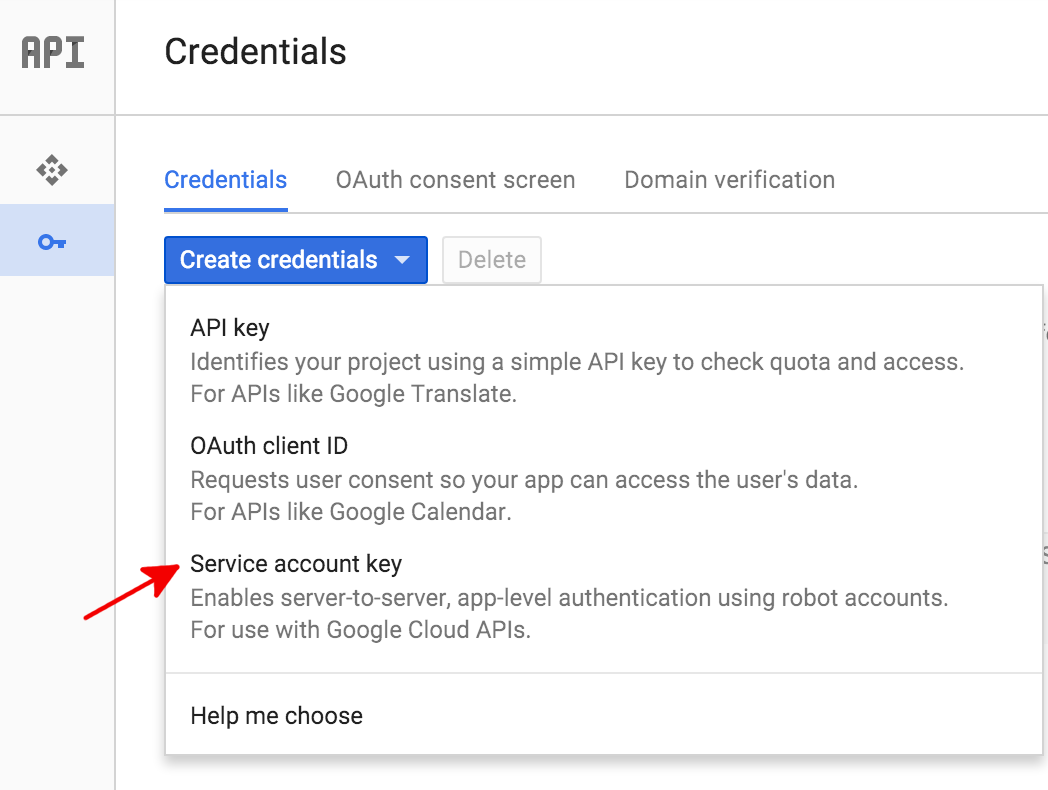
Select Create credentials then Service account key from the console Credentials page. Access the credentials page from here.

-
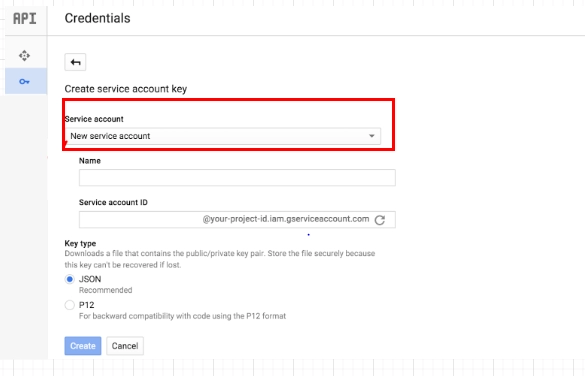
Select New service account under Service account.

-
In the Service account name box, the user should enter a name for the service account. This name is used as the default name for the Service account ID (to the left of the "@" in the generated service account ID address), but this service can be changed with the account ID name.
-
Select JSON for most new projects under Key type.
-
Click Create.
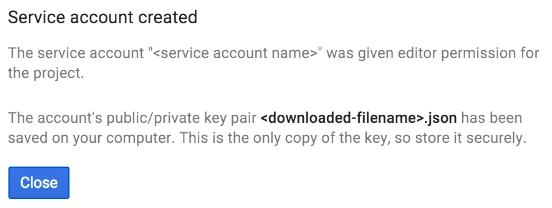
The console produces a JSON key as a .json text file, prompts the user to download the file to the device, and shows a Service account-created dialog box.

The generated JSON key will be similar to the following sample JSON key:
{
  "type": "service_account",
  "project_id": "PROJECT_ID",
  "private_key_id": "SOME_NUMBER",
  "private_key": "-----BEGIN PRIVATE KEY-----\nPRIVATE_KEY\n-----END PRIVATE KEY-----\n",
  "client_email": "SERVICE_ACCOUNT_EMAIL",
  "client_id": "...",
  "auth_uri": "https://accounts.google.com/o/oauth2/auth",
  "token_uri": "https://accounts.google.com/o/oauth2/token",
  "auth_provider_x509_cert_url": "https://www.googleapis.com/oauth2/ex1/certs",
  "client_x509_cert_url": "https://www.googleapis.com/robot/ex1/metadata/x509/SERVICE_ACCOUNT_EMAIL"
}
This JSON file should be stored securely, as it contains the user’s private key. This file is the only copy of that key.
The following steps can be followed for video analysis.
Sending video annotation request
Below shows sending a POST request to the videos: annotate method. The instances utilize the access token for a service account set up for the project using the Google Cloud CLI.
Before using any of the request data, make the following replacements:
-
INPUT_URI: a Cloud Storage bucket that contains the file that the user wants to annotate, including the file name. Must start with gs://.
For example: "inputUri": "gs://cloud-videointelligence-demo/example.mp4"
HTTP method and URL:
POST https://videointelligence.googleapis.com/ex1/videos:annotate
Request JSON body:
{
  "inputUri": "INPUT_URI",
  "features": ["NAME_OF_THE FEATURE_THAT_HAS_TO_BE_EXTRACTED"]
}
After this, the user should send the request. The results are sent in JSON format.
Getting annotation results
For retrieving the result of the operation, a GET request is made, and the operation name returned from the call to videos: annotate is used as follows:
Before using any of the requested data, the following replacements should be made:
-
OPERATION_NAME: The operation name has the format projects/PROJECT_NUMBER/locations/LOCATION_ID/operations/OPERATION_ID. The name of the operation that is returned by Video Intelligence API.
HTTP method and URL:
GET https://videointelligence.googleapis.com/ex11/OPERATION_NAME
Shot detection annotations get returned as a shotAnnotations list.
Note: The done field is only when its returned value is ‘True’. It is not included in responses for which the operation has not been completed.
Downloading annotation results
Copy the annotation from the source to the destination bucket by the following command:
gsutil cp gcs_uri gs://my-bucket
Note: The annotation is stored in that gcs URI if the output gcs URI is provided by the user.
This was all about the setup, now let us see what actually Video Intelligence API can be used for.
Applications of Video Intelligence API
Detecting explicit content in videos
Explicit Content Detection checks for adult content in videos. Adult content is usually inappropriate for those under 18 years of age and includes, but is not limited to, sexual activities, nudity, and pornography. Such content detected in anime or cartoons is also identified.
The response contains a bucketed likelihood value, from VERY_LIKELY to VERY_UNLIKELY.
When Explicit Content Detection checks a video, it does that on a per-frame basis and considers only visual content. The audio part of the video is not utilized for evaluating explicit content levels.
Getting the Audio Track Transcription
The Video Intelligence API transcribes speech to text from supported video files. There are two supported models - "video" and "default".
Recognizing Text
Text Detection does the OCR (Optical Character Recognition). It detects and extracts text from an input video.
Text detection is there for all the languages that are supported by the Cloud Vision API.
Detecting people
Video Intelligence can detect the presence of human beings in a video file and then track individuals across a video segment or the whole video.
Tracking objects
Object tracking tracks objects detected in a given video.
For spatial locations and other entities that are detected in video or video segments, object tracking requests annotate the video with the appropriate labels for them. For example, a video of a playground will have entities such as “Tree”, “Birds”, “Lake”, and many more. Each label can include several bounding boxes, with every bounding box having an associated time segment containing a time offset that indicates the duration offset from the starting of the video.
Frequently Asked Questions
What is an API?
API is short for Application Programming Interface. It can be considered as a type of software interface that offers a service to other pieces of software.
What is AI Video Analytics?
A REST API is also known as RESTful API. It is an application programming interface that conforms to the constraints of REST architectural style and enables for interaction with RESTful web services.
What is AI Video Analytics?
Video AI Analytics increases insights from data in video files by using AI to automatically detect, analyze, and interpret activity in real-time.
Conclusion
This article extensively discusses the topic of Video Intelligence API in depth. It specifically focuses on annotating a video by using the command line.
To hold a tighter grip on the topic, we recommend reading more related blogs like REST API, GET vs POST Requests, and Building REST API.
We hope that this blog has helped you enhance your knowledge regarding the topic, and if you would like to learn more, check out our articles on Coding Ninjas Blogs.
You can refer to our Guided Path on Coding Ninjas Studio to upskill yourself in Data Structures and Algorithms, Competitive Programming, JavaScript, SQL, System Design, and many more!
If you want to test your competency in coding, you may check out the Mock Test Series and participate in the Contests organized on Coding Ninjas Studio! But if you have just started your learning process and are looking for questions asked by tech giants like Amazon, Microsoft, Uber, etc; you must look at the Problems, Interview Experiences, and Interview Bundle for placement preparations.
Nevertheless, you may consider our Courses to give your career an edge over others!
Do upvote our blog to help other ninjas grow.
Happy Coding!


