Do you think IIT Guwahati certified course can help you in your career?
Introduction
Postman is a platform that is used to examine APIs. In 2012, it began as a small project with a team of a few developers to design, test, build, and iterate their APIs. As of now, that is 2022, Postman has grown to an extent with over 20 million registered users and 75000 open APIs. That means you can conclude that it is the world’s largest public API hub.
Now, the question arises, what is API?
API stands for Application Programming Interface. By its name, we get the idea that it enables the software to interact with each other via API requests. It facilitates users’ collaboration with each other within the Team Workspaces. This is one of the reasons for the growing Postman’s popularity. One other such reason is Postman Visualizer, which will be discussed in this blog.
What is a Response?
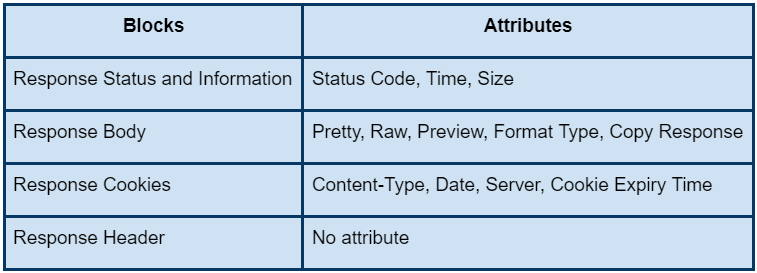
A response is a message which is received by the server in return for any request that is sent. When any request has been made, the server acts upon that request and, if possible, tries to send back a packet of the information requested by the client. That means it is clear that the response is dependent only on the request. Every request will generate a different kind of response, and it is very necessary to extract precise and useful information for all the requests.
Learning about a Response in Postman, the interface has a lot of different things. The various blocks with respective attributes are present in the table below.
Visualizing Responses in Postman
As we learned that there are many reasons that makes Postman immensely popular. The facility to be able to send API requests is one such reason. This sending of requests is made easy by Postman Visualizer. It offers a programmable way to represent users’ request responses visually. The Visualization Code added to the Tests when a request is being generated will be visible in the Visualize tab, along with options such as Pretty, Raw, and Preview. Visualizers help you present and make sense of your response data and model and highlight the relevant information.
Adding Visualizer Code
The method pm.visualizer.set() accepts a template string with Handlebars as its first parameter. The data you want to use to be displayed in the template is the second parameter. This is how we add the Visualizer Code.
The code is always added to the Pre-request or the tests script, and the method mentioned will be responsible for applying visualizer code to the data and presenting it in the Visualize Tab if the request is put.
Rendering HTML
To see an example of a basic visualizer in action, follow the steps mentioned below. An example endpoint given below is such that which responds with a list of names and email addresses with the following body structure as per JSON response.
[
    {
        "name": "Rohan",
        "email": "rohan@example.com"
    },
    {
        "name": "Sohan",
        "email": "sohan@example.com"
    },
    // ... and so on
]
This Visualizer Code will output a table with a Handlebars template that will display the names and email addresses by forming a loop over an array. This is done using {{#each}} tag. The script given below runs in the Tests request.
You have just seen an example above. In actuality, the variable names which are present inside the double curly braces in the template are substituted by the data passed to the pm.visualiser.set() method. For the complete application of the Template, the code below completes the Tests Script.
// Set visualizer
pm.visualizer.set(template, {
    // Pass the response body parsed as JSON as `data`.
    response: pm.response.json()
});
The template variable used above is the template string that you created earlier. The response property, which is the second argument passed in the object, is that variable which the template expects in the {{#each response}} loop. The value assigned to that property, the name Response property, is the response JSON data which was parsed as an object in the request.
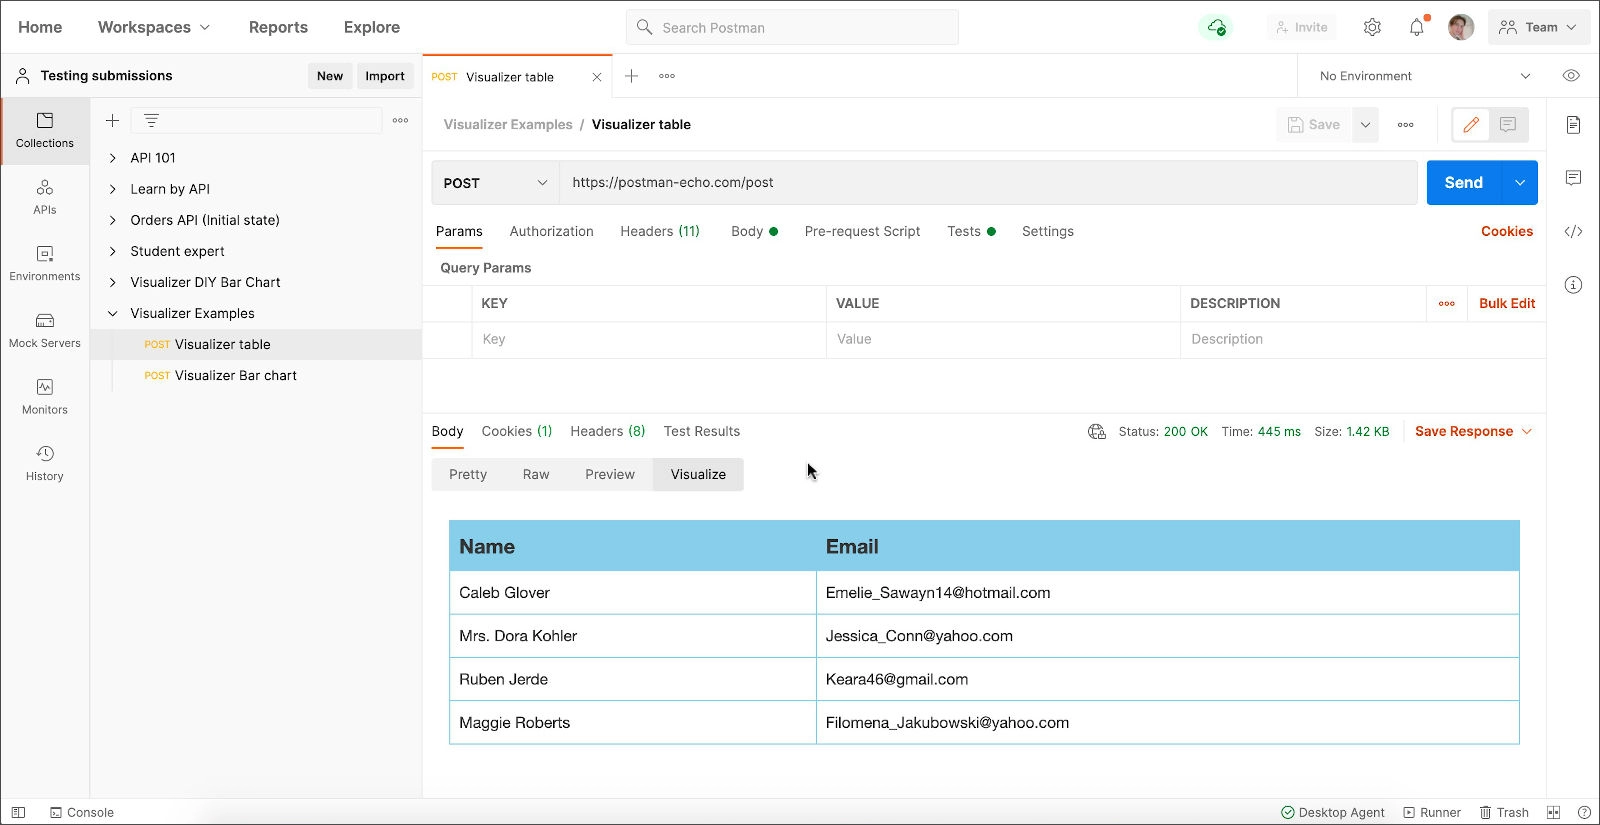
Viewing Visualizations
For viewing any visualization, you need to send the request to the Postman. After that, select the Visualize Tab. A Table would be displayed by the Postman. That table is the same as that appears in HTML, as it would be in a web browser. You can refer to the image for a better understanding.
An external stylesheet is loaded in your HTML Template code by using the <link> tags. In this, the same technique will be used as it is used to add a stylesheet to any webpage. Stylesheets can also be added using <style> tags. In a similar way, Interactions can be added by putting JavaScript code in the <script> tags inside the HTML code templates.
Using our own libraries
The libraries of the Postman Sandbox is used to generate the layout template. You can use any of the available libraries programmatically for layout template generation. In case you want to export an additional external JavaScript library, you need to add the URL to a <script> tag in the template code. For adding any URL, the same process will be used as it is used when you load JavaScript into any HTML file. By doing this, you will be able to render your request data by using any Visualization tool of your choice.
Accessing data inside the template
You can call the pm.getData(callback) method to access the data passed in the second argument to pm.visualizer.set() by using the <script> elements inside your template.
The pm.getData(callback) method takes a callback function as its parameter. Such a callback accepts any two parameters, that are, error and data. The second parameter, that is, data, is passed to the pm.visualizer.set() method.
Visualizer API
Visualizers can be accessed from the Postman API. The pm.visualizer.set() is a method that takes three parameters. That are:
✍️Layout (required)
This is the first parameter. It is a Handlebars HTML template string.
✍️data (optional)
This is the second parameter, and it is optional. It is that data that you can bind to the template. The properties of such an object can be accessed in the template.
✍️options (optional)
This is the third parameter, and it is optional. It is an object for Handlebars.compile(). This parameter is used for controlling the way HandleBars compiles the template.
The information passed to pm.visualizer.set() method is used by Postman to output an HTML page in the sandbox for the visualizer. You need to select the Visualize tab for the rendered HTML page. The layout string that is inserted into the <body> of the output page includes everting JavaScript, CSS, and HTML codes that the template would contain.
Debugging Visualizers
A Visualization can be debugged in the Postman by right-clicking on the Visualize Area and then choosing the Inspect Visualization. This will, in turn, open the visualizer Developer Tools that are attached to the Sandbox. This process is used in the same way as it is used while debugging any webpage.
Now that you have understood all the visualizing responses available in Postman, there is time for you to start creating your own visualizations.
In order to start, you can experiment with some more visualizer workspaces. You just need to run the example requests. Then, adjust the code provided so that you can get the results you want for the code you created.
Frequently Asked Questions
What are the steps required to render Visualizer Code in Action?
To render Visualizer Code in Action, you need to import the required collection. For that import, the respective Run in Postman buttons will be used. Once importing has been done, then you can open a request from Collections in the Sidebar. Then, select Send to run the request. The complete rendered data will be displayed in the Visualize Tab.
Name some collections that can be used to put Visualizer Code in Action.
A few collections that are used to put Visualizer Code in Action are mentioned below.
A DIY collection that outputs a bar chart using ChartJS.
Heat Map Visualization
Various chart and graph examples
What are the various products offered by Postman?
The various products offered by Postman are mentioned in the list below.
API Repository: Store, catalog, and collaborate API artifacts.
API Builder: Implement an API design workflow.
Tools: API Client, API Documentation, API Detection, etc.
Intelligence: API Governance, Security warnings, Workspaces, etc.
Workspaces: Public, Private, or Partner.
Conclusion
In this article, we have extensively discussed what is response, and various visualizing responses available in Postman. We have discussed how to add Visualizer code, render HTML, view Visualizations, add Styling and Interactions, use libraries, access data inside the template, implement visualizer API, and debug Visualizers.
For peeps out there who want to learn more about APIs, you can refer to our blog on Web Testing, API Testing, API, Web Application Testing Tools, or API Reference, you can click on the respective links. Enroll in our courses, go for mock tests, solve problems available, and interview puzzles. Also, you can put your attention towards interview stuff- interview experiences and an interview bundle for placement preparations. Do upvote our blog to help other ninjas grow.


 9+ registered

