Do you think IIT Guwahati certified course can help you in your career?
Introduction
The Arduino Uno is the kind of board that is best to get started in electronics and coding. Arduino Uno is easy to use and program, making it one of the best boards for beginners.
With technological advancement, Arduino Boards are essential in developing intelligent solutions for the future. Let’s now dive into the Architecture of Arduino Uno and understand every part of it in detail.
What is Arduino UNO?
Arduino Uno is open source microcontroller board that helps create interactive projects giving smart solutions by automation. It is based on the processor ATmega328p. It also comes with a variety of input and output pins that can be used to connect different electronic components.
Arduino Uno is the most famous among the Arduino boards family as it is easy to use and program and requires little or no experience.
Why is Arduino UNO Used?
Newbies in electronics and programming often turn to the Arduino UNO as their go-to option. Arduino UNO has multiple features, such as:
Easy Connection: You can effortlessly join the board to your computer via USB.
Changeable Microcontroller: If it gets damaged, you can swap the heart of the board, the ATmega328 microcontroller. Not all Arduino boards provide this feature.
Steady Voltage: The board has pins that provide a constant 5V power supply, which is helpful for various components. You can adjust the voltage using digital and analog pins.
User-Friendly Design: The community well-supports its straightforward layout, making it user-friendly.
Hardware Interaction: The UNO can connect with Bluetooth, the internet, and motors.
Affordability: One big reason people prefer the UNO is its lower price than other Arduino boards.
Features of Arduino UNO
There are many features of Arduino UNO such as:
The board has a USB connection that lets it act like a computer's serial device. This connection facilitates communication with other devices and supplies power to the board.
This board is open-source, meaning many users utilize it. This community helps troubleshoot problems and eases debugging for your projects.
The board's pins function as oscillators, producing a frequency of around 16 MHz, which is suitable for most applications. It doesn't alter the microcontroller's speed.
The board has voltage regulation features to power it directly or through USB.
There are thirteen digital and six analog pins on the Arduino UNO. These pins enable you to connect various hardware components and enhance the board's capabilities.
There's a handy reset button for restarting programs on the board.
Hardware Structure of Arduino Uno
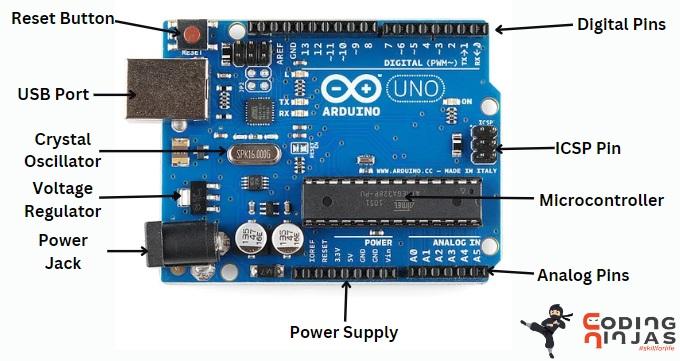
Arduino Uno board is an easy-to-use board that is beginner friendly. It consists of a microcontroller chip which is made up of an ATmega328p processor. It has input and output pins, Analog pins, a USB connection, a power jack and a reset button. The main component of the Arduino Uno board includes the following:
Microcontroller
Arduino Uno Board is an open-source microcontroller board powered by an ATmega328p processor.
Input/Output Pins
It comprises 14 input and output pins with 6 analog input pins. These pins are used to connect Arduino boards to different electronic components.
Power Supply
The power supply components include IOREF, GND, 3.3V, 5V, and Vin, which connect sensors. Voltage regulators regulate the Power supply of the Arduino Uno board.
LED
LED indicators are used in Arduino Uno, which is used for debugging or indicating a signal.
Reset Button
A reset button is used to restart the microcontroller.
USB Interface
It consists of a USB port to upload the program to the arduino uno board.
Voltage Regulator
It provides a stable and reliable voltage supply to the board's components.
ICSP Pin
It programs the microcontroller and performs functions like debugging the code.
Crystal Oscillator
It is an electronic oscillator that is used to create stable and precise frequency signals.
Technical Specifications of Arduino UNO
Now let us look at some of the specifications of Arduino Uno.
Microcontroller Chip
ATmega328
Digital I/O Pins
14
Analog I/O Pins
6
DC Current per I/O Pin
40 mA
DC Current for 3.3V Pin
50 mA
SRAM
2 KB
EEPROM
1 KB
Flash Memory
32 KB
Clock Speed
16 MHz
Operating Voltage
5V
Input Voltage
7-12V
How to Download the Arduino IDE
Here are steps that will help you to download the Arduino IDE easily.
Step 1: To begin with Arduino, gather an Arduino board and a USB cable (used for printers), especially if using boards like Arduino UNO, Nano, etc.
Step 2: Visit the official website to download the Arduino IDE software. Choose the version that matches your computer's operating system (Windows, macOS, or Linux), then unzip the downloaded file.
Step 3: Activate your Arduino board. Boards such as Uno, Mega, and Nano derive power from either USB or an external supply. If you're using Diecimila, configure it to draw power from USB using a small plastic jumper. Link the board to your computer through USB, and you should observe a green LED illumination.
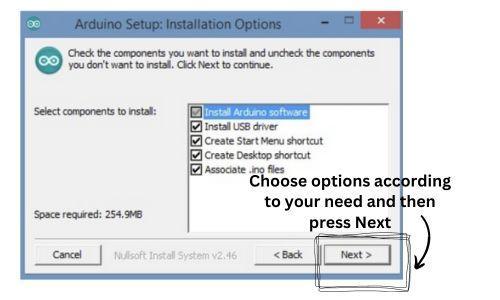
Step 4: To launch the Arduino IDE, download the folder, unzip it, and double-click the IDE icon (application.exe).
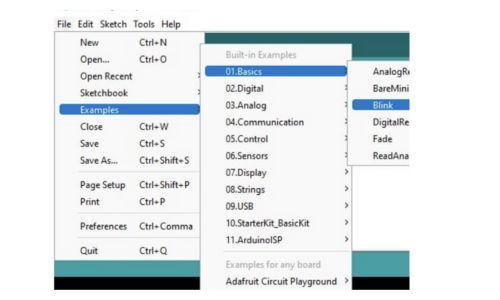
Step 5: Open a project. You can start a new project or open an example. For instance, "Blink" turns an LED on and off. Access examples via file → Example → Basics → Blink.
Step 6: Choose your Arduino board. Go to Tools → Board and select your board type (e.g., Arduino Uno) to match the one connected.
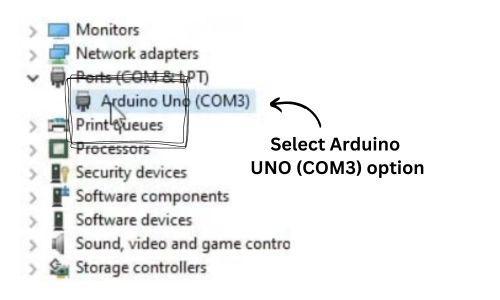
Step 7: Select the serial port. Under Tools → Serial Port, pick the one associated with your Arduino board (usually COM3 or higher).
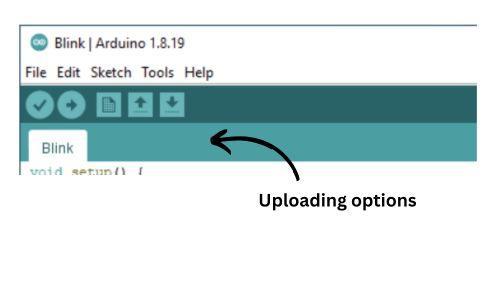
Step 8: Upload the program. Click "Upload." The RX and TX LEDs on the board will flash. If "Done uploading" appears after a few seconds, the upload was successful.
Advantages
Here are some advantages of the Arduino Uno board.
It is simple and easy to use. It is easily programmable, which makes it beginner friendly.
Arduino Uno can be used to build many projects, including LED blinkers, Robots etc.
It consists of various pins, which makes it more compatible and can be used to connect different electronic components.
Arduino Uno boards are cheap in comparison to other microcontroller boards.
Arduino has a large community of active users, making support or any help that is needed for Arduino boards widely available.
Disadvantages
While the Arduino Uno board has many advantages, there are some significant disadvantages to look up to.
The ATmega328p processor has limited memory and low processing power, which makes it slower than other microcontroller chips.
Arduino Uno boards can process only one task at a time as it has a single-core processor.
Arduino Uno boards do not have various connectivity options.
Frequently Asked Questions
What is Arduino Uno in simple words?
Arduino.cc introduced the Arduino Uno, a readily accessible board using Microchip's ATmega328P microcontroller, in 2010. It has since served as a foundational component for diverse electronics projects.
What is an Arduino Uno used for?
Arduino Uno is used for creating and experimenting with electronic projects. It delivers a platform to manage various elements like LEDs, sensors, and motors using code, fostering learning and innovation.
Is Arduino Uno a microcontroller?
Yes, Arduino Uno is a microcontroller board that uses the ATmega328P chip, serving as the brain of electronic projects, handling tasks and interactions you program it for.
What are the features of the Arduino?
Arduino features include microcontroller boards, easy coding via IDE, diverse sensors, actuators, and shields for expanding functionality, enabling DIY electronics projects and prototyping with simplicity and flexibility.
Conclusion
This article discusses the topic of Arduino Uno. In this blog, we have discussed about Arduino Uno board, its main components, and its advantages and disadvantages. We hope this blog has helped you enhance your knowledge of the Arduino Uno. If you want to learn more, then check out our articles.


 9+ registered

