Do you think IIT Guwahati certified course can help you in your career?
Introduction
A Window in pyglet is a top-level window provided by the operating system. Windows can be floating (overlapping with other application windows) or fullscreen. And the use of these windows for the simultaneous display of more than one item on a screen is called windowing. Windowing is one of the most used tools by any user. It helps the user to see multiple items on a screen at the same time. The user can use this technique in the most optimum way according to its need.
So let’s discuss how windowing is done in pyglet and how the windowing technique helps the user in his work environment.
Creating a window
If the Window is called without any arguments, the following default values will be assumed for all parameters:
window = pyglet.window.Window()
The following are the default parameters:
The window will be 640x480 in size and will not be resizable.
The template config described in OpenGL configuration options will be used to create a default context.
The window caption will be the Python script's name (i.e., sys.argv[0]).
Unless you pass the visible=False argument to the function Object() { [native code] }, windows are visible as soon as they are created. The example below shows how to create and display a window in two steps:
window = pyglet.window.Window(visible=False)
# ... perform some additional initialisation
window.set_visible()
Context configuration
A window's context cannot be changed once it has been created. There are several methods for controlling the created context:
Using the context argument, provide an already-created Context:
Using the config argument, supply a complete Config obtained from a Screen. This config will be used to create the context, which will share object space with the most recently made existing context:
Using the screen argument, specify a Screen. The context will make use of a configuration created from the default template configuration and the following screen:
Using the display argument, specify a display. Using the default template configuration, the default screen on this display will be used to obtain a context:
If a template Config is specified, a Screen or Display can also be specified; however, any other combination of parameters restricts the configuration, and some parameters are ignored.
Fullscreen windows
When the fullscreen=True argument is passed to the window constructor, the window will draw to the entire screen instead of a floating window. Because no window border or controls will be displayed, you must ensure that another way to exit the application is provided.
Here, the default screen on the default display will be used by default, but you can specify another screen to use instead. The following code, for example, creates a fullscreen window on the secondary screen:
There is no way to make a fullscreen window that spans multiple windows (for example, if you want to create an immersive 3D environment across various monitors).
Instead, please make a new fullscreen window for each screen and assign the same event handlers to all of them.
The set fullscreen() method can be used to toggle Windows into and out of fullscreen mode. To return from fullscreen to windowed mode, for example:
window.set_fullscreen(False)
The previous window size and location will be attempted to be restored, but the operating system does not always allow this, and the Window may have been relocated.
Size and position
This section only applies to non-fullscreen windows. Fullscreen windows are always the width and height of the screen they occupy.
The window size can be specified as the first two arguments to the window constructor. In the following example, a window with a width of 1280 pixels and a height of 720 pixels is created:
window = pyglet.window.Window(1280, 720)
A window's "size" refers to its drawable space, excluding any additional borders or title bar drawn by the operating system.
By specifying resizable=True in the function, you can allow the user to resize your window. We may also want to handle the on_resize() event if you do this:
window = pyglet.window.Window(resizable=True)
@window.event
def on_resize(width, height):
    print('The window was resized to %dx%d' % (width, height))
With the set_maximum_size() and set_minimum_size() and methods, we can specify a maximum and minimum size to which we can resize the Window:
The set_size() method can also be used to resize the window programmatically (even if the window is not user-resizable):
window.set_size(1280, 720)
The operating system will position the Window at first. Typically, it will use its algorithm to locate the Window in a location that does not block or cascade with other application windows. The get_location() and set_location() methods can be used to adjust the position of the Window manually:
x, y = window.get_location()
window.set_location(x + 20, y + 20)
On the contrary to what we had seen in the usual coordinate system in pyglet, here the window location is relative and it is to the top-left corner of the desktop, as illustrated in the diagram below:
The window's position and size in relation to the desktop.
Appearance
Window style
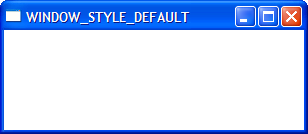
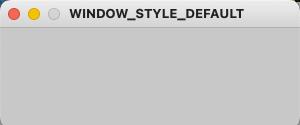
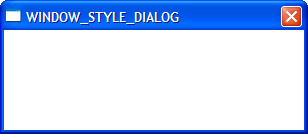
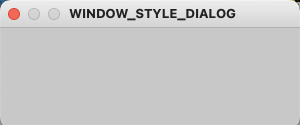
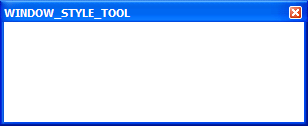
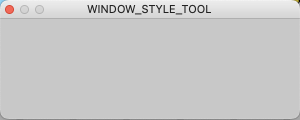
Non-fullscreen windows can be made in four different styles: default, dialogue, tool, or borderless. The following images show how each style appears under Windows and Mac OS.
Style
Windows
Mac OS
WINDOW_STYLE_DEFAULT
WINDOW_STYLE_DIALOG
WINDOW_STYLE_TOOL
WINDOW_STYLE_TRANSPARENT
<Not Implemented>
WINDOW_STYLE_OVERLAY
<Not Implemented>
These window styles' non-resizable variants may appear slightly different (for example, the maximize button will either be disabled or absent).
Aside from appearance, window styles influence how the Window behaves. Tool windows, for example, do not typically appear in the taskbar and cannot be given keyboard focus. Dialog windows are not able to be minimized. Overlays necessitate custom window sizing and movement. When you use the right window style for your windows, your application will behave correctly for the platform; however, this behavior may not be consistent across Windows, Linux, and Mac OS.
Windows' appearance and behavior in Linux will vary greatly depending on the distribution, window manager, and user preferences.
The operating system does not decorate borderless windows (WINDOW_STYLE_BORDERLESS), and they cannot be resized or moved around the desktop. These can be used to create splash screens or custom window borders.
The Window constructor allows you to specify the style of the window. The window style cannot be changed once it has been created:
The Window caption appears in the title bar and taskbar icon (on Windows and some Linux window managers). You can change the caption of a window at any time by using the set_caption() method:
window = pyglet.window.Window(caption='Initial caption')
window.set_caption('A different caption')
Icon
On Windows and Linux, the window icon appears in the title bar and taskbar icon, and on Mac OS X, it appears in the dock icon. Dialog and tool windows do not always display their icon.
Each window manager in Windows, Mac OS X, and Linux has its preferred icon size:
Windows
A 16x16 title bar and taskbar icon.
Alt+Tab switcher icon in 32x32 size.
Mac OS
Any number of icons in 16x16, 24x24, 32x32, 48x48, 72x72, and 128x128 resolutions.
The displayed image will be interpolated to the correct size from the sizes provided.
Linux
There are no restrictions in Linux, but most window managers will use a 16x16 and a 32x32 icon the same way that Windows does.
We can set any number of images as the icon using the set_icon() method. pyglet will choose the best ones to use and apply them to the Window. If alternate size is required but is not supplied, pyglet will scale the image to the correct size using a simple interpolation algorithm.
As the window icon, the following example uses both a 16x16 and a 32x32 image:
Images in any format supported by pyglet can be used, but it is recommended that you use a format that can support alpha transparency, such as PNG. Because Windows only support Windows.ico files, their use is discouraged. .icon files from Mac OS X are not supported at all.
It should be noted that the icon you specify at runtime has nothing to do with the application icon, which must be explicitly encoded in the application binary.
Visibility
Windows have several visibility levels. The visible property, which hides or shows the window, is already shown.
Windows can be minimized, which is the same as hiding them, except that they remain visible on the taskbar (or are minimized to the dock on OS X). A window can be minimized by clicking the appropriate button in the title bar. You can also reduce a window programmatically by using the minimize method (there is also a corresponding maximize method).
The on_show() event is triggered when a window is made visible. The on_hide() event is triggered when it is hidden. These events will only occur on Windows and Linux when you manually change the Window's visibility or when it is restored or minimized. On Mac OS, the user can also use the Command+H shortcut to hide or show the Window (affecting visibility).
Subclassing Window
Subclassing Window for each type of Window you will display, or as your main application class, is a helpful pattern in pyglet. There are several advantages:
Loading fonts and other resources from the constructor is possible if the OpenGL context has already been created.
Define event handlers in the class to add them. The on_resize() events will be called as soon as the Windows are created (this is unusual because the Window must be created before event handlers can be attached).
There is less need for global variables because you can keep the application state on Windows.
The following example shows the same "Hello World" application as shown in Writing a pyglet application with a Window subclass:
Every Window in pyglet is associated with an OpenGL context. Specifying the context's configuration was already covered in Creating windows Drawing into the OpenGL context is the only way to pull into the Window's client area.
Double-buffering
OpenGL commands are applied to a hidden back buffer if Windows is double-buffered (i.e., the configuration specified double_buffer=True, the default). The flip method can bring this back buffer to the front. The previous front buffer becomes the hidden back buffer to which we render in the next frame. This is handled automatically after each on_draw() event if you use the standard pyglet.app.run or pyglet.app.EventLoop event loop.
If the window is not double-buffered, flip() is unnecessary, and you should only call pyglet.gl.glFlush() to ensure buffered commands are executed.
Vertical retrace synchronization
Double-buffering eliminates one cause of flickering: the user cannot see the image as it is painted, only the final rendering. It does, however, introduce a new source of flicker known as "tearing."
When displaying fast-moving objects in an animation, tears appear. While the video display is still reading data from the frame buffer, the buffer flip occurs, causing the top half of the display to show the previous frame while the bottom half shows the updated frame. If you rapidly update the frame buffer, you may notice three or more such "tears" in the display.
Pyglet prevents tearing by synchronizing buffer flips with the video refresh rate. This is enabled by default, but it can be manually enabled or disabled using the vsync (vertical retrace synchronization) property. In the following example, a window is created with vsync initially disabled:
window = pyglet.window.Window(vsync=False)
It is usually best to leave vsync enabled because it produces flicker-free animation. You might want to disable it in the following situations:
Application profiling Measuring the time it takes to operate will be influenced by the amount of time spent waiting for the video device to refresh, which can cause errors. If you are measuring the performance of your application, you should disable vsync.
Suppose you cannot afford to have your application blocked. If your application run loop needs to poll a hardware device quickly, you should avoid blocking with vsync.
It should be noted that some older video cards do not support the necessary extensions to implement vsync; this will result in a warning on the console but is otherwise ignored.
Frequently Asked Questions
What is a window?
A Window is a top-level window provided by the operating system. Windows can be set to be floating or fullscreen.
What are various Windows styles?
The various windows styles are default, dialog, tools, transparent, and overlay.
What are events in the visibility of windows?
There are mainly two events in the visibility of the Window. The first is "show," The other is "hide." The on_show() event is triggered when a window is made visible. The on_hide() event is triggered when it is hidden.
Conclusion
In this article, we have extensively discussed the windowing in pyglet. You should check this out to know more about pyglet applications. You should also check out this; it will help you with the concept of pygame, a python project. If you would like to learn more, check out our articles here. Do upvote our blog to help other ninjas grow.


 8+ registered

