Do you think IIT Guwahati certified course can help you in your career?
Introduction
When we start working with any new technology, we got introduced to a new set of frameworks. It is interesting to learn about it, but sometimes it is complicated when we are provided with a number of options. The consistent tool which we had for sure used in development is “Git”. And “Git” is the handiest tool we use with almost all new technologies.
This article will help users in working with Git for Play. It is intended to assist new contributors in getting started with Play, the conventions mentioned here are good and make it easier to make contributions to Play, but they are by no means mandatory. It would help if you used whatever works best for you.
We will start our discussion of working with Git for Play by knowing git remotes for Play. Afterward, we will discuss branches and how to squash commits in Git. We will also discuss how to respond to reviews/build breakages; if faced with mistakes while making pull requests and how to start over and change history on Git.
So let’s get started!
Git Remotes for Play
We start our discussion of working with Git by knowing about Git remotes for Play. We recommend calling the remote for the official Play repository origin your username, and the remote for your fork is your username.
This convention works well when sharing code between multiple forks and will be used for all of the remaining Git commands in this article. It is also the convention that works best with the GitHub command line tool out of the box.
Branches
For working with Git, branches are the most critical part. Branches are typically where all work is done. If you work directly on main, you can only submit one pull request at a time. It is because submitting a second pull request from the main will result in the second containing commits from both, ie, from your first and second, leading to an error.
Working in branches allows you to keep pull requests separate from one another. It is entirely up to you what you name your branches; some people include issue numbers in their branch names, while others prefer a hierarchical structure. Thus using branches is a more favorable way of working with Git.
While going through our discussion of the topic of working with Git, it is crucial to know how to manage multiple pull requests or commits. We prefer that all pull requests be combined into a single commit. There are several reasons for this, including:
Backporting single commits to stable branches is much easier and less error-prone than backporting groups of commits. If the change is only in one commit, there is no room for error; either the entire change is cherry-picked, or it isn't.
We intend for our main branch always to be releasable, not just now, but throughout history. If we need to back out of something, we want to know the commit before it is stable.
When changes are contained in a single commit, it is much easier to get a complete picture of what happened in history.
Of course, there are some situations where squashing commits is not appropriate; this will be decided on a case-by-case basis, but examples of when we will not require squashing commits include:
When a pull request contains commits from multiple people. In this case, we'd prefer to squash consecutive commits by the same person where possible.
When a pull request comes from a fork or branch shared with the community, rewriting history will cause problems for people who have pulled changes from that fork or branch.
Where the pull request is a large amount of work, the commit log is useful in understanding how that work evolved.
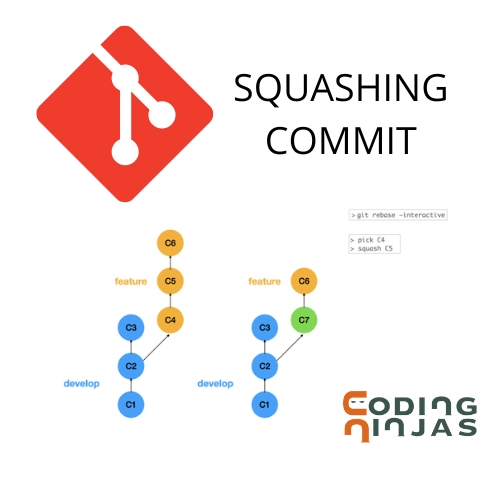
However, in general, if your pull request contains more than one commit, it must be squashed. To accomplish this, or if you have already submitted a pull request and we have asked you to squash it, please follow these steps:
Step 1: Check that your repo contains all of the changes from the main core branch:
git fetch origin
Step 2: Begin an interactive rebase.
git rebase -i origin/main
Step 3: This will bring up a screen in your editor where you can specify what should be done with each commit. If the commit message for the first commit is appropriate for describing all of the commits, leave it alone; otherwise, change the command to pick to reword.
Step 4: Change the command from pick to fixup for each remaining commit. This instructs Git to merge that commit into the previous commit, using the previous commit's commit message.
Step 5: Exit your editor and save the file. Git will now begin rebasing. If you told it to reword the first commit, it would prompt you for the wording in a new editor. If everything goes well, you're done, but there may have been conflicts when applying your changes to the most recent main branch. If this is the case, resolve the conflicts, stage the fixes, and then execute:
git rebase --continue
If there are more changes than conflict, this process may need to be repeated.
Step 6: You can now push your changes after rebasing. If you've previously pushed this branch (including when you created the pull request), you'll need to do a force push. This can be accomplished as follows:
git push yourremote yourbranch --force
Responding to reviews/build breakages
If your pull request fails the CI build, if we review it and ask you to update it, or if you want to update it for any other reason, amend the existing commit rather than create a new one. This can be accomplished by including the --amend flag when committing:
git commit --amend
After doing the amendment, you must force push using the --force flag:
git push yourremote yourbranch --force
Starting Over
One of the most important this that you should know while working with Git is how to start over after you did a mistake. Sometimes people make a mistake with their pull request and want to start over. This is fine, but there is no reason to close the original pull request and create a new one. A force push can be used to insert a completely new branch into a pull request.
To begin again, make sure you have the most recent changes from Play core, and then create a new branch from there:
Now make your changes, and when you're ready to submit a pull request, push your new branch into your repository's old branch, assuming your old branch was called myoldbranch:
The pull request should now be updated to reflect your new branch.
Changing History on Git
You may have heard that once you publish Git history, you should not change it. Both rebase and commit --amend change history, and push --force publishes your changed history.
There are times when Git history should not be changed after it has been published. The main times are when other people are likely to have forked your repository or pulled changes from it. In those cases, changing history will make it impossible for them to merge changes from your repository into their repository safely. As a result, we never modify history in the official Play Framework repository.
However, when it comes to your personal fork, for branches that are only meant to pull requests, it's a different story - the workflow intends for your changes to be "published" once they are merged into the main branch. Prior to that, history can be thought of as a work in progress.
If, on the other hand, your branch is a collaboration of many people and you believe that other people have pulled from your branch for good reasons, please let us know; we will not force squashing commits where it makes no sense.
You must download and install the Scala plugin to run Play Framework applications with Intellij Idea tools. You can launch your Play-app from the command line by typing Play run in the application root directory.
What is an activator in the Play framework?
To make a new Play application, use the activator command. Activator allows you to choose a template on which to base your new application. These templates are named Play-scala for Scala-based Play applications and Play-java for Java-based Play applications in vanilla Play projects.
Which server does Play use internally?
Play includes two server backends that can be configured to handle the low-level work of processing HTTP requests and responses to and from TCP/IP packets. The default server backend in 2.6.x is the Akka HTTP server backend, which is based on the Akka-HTTP server.
Conclusion
In this article, we have extensively discussed working with Git by knowing Git remotes for Play. Afterward, we discussed branches and how to squash commits in Git. We also discussed how to respond to reviews/build breakages; if faced with mistakes while doing pull requests, and how to start over and change history on Git, thus concluding our discussion of Working with Git.
But suppose you have just started your learning process and are looking for questions asked by tech giants like Amazon, Microsoft, Uber, etc. In that case, you must look at the problems, interview experiences, and interview bundle for placement preparations.
Nevertheless, you may consider our paid courses to give your career an edge over others!
Happy Learning!
Live masterclass
Prompt Engineering: Must-have GenAI Skill for 30L+ Roles at Amazon
by Anubhav Sinha
16 Jul, 2026
12:30 PM
Using Netflix Data to Master Power BI
by Ashwin Goyal
13 Jul, 2026
12:30 PM
Top GenAI Skills to crack 30L+ CTC at Amazon & Google
by Sumit Shukla
14 Jul, 2026
11:30 AM
JioHotstar Sports Analytics using IPL Dataset
by Prerita Agarwal
15 Jul, 2026
12:30 PM
Prompt Engineering: Must-have GenAI Skill for 30L+ Roles at Amazon


 9+ registered

