Do you think IIT Guwahati certified course can help you in your career?
Introduction
Hello Ninjas! Linux and Ubuntu users are likely familiar with concepts like hexadecimal formats. In this article, we will cover the command xxd in Linux and will explore its built-in options, installation in Linux system and some working examples.
The xxd command in Linux is a versatile tool used for creating hexadecimal dumps. ItConverts the content of a file or standard input into a hexadecimal representation. It makes it easier to read and understand the raw bytes of a file.
xxd command in Linux is a very useful command:
It can generate a hexadecimal dump for the given standard file or input.
It can do the reverse also, i.e., convert a hexadecimal file input into a standard text file.
It can convert the data into its ASCII representation and the hexadecimal values of it.
It enables editing this interpretation in Unix-like operating systems.
Along with this, it can also convert the hex dump into its binary form.
It can decode into a standard output like uuencode(1) and uudecode(1).
It can implement binary patching.
Syntax of xxd Command in Linux
xxd in Linux has the following syntax for creating a hex dump of the file:
xxd <options> <file>
Here, <options> denotes the option you want and <file> indicates the file or standard input you want to give.
For example, let us take a file sample.txt shown below.
Hello
How
do
you
do?
Hope
you
are
fine!
With the following command, we can get the hexadecimal dump of this file.
xxd sample.txt
Output:
Built-in Options for xxd Command in Linux
There are some built-in options to use with xxd in Linux. Let us study them.
OPTIONS
USES
-a | autoskip
Toggle autoskip. A ‘*’ replaces all the null lines.
-b | bits
It gives binary digits dump rather than a hex dump.
-c cols | cols cols
It forms [col] octets per line. The default number is 16. The maximum possible is 256.
-E | EBCDIC
It forms the encoding from ASCII-EBCDIC in the right column. It does not affect the hex dump.
-g bytes
It groups the hexadecimal bytes to the specified number.
-h | -help
It prints the available commands. It does not create a hex dump.
-l
It limits the output to the specified length.
-p | -ps | -plain | -postscript
It generates output in plain hex dump style.
-r | -revert
It reverts the hex dump into binary.
-seek offset
If we use it after -r, it reverts with <offset> included in file positions.
-u
It uses uppercase hex format. By default, the dump is in lowercase.
-v | -version
Outputs the version string.
Caveats of XXD command in Linu
Here are some things to keep in mind when using the xxd command:
Missing or Out-of-Order Line Numbers: When using xxd to convert a hexdump back to binary data (-r option), especially with seekable output files, line numbers in the output might be missing, out of order, or overlapping. This is because xxd tries to maintain the original layout as best as possible. In such cases, xxd will use lseek (a system call) to skip to the next valid position.
Gaps Filled with Null Bytes: If the output file for reconverting a hexdump is not seekable (e.g., standard output), xxd can't handle gaps in the data. It will fill those gaps with null bytes (zeros) by default.
Silent Error Handling: xxd doesn't always generate informative error messages. If it encounters issues parsing the input or writing the output, it might just exit without giving a clear indication of the problem.
Return Value of XXD Command in Linux
The xxd command returns different exit codes depending on the outcome:
0: No errors encountered, successful execution.
-1: Operation not supported (e.g., using -r -i together, which doesn't make sense).
2: Problems with the input file (e.g., file not found, permission issues).
3: Problems with the output file (e.g., file not writable, disk full).
Installing XXD on a Linux System
To install the "xxd" command on a Linux system, you can typically use the package manager specific to your distribution. For example:
Debian/Ubuntu: Use the apt package manager with the following command:
sudo apt-get install xxd
Red Hat/CentOS: Utilize the yum package manager with the following command:
sudo yum install vim-common
Arch Linux: Use pacman for installation:
sudo pacman -S vim
Make sure to use sudo before the installation command. Once installed, you can use the xxd command for various hexadecimal-related operations in your Linux environment.
Examples of xxd Command in Linux
Let's see examples of using xxd for the following purposes:
Limiting the column length of the output
Conversion from a specific Index
Limiting the output to specified length
Output in binary form
Output in UPPERCASE
Hex file to normal file
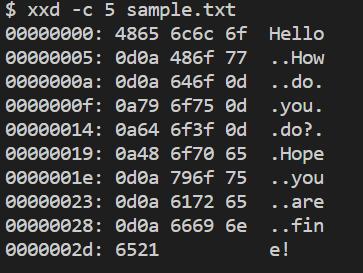
1. Limiting the Column Length
Using the following command, we can limit the column length of the output.
xxd -c 5 sample.txt
Output: We can see that the column length is 5 bytes of data.
2. Conversion From a Specific Index
Using the following command, we can get the hex dump of the file from a specified index.
xxd -s 0x20 sample.txt
Output: We can see that it prints a hex dump from the 20th byte of data.
Also, we can print the last 20 bytes of data in the hex dump. We can do it using the following command.
xxd -s -0x20 sample.txt
Output: We can see that it prints a hex dump for the last 20 bytes of data.
3. Limiting the Output to Specified Length
We can print the initial number of specified bytes in a hex dump using the following command.
xxd -l 0x20 sample.txt
Output: We can see that it generates a hex dump of the initial 20 bytes of data.
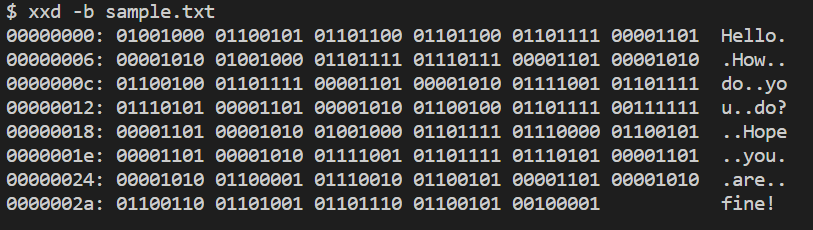
4. Output in Binary Form
We can generate the binary digits for the given file using the following command.
xxd -b sample.txt
Output: We can see that the output is in binary form.
5. Output in UPPERCASE
Using the following command, we can print the hex dump of the file in UPPERCASE format.
xxd -u sample.txt
Output: We can see that it prints a hex dump of the file in UPPERCASE format.
6. Hex File to Normal File
With xxd, we can convert a generated hex dump back to normal text too. First, we create the hex dump of the file and store it in another text file. We use the above-mentioned command to generate the hex dump of sample.txt. Then, we save it in a file hex.txt. The generated hex dump is shown below.
Then, we use the following code to generate the normal text from the hex dump.
xxd sample.txt > hex.txt
Output: Here, we can see that in the file hex.txt normal text of the hex dump is generated.
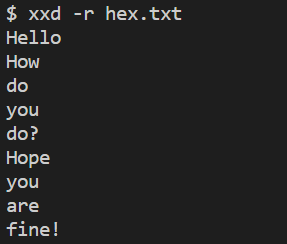
We can use the following command to view only the normal text from hex.txt.
xxd -r hex.txt
Output: Here, we can see the original normal text as our output.
Frequently Asked Questions
What is Linux?
Linux is a set of open-source operating systems based on the Linux kernel. Just like Windows, Mac OS, Linux is an operating system. It is known for its security and flexibility. Also, it is free and available for everyone.
What is the xxd process?
The xxd process in Linux allows you to convert files or data to a hexadecimal format (hexdump) for analysis. Optionally, recreate binary data from its hexdump representation.
How to read xxd output?
xxd output displays data in hexadecimal format each line shows offsets (addresses) followed by byte values in hex (with spaces). Optional characters represent printable ASCII characters from the data.
What is xxd command to print the last bytes of a file?
If you want to print the last specified number of bytes, you can use the xx command. The syntax will be xxd -s <number_of_bytes> <file_name>.
How to install xxd in Ubuntu?
Run the command: sudo apt-get install xxd. By this, you can install the xxd utility in your system.
How to use the xxd in Linux?
The main syntax of using the command xxd in Linux is xxd <options> <file>. Here, by running the command, <options> denotes the option you want. And <file> represents the file or standard input you want to give.
In this article, we studied xxd commands in Linux, we discussed how to install it in a Linux system. We have also discussed built-in options and have seen some of the examples to better understand the topic. Finally, some of the FAQs are discussed.


 8+ registered

