Do you think IIT Guwahati certified course can help you in your career?
Introduction
Security is really important. If our data falls into the wrong hands, it can cause a lot of trouble. In a similar way, we have to make sure that APIs also stay safe and that the wrong people cannot make changes to our systems. For this reason, Katalon Studio uses Authentication. Let us have a look at the different types of Authentication Katalon has to offer. We will also see the Steps and process to use them.
Authorization in Katalon Studio
We all know that APIs use Authorization. This is to ensure client requests have safe and secure access to data. The Authorization applies to verify and make sure that the sender of a request is actually allowed to access and change the data.
We can add the Authorization data in the Authorization tab in our Web Service Request.
Authorization Types
We have different Authorization types in Katalon Studio. They all have various perks and uses. The following are the ones that are supported in Katalon:
Bearer Authentication (Available in Katalon Studio Version 8.4.0 and above)
Basic Authentication
OAuth 1.0
OAuth 2.0
NTLM ( Available in Katalon Studio Version 8.4.0 and above . Also requires an active license to Katalon Enterprise Version.)
We will take a look at the first four Authentication/Authorization methods today. We also have to make sure that we click on "Update to HTTP Header" to use our current Authentication Information. Katalon Studio will add up the needed information to the Header of Web Service Request.
Bearer Authentication
Let us find out about Bearer Authentication. It is an HTTP authentication Methodology. It uses security tokens known as bearer tokens. You must be thinking, what is a Bearer Token? The bearer token is a cryptic string that the server creates in response to a login request. The client must include this token in the Authorization header when making requests to the protected files or resources.
We must take note that Bearer tokens can be generated through OAuth 1.0 and OAuth 2.0 Authorization. But if the user already has a bearer token, they can use bearer authentication directly in Katalon Studio.
Requirements
There is a very simple requirement for using Bearer Authentication in Katalon studio.
Katalon Studio Version: The user must have a Katalon Studio Version of 8.4.0 and above to use Bearer Authentication.
Using Bearer Authentication
There are some simple steps to follow if we want to use Bearer authentication in Katalon Studio. We have to do as the following process shows to use it. Followed by that, we can see the results.
Process
Now we will look at the process for setting up bearer Authorization in simple steps:
Step 1: First, we have to open a Web service test object.
Step 2: We have to find and go to the Authorization tab.
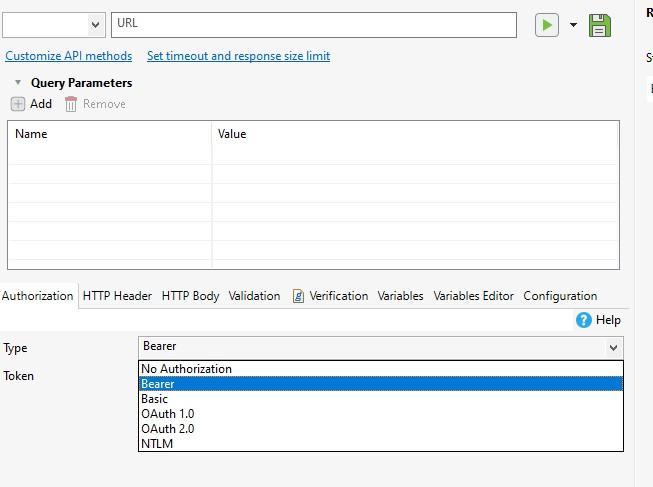
Step 3: In the Authorization tab, we will find the "Type" dropdown menu.
Step 4: We have to select the "Bearer" option in the dropdown menu.
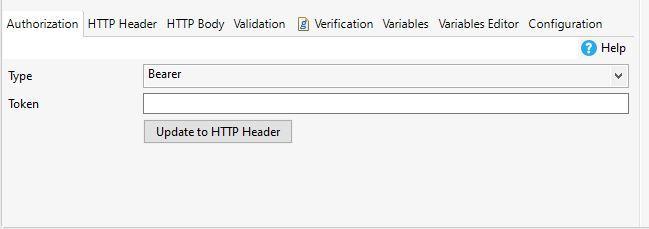
Step 5: Now, we have to enter the bearer token in the space.
Step 6: Now we will click on "Update to HTTP Header". This will let us use this Bearer Authentication.
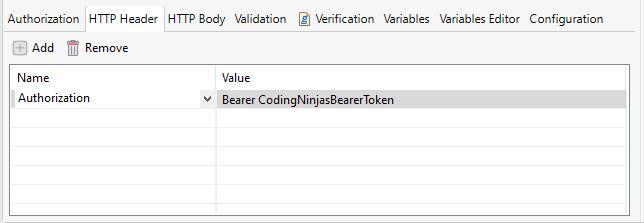
Result
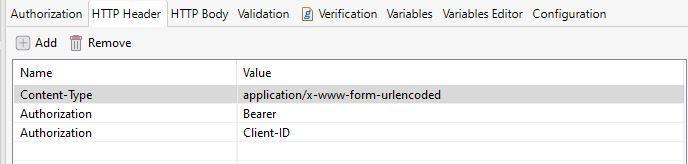
After we are done with the steps above, we will have our results. The bearer token will get added to the HTTP Header. It will be as "Bearer<myBearerToken>".
Basic Authentication
Now let us have a look at Basic Authentication. Basic Authorization is the simplest Authorization for a request. In this type of Authentication, we have to send a username and a password that has been verified with our request. For authenticating a request that is using basic Authentication, we have to enter our credentials. Then the Authorization request headers will have these credentials encoded in them.
Using Basic Authentication
Let us see what we have to do to Use Basic Authentication in Katalon Studio. We will follow some simple steps and then will see the results.
Process
The process for using Basic Authentication is as follows:
Step 1: First, we have to open a Web service request.
Step 2: We have to find and go to the Authorization tab.
Step 3: Now, we have to set the type of Authorization as Basic.
Step 4: We will enter the username and password for request authentication.
Step 5: Now, we click on "Update to HTTP Header".
Result
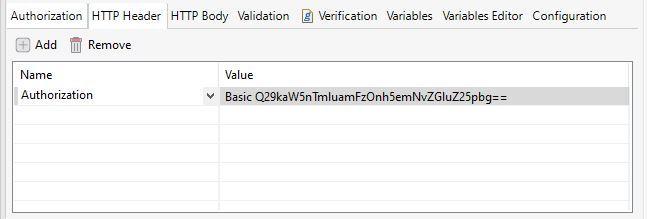
After we are done with the above steps, we will have our results. The username and password that we have entered will get encoded to the Authorization request. We will be able to see it in the HTTP Header tab.
Authorization OAuth 1.0
The OAuth protocol lets websites or Consumers to access protected resources or data from a Service Provider through an API. It helps as it does not need users to give away their service provider credentials to the Consumers. In a simple way, OAuth makes a generic methodology for API authentication that can be freely implemented.
Example
A simple example would be letting a student (in this case, the customer) with the ID "studentABC.codingninjas.com" access the Private study materials. Which may be stored in the college resource vault (the service provider) at the address "StudyVault.college.net". The student would be able to access the study materials without needing to give their "studentABC.codingninjas.com" credentials to "StudyVault.college.net".
Using OAuth 1.0 Authorization
We will now see the steps to use OAuth 1.0 Authorization in Katalon Studio. Once we are done with the steps, we will also read about the results.
Process
These are the simple steps for setting up OAuth 1.0 Authorization. We have to do as follows to use OAuth 1.0 Authorization in Katalon Studio.
Step 1: First, we have to open a Web service request.
Step 2: We have to find and go to the Authorization tab.
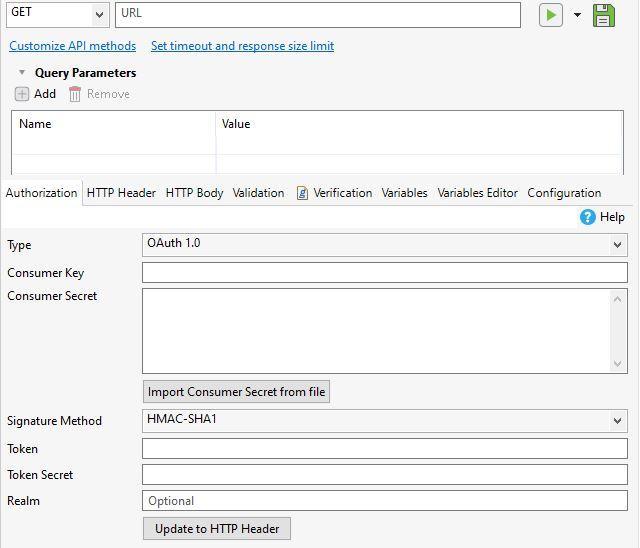
Step 3: Now, we have to set the type of Authorization as OAuth 1.0.
Step 4: Now, we have to fill up the Authorization information.
Step 5: After filling up the Authorization info, we click on "Update to HTTP Header".
Result
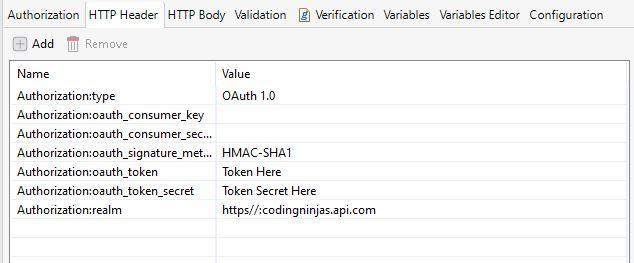
Now let us have a look at the Result. After we are done with all the above steps, the Authorization information gets updated.
We can see above that the Authorization information has been updated.
Authorization OAuth 2.0
Let us find out about OAuth 2.0 now. OAuth 2.0 actually means "Open Authorization 2.0". It is now the de facto industry standard when we are looking for online Authorization. It is created to let a website or application to access files that are being hosted by any other web application. It is done on behalf of a user. It had replaced the first version of OAuth 1.0 2012. Now, as said, it has turned out to be the standard for online Authorization. Below we will see, in a simple way, how to use OAuth 2.0 in Katalon Studio.
Grants in OAuth 2.0
For getting resource access Authorization in OAuth 2.0, the clients have to do some sets of steps. This is known as Grants in OAuth 2.0. We can see the grant types that are supported in Katalon Studio below.
Authorization Code: This is Used by both Confidential and Public clients. It lets the clients to exchange an Authorization code for an access token. When the user comes back to the client through the redirect URL, the application finds the Authorization code from the URL and uses it to ask for an access token.
Password Credentials: Password Credentials are employed to swap a user's credentials for an access token. Password credentials are the most basic OAuth permits, requiring only one step. In this, the application displays a standard username and password to log in. Password credentials are not a preferred grant type here. This is because the client application must collect a user's password and provide it to the Authorization server.
Client Credentials: Client Credentials are used by clients. It is used to get an access token. It gets done outside a user's context.
Refresh Token: Clients use the Refresh Token to exchange a refresh token for an access token when the access token expires. Refresh tokens let clients to keep a genuine access token without interacting with the user.
Using OAuth 2.0 Authorization
We will now have a look at the step to use OAuth 2.0 Authorization. We will first see the procedures and then discuss the results.
Procedure
Step 1: First, we have to open a Web service request.
Step 2: We have to find and go to the Authorization tab.
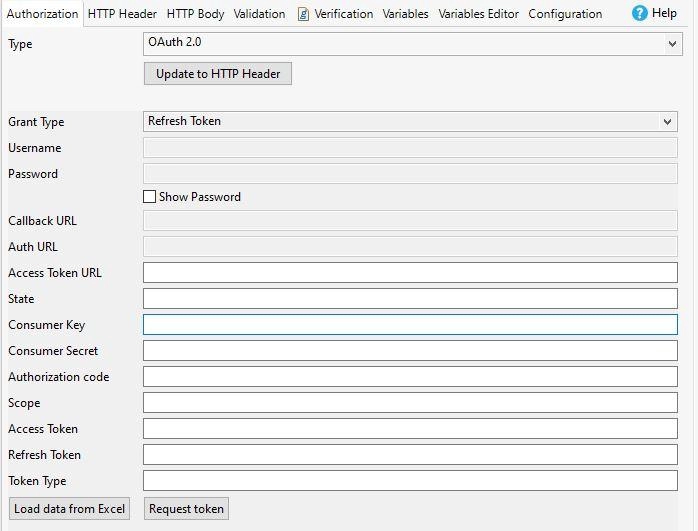
Step 3: Now, we have to set the type of Authorization as OAuth 2.0.
Step 4: We will now have a list of data to fill in. It will look like a form. There we have to find the Grant Type dropdown menu. We have to choose the grant Type we want here.
Step 5: Now, we have to enter all the values needed for the grant type that we have chosen.
Step 6 (This is an optional step): We also get the choice to upload all the information using an excel file. To do this, we have to click on the "Load data from Excel" option we can find at the bottom.
(We must take note that if we have an Authentication Code grant type, we will need to click on the "request token" option at the bottom.)
Step 7: Now, we will click on "Update to HTTP Header" to use the current Authorization info.
Result
After we do all the above steps correctly, the Authorization information gets added to the HTTP Header. It will appear in a similar way to the one below.
Frequently Asked Questions
What is Authorization in API testing?
APIs use Authorization to make sure that client requests have secure access to data. This may involve authenticating the sender who is sending a request and ensuring that they have the Authorization to access or change the related data. When creating an API, the users have a choice to select from a number of authentication models available.
When to use the bearer token and API key?
API keys get used for system-to-system integration. If we are going for direct integration, an API key might be a better option. Bearer token exchange is helpful when we have human-system integration that must go through a third-party tool.
Is the bearer token the same as OAuth?
Bearer tokens are generally used to authenticate with OAuth2. A bearer token is an encoded item that typically includes the user ID, an authenticated token, and a timestamp. It is most frequently found in REST APIs. If the API supports OAuth2, a bearer token will be used.


 16+ registered

