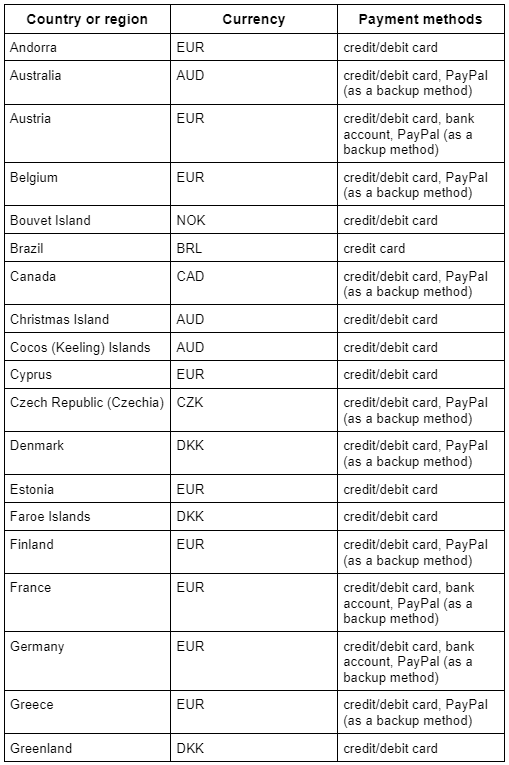
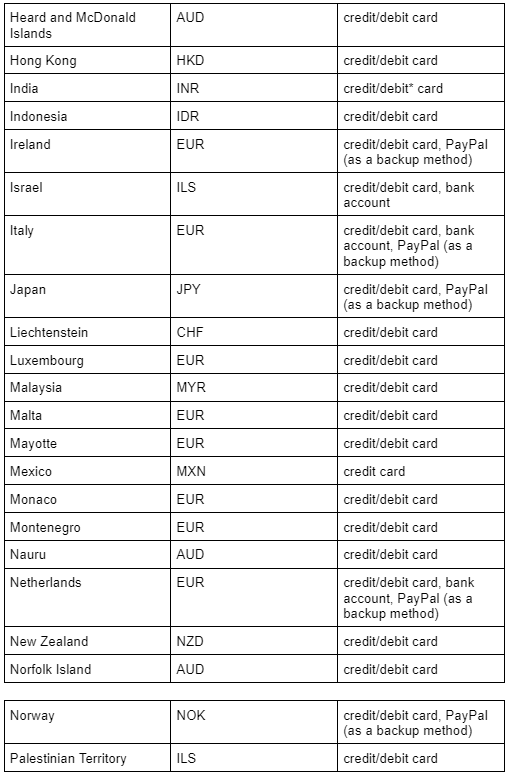
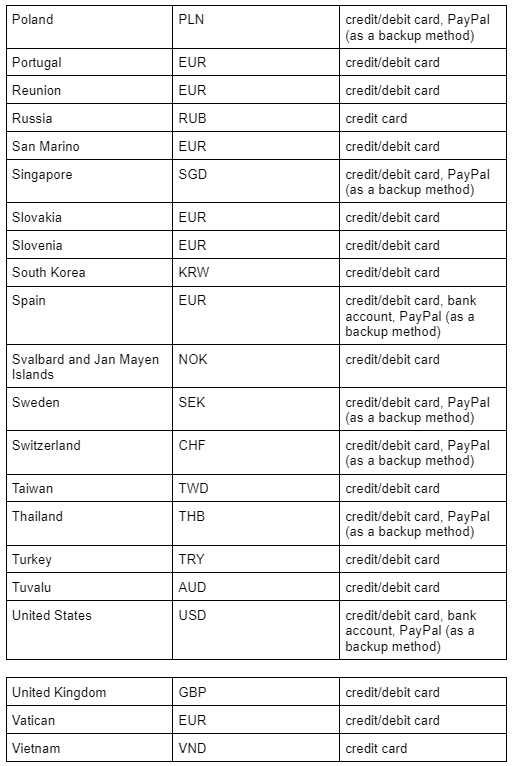
Table of contents
1.
Introduction
2.
Manage payments users, permissions, and notification settings 
2.1.
About payments profile account types
2.2.
Permissions required to manage payments users
3.
Accessing the payments settings page
3.1.
Updating payments profile users and notification settings
3.1.1.
Add a user to a payments profile.
3.1.2.
 
3.1.3.
Why can't I add a new user to my payments profile?
3.1.4.
 
3.1.5.
Resend an email invitation
3.1.6.
 
3.1.7.
Update settings for a payments profile user
3.1.8.
 
3.1.9.
Remove a user from a payments profile.
3.1.10.
 
3.1.11.
Why can't I remove a user from the payments profile?
3.2.
About the primary contact
3.3.
About payments profile permissions
3.4.
About email preferences
4.
Currencies available for Cloud Billing auto-pay accounts 
4.1.
About payment methods for Cloud Billing accounts
4.2.
About currencies for Cloud Billing accounts
4.3.
List of countries and regions
4.3.1.
Filter the list
5.
Verify Your Bank Account 
5.1.
Find and enter a test deposit.
5.2.
Failed test deposits
5.3.
Instant bank verification
5.3.1.
If you haven't input your bank account information yet
5.4.
If you just recently entered the details for your bank account...
6.
Make a manual payment or pay early. 
6.1.
Why would you pay manually or before your automatic charge?
6.2.
Permissions required to make a manual payment
7.
Make a manual payment.
8.
Make a Payment to an Invoiced Cloud Billing Account 
8.1.
Keep this in mind
8.2.
When to pay
8.3.
How to pay
8.3.1.
Pay using an ACH, EFT, or wire transfer.
8.3.2.
Pay using a check/cheque within the United States.
8.3.3.
Pay using a check/cheque outside of the United States
8.3.4.
(India only) Pay using a Unified Payment Interface (UPI)-enabled app
8.4.
When to contact collections
8.5.
When to contact billing support
9.
Frequently Asked Questions
9.1.
What are the main characteristics of cloud computing?
9.2.
Which five essential aspects of cloud computing?
9.3.
How does cloud computing function?
9.4.
Who makes use of the cloud?
9.5.
What are Google Cloud's characteristics and advantages?
10.
Conclusion
Last Updated: Jun 25, 2025
Hard

Features in Cloud Billing

Author
0 upvote
Career growth poll
Do you think IIT Guwahati certified course can help you in your career?

Introduction

In Google Cloud, a Cloud Billing account is created to specify who is responsible for paying for a particular set of Google Cloud services and Google Maps Platform APIs. IAM roles define who has access to an account for Cloud Billing. A Google payments profile is linked to a Cloud Billing account. The Google Cloud Platform is a collection of cloud computing services that Google offers. It employs the same internal architecture as Google for its consumer products, including Google Search, Gmail, Drive, and YouTube. In this article, we will discuss the features of cloud billing.

Manage payments users, permissions, and notification settings 

You may manage users, payment permissions, and email notification settings on the Payment settings page for Google Payments. The Google payments center and your Google payments profile are linked to the Payments settings page.

Any Google Payments business profile you control allows you to add more users. You can choose whether or not a person can invite other users, purchase or join up for a paid Google service, access your payment history, or make modifications to the profile for each person you add to a payments profile. Their preferences for email notifications can also be changed.

This section covers how to manage the user accounts of the Google Payments profile connected to your Cloud Billing account. You may manage the Payments users by going to the Payment settings page in the Google Cloud console. You can also manage your payment users' profiles in the Google payments center.

About payments profile account types

Two different payment profiles can be created: business and individual. For identity and tax purposes, the account type is used. The account type setting cannot be modified once the payments profile has been created. Choose the option that most closely matches how you intend to use your Google payments profile.

  • You must select the Account type to Business if you wish to allow multiple users to be added to your Google Payments profile.
  • When you establish a payments profile and choose Individual as the account type, only the user who created the profile is associated with it; other users cannot be added.

Permissions required to manage payments users

You must have the necessary permissions to make the modifications outlined in this article.

You require permissions on your Google payments profile and your Cloud Billing account if you wish to manage payments users from the payment settings page in the Cloud Billing dashboard.

  • You must be either a Billing Account Administrator or Billing Account Viewer on the Cloud Billing account. View Overview of Cloud Billing Access Control for additional details.
  • You must have at least the Manage users permission on your Google Payments profile, while some user administration actions may also require the Admin permission. 

You simply need permissions on your Google payments profile to handle users' payments in the Google payments center. You do not require Cloud Billing account permissions if you are not navigating to the Google Cloud console's payment settings page.

Accessing the payments settings page

The Google Cloud Console or the Google payments center will take you to the setting page for your Google payments profile.

Follow these steps to get to the Google Cloud console's Payment options page:

  • Log in to the Google Cloud dashboard and visit the Manage billing accounts page.
  • Sign in to Manage billing accounts
  • The name of the Cloud Billing account associated with the payments profile you want to edit should be selected.
  • Click Payment settings in the Navigation menu for Billing.

Updating payments profile users and notification settings

The following actions will allow you to modify the users' payment profiles or the notifications you want to receive.

Add a user to a payments profile.

  • Use the Google Cloud interface or Google Payments Center to access the payment profile settings page.
  • Click Manage payments users under Payments users on the Payment settings page.
  • Select + Add a new user from the Manage Users page.
  • The contact's name, optional phone number, and email address should all be included.
  • Click visibility Permissions to choose the new user's permissions.
  • Click Email preferences to select the new user's email preferences.
  • Optional: Check the Primary contact box to make this user the primary contact. Every profile must have a primary contact, so keep that in mind. A profile can only have one primary contact.
  • After finishing, click Invite.
  • Until they accept your invitation, the user's name appears as Pending. The user has two weeks to accept your invitation before they can use the payments profile.
  • To accept your invitation, users must:
    • Open the invitation email.
    • Click Review and accept.
    • Click Accept at the bottom of the following screen.


Why can't I add a new user to my payments profile?

The following causes could apply if you enter the manage users page in the Google payments settings but are unable to find the opportunity to create a new user:

  • Instead of being set up as a corporate account, the payments profile is an individual account. Users cannot be added to a single account. There is no way to alter this setting.
  • You lack the authorization required to add a new payment user. Contact the administrator of your Google payments profile or Cloud Billing account.


Resend an email invitation

Follow these procedures to issue an email invitation to a user again:

  • Use the Google Cloud interface or Google Payments Center to access the payment profile settings page.
  • Click Manage payments users under Payments users on the Payment settings page.
  • Find the person to whom you issued an invitation.
  • Clicking the Down arrow will bring up their contact information.
  • Select Resend invitation.


Update settings for a payments profile user

  • Use the Google Cloud interface or Google Payments Center to access the payment profile settings page.
  • Click Manage payments users under Payments users on the Payment settings page.
  • Click the Down arrow next to the name of the contact you wish to edit to access that user's record.
  • To change the contact details:
    • Click Edit under Contact details.
    • Type in the new contact details.
    • Press Save.
    • Keep in mind that you cannot change a user's email address. A user must be added as a new user if their email address needs to be updated.
  • To modify the user permissions:
    • Click Edit under Permissions.
    • Select the user's payment authorizations.
    • Press Save.
    • No ability to change permissions? The following are several possibilities as to why you might not see the edit icon:
      • The only admin-level user on this payments profile is the one you want to modify. A minimum of one user must be assigned the role of payments profile admin for each profile. Give another user admin access before editing the user permissions.
      • You lack the authorization needed to edit the payments user. Contact the administrator of your Google payments profile or Cloud Billing account.
  • For a user's payment notifications to be updated:
    • Click Edit under Email Preferences.
    • Choose the notification level type: Emails regarding all payments, administrative payments only (such as notices of account suspension), or no emails regarding payments.
    • Press Save.
    • The email preferences cannot be changed? The following are several possibilities as to why you might not see the edit icon:
      • The admin or principal contact is the user you want to modify. The All payments email preference must be selected for the primary contact and all admin-level users to get notifications for all payments.
      • You lack the authorization needed to edit the payments user. Speak with the administrator of your Cloud Billing account or your Google Payments profile.


Remove a user from a payments profile.

  • Use the Google Cloud interface or Google Payments Center to access the payment profile settings page.
  • Click Manage payments users under Payments users on the Payment settings page.
  • Click the Down arrow next to the user's name to reveal their record, then click the Remove button.
  • Select Remove.
  • Click Yes to indicate that you want to delete that user permanently.


Why can't I remove a user from the payments profile?

The following reasons could apply if you visit the Google Payments manage users page and expand the user you wish to delete but don't see an opportunity to do so:

  • The primary contact is configured to be the user. There must be a primary contact on every profile. A user who has been assigned the role of principal contact is inaccessible. Reassign the primary contact role to another user before removing the person.
  • The only admin for this profile is configured to be the user. A minimum of one user must be assigned the role of payments profile admin for each profile. Give another user admin access before removing the current user.
  • You lack the authority necessary to delete a payment user. Contact the administrator of your Google payments profile or Cloud Billing account.

About the primary contact

All payments-related emails are sent to one key contact for each payment profile. Google will get in touch with this individual with any inquiries about payments.

There must be a primary contact on every profile. A user identified as the principal contact cannot be removed, although the role can be transferred to another user.

To change the primary contact:

  • Use the Google Cloud interface or Google Payments Center to access the payment profile settings page.
  • Click Manage payments users under Payments users on the Payment settings page.
  • Click the Down arrow next to the name of the contact you wish to set as the primary contact to access that user's record.
  • Check the box next to Primary contact.
  • Press Save.

For some goods, the principal contact might receive an email receipt whenever a payment is made using that profile.

About payments profile permissions

Set the access levels for the same payments profile so that different users have varying access levels. Even if no permissions are chosen, users may still receive email notifications. These are the permissions you can set:

  • Access to read: View the payment history.
  • Change your payment profile: View and make changes to this payment profile. The Read Access permission is also necessary for this permit. The user must also be a Billing Account Administrator or a Billing Account Viewer on the billing account to make manual payments to an automatically paid, self-serve Cloud Billing account.
  • Sign-up and purchase: Utilize additional Google products with this payment profile. The Read Access and Edit payments profile permissions are also necessary for this privilege.
  • Manage users: Add and update users for this payments profile to manage users. The Read Access permission is also necessary for this permit. Users with this privilege can delete their accounts; however, deleting other user accounts requires admin-level permissions.
  • Administrator with full access: has every present and future permission.

You must be an admin on this payments profile to grant a user the Admin authority. Only the permissions already given to them on their user account are available to users with the Manage user's permission. For example, a user who can add new users and grant them the same or different permissions can do so if they also can read, edit payments profiles, and manage users.

About email preferences

Set the email notification categories that the user of the payments profile will receive. You must set email preferences to All payments email if the user is listed as the principal contact or if you give them admin privileges.

  • Email for all payments: Administrative emails, receipts, invoices, monthly statements, and other transactional notifications are all included in the payment email.
  • Administrative payments email only: Exclusively through email for administrative payments. Account management notifications, including tax forms, client suspensions, Terms of Service revisions, and account cancellations, are included in administrative emails.
  • The email with no payments: There won't be any notification messages delivered.

Currencies available for Cloud Billing auto-pay accounts 

The section includes a list of the countries and areas where Google Cloud expenses are billed to Cloud Billing accounts in local currency, along with the methods of payment accepted in each location.

There is no price list for Google Cloud goods in this section.

  • Take a look at the Google Cloud price lists for pricing information.
  • You can view prices by SKU in the Pricing Table report if you have a Cloud Billing account and are an existing Google Cloud user.

About payment methods for Cloud Billing accounts

  • The payment methods discussed in this article only apply to self-serveonline Cloud Billing accounts and not to accounts paid by invoice. They are the kinds that are accepted for automatically paid accounts.
    • Visit Make a payment to an invoiced Cloud Billing account to find out how to pay your Google Cloud bill if your Cloud Billing account is configured as an invoicing account.
  • Several payment options are accepted for your Cloud Billing account, depending on the nation and location.
  • Other payment options that are not recognized as accepted payment methods for your Cloud Billing account might be permitted by your Google payments profile. These payment methods may be acceptable for purchasing Google Play and Google Ads products, which are not part of the Google Cloud.
  • Add, remove, or update a payment method that has more information on Cloud Billing payment methods.

About currencies for Cloud Billing accounts

After you create your Cloud Billing account, you cannot modify the currency in which each account operates. You must set up a new Cloud Billing account if you require a Cloud Billing account to function in a currency other than the currency of your current Cloud Billing account.

  • When Google bills in a local currency other than the US dollar, we convert Google Cloud prices using the exchange rates provided by reputable financial institutions.
  • Every month begins when the exchange rates are determined.
    • Note that beginning with the first calendar quarter of 2022; we shall determine the Brazilian Real (BRL-to-USD) exchange rate.
    • We offer insurance against significant month-to-month rate swings for a few currencies.
  • You may see the precise exchange rate data used to calculate your billing account's charges if you export your Cloud Billing data to BigQuery. Look for the currency conversion rate field in your standard and in-depth pricing and use cost data exports.
  • For your Cloud Billing account, not all currencies are supported.

List of countries and regions

To find your country or region, scroll down the table or use the filtering feature. If your country or territory is not listed below, it may mean that Google Cloud charges cannot be made in the currency of your country or region. Occasionally, USD costs could be applied to your Cloud Billing account.

Check the payment choices tool for details on nations or locations that aren't included here.

Filter the list

Filter the list 1
Filter the list 2
Filter the list 3

Verify Your Bank Account 

Depending on your country, you might need to validate your bank account to utilize it as a direct debit payment option. A modest test deposit will show up in your bank account within a few days of adding the account as a payment option. As mentioned in Find and enter a test deposit, you should validate the deposit after seeing it.

Instead of using the test deposit, you can instantly verify your bank account if your account has a billing address in the US, as explained in Instant bank verification.

Follow the directions to build a new Cloud Billing account if you validate bank details while setting up a new billing account.

Find and enter a test deposit.

A tiny test deposit will show up in your bank account three to five business days after you add your bank account details to your Cloud Billing account.

When examining the test deposit:

  • Check your bank records for any deposits made by Google Inc. or its payment partner, AFS. Less than $1 will be required as a deposit.
  • Make a note of the deposit's precise amount when you find it.
  • Navigate to the Manage billing accounts page in the Google Cloud dashboard.
  • Go to the Manage billing accounts page.
  • Choose the Cloud Billing account name corresponding to the bank account you want to confirm.
  • Click the Payment method in the Billing navigation menu to start.
  • Click Verify test deposit after selecting your bank account.
  • Click "Submit" after entering the test deposit's precise amount.
  • The account is validated once the correct amount is entered, at which point you can start utilizing your bank account as your primary payment method.

Failed test deposits

Our attempt to make a test deposit occasionally fails. An email will be sent to you, and a notice will appear in your billing accounts if this occurs. The test deposit may not function for several reasons, including:

  • The details of your bank account are incorrect.
  • Your bank account has been closed.
  • Your bank account prohibits automatic bank account payments.


Please verify the accuracy of the bank account information you supplied if your test deposit was unsuccessful. This is how:

  • Navigate to the Manage billing accounts page in the Google Cloud dashboard.
  • Go to the Manage billing accounts page.
  • Choose the Cloud Billing account name corresponding to the bank account you want to confirm.
  • Click the Payment method in the Billing navigation menu to start.
  • Track down your bank account. Verify that all of the account information is accurate.
  • After that, choose one of the following:
    • Contact your bank to check that no account restrictions prevent you from using automatic bank account payments if the account information is accurate. Your bank may also refer to these payments as direct debit payments. You cannot use this account as a payment source if your bank prohibits automatic payments. If they do, delete it from your Cloud Billing account and add your bank account once more as if it were a new payment method to restore the account.
    • You must add your bank account again as a new payment method if the bank account information is inaccurate. The erroneous bank account can be eliminated later from your Cloud Billing account payment methods.

Instant bank verification

Customers of Google Cloud can get fast bank verification from us. With instant bank verification, you may verify your bank account instantly, unlike the test deposit approach, which requires several days to complete.

Both of the following conditions allow for the usage of quick bank verification:

  • If you haven't already, please input your bank account details.
  • If you just input your bank account details,

The following sections provide descriptions of each of these circumstances.

Note: Currently, customers with US bank accounts are the only ones who can use this service.

When trying rapid bank account verification, it's crucial to keep the following things in mind:

  • Verify the accuracy of your bank's name. Verify the bank information on the Payment Settings page if it is incorrect.
  • Instead of using your Google Cloud account credentials, you must input the ones you use to access your bank's website.
  • You can try again later or use test deposit verification if instant verification fails due to a connection issue with your bank.

Warning: We advise you to take additional security measures when verifying your account.

  • Make sure your browser displays a secure connection before entering your account information.
  • Google will never email you for account details.

If you haven't input your bank account information yet

When inputting your US bank account details for the first time, you can choose to verify quickly or by making a test deposit. To verify your bank account information utilizing immediate bank verification after inputting your US bank account information, follow these steps:

  • Navigate to the Manage billing accounts page in the Google Cloud dashboard.
  • Go to the Manage billing accounts page.
  • Choose the Cloud Billing account name corresponding to the bank account you want to confirm.
  • Click the Payment method in the Billing navigation menu to start.
  • After selecting Add a bank account and entering your account information, click SAVE under ADD PAYMENT METHOD.
  • Select Verify by login into your bank account on the Verify your bank account screen, then click VERIFY.
  • Enter your online ID and password to access your bank's website.
  • Note that Google will not save your online banking login information.
  • Choose VERIFY.

Now that your bank account has been validated.

If you just recently entered the details for your bank account...

You can quickly switch from the test deposit verification method to instant verification if you recently added a US bank account. To verify your bank account information utilizing immediate bank verification after inputting your US bank account information, follow these steps:

  • Navigate to the Manage billing accounts page in the Google Cloud dashboard.
  • Go to the Manage billing accounts page.
  • Choose the Cloud Billing account name corresponding to the bank account you want to confirm.
  • Click the Payment method in the Billing navigation menu to start.
  • Select your bank account, then press VERIFY.
  • Select Verify by login into your bank account on the Verify your bank account screen, then click VERIFY.
  • Enter your online ID and password to access your bank's website.
  • Note that Google will not save your online banking login information.
  • Choose VERIFY.

Now that your bank account has been validated.

Make a manual payment or pay early. 

This section explains how to pay for your automatically paid self-serve billing account manually. Self-service (online) accounts accumulate charges, which are then paid automatically following the cycle of charges for the account.

Your automatically billed account is always open to manual payments. If your payment is more significant than what you already owe, it will lower your next automatic charge and be applied to your accrued costs.

Visit Make a payment to an invoiced Cloud Billing account to find out how to pay your Google Cloud bill if your Cloud Billing account is configured as an invoiced account.

Why would you pay manually or before your automatic charge?

For the following reasons, you could decide to make a manual payment:

  • You desire more discretion over when and how you are charged. You can manually pay the entire account balance, a portion of it, or even more than your balance to meet additional expenses. It would help if you made a manual payment sufficient to cover your anticipated usage to avoid an automatic payment when paying for future costs.
  • You wish to spread out your money among various payment options. This may help postpone the charging of your preferred payment method. Remember that you can occasionally be charged twice if you make a manual payment just before an automated payment is due.
  • You wish to keep using your services even though your credit or debit card was denied. If your card is ever refused, you can still use your services while the declined payment issue is fixed by making a manual payment. If you pay by bank transfer or direct debit, your account will reopen as soon as the payment has been received (there is a possible delay of up to seven days while waiting to obtain confirmation of payment from the bank).

Your balance will be automatically withdrawn from your account if you have already resolved a problem with your payment method, such as by adding a new payment method to your account. You won't need to make a manual payment. However, if you pay twice, the extra sum counts as credit toward your usage for the next month.

Permissions required to make a manual payment

You require permissions on both your Cloud Billing account and the Google payments profile connected to your billing account to make a manual payment to an automatically paid, self-service Cloud Billing account:

  • You must be allocated to one of the following Cloud Billing IAM roles on your Cloud Billing account:
    • Billing Account Viewer 
    • Billing Account Administrator
  • You must be added as a user with at least the Edit payments profile level of permissions on your associated Google payments profile.

Make a manual payment.

To make a manual payment, follow these instructions:

  • Log in to the payment overview page for your Cloud Billing account in the Google Cloud dashboard.
  • Sign in to your account with Cloud Billing.
  • Select the Cloud Billing account you want to pay for at the popup manually. The chosen billing account's overview page for billing payments opens.
  • Click the Make a payment or Pay early buttons to access the payment form.
  • Choose the payment method you want to use to complete the transaction or enter a new one. Use any form of payment that is permitted in your country and currency. Check the payment options you have available.
  • Allow for Processing time: Depending on your payment option, it may take anywhere from 24 hours to a week or more for your payment to arrive at your account. It could take up to seven days for payments made via a bank account to post to your account. We advise you to manually pay with a credit card and settle the entire outstanding bill if you are encountering service restrictions and wish to resume using Google Cloud immediately.
  • Enter the payment amount you wish to make.
  • Make a payment by clicking.

Make a Payment to an Invoiced Cloud Billing Account 

This section outlines the procedures for paying your monthly billed Google Cloud account, as well as some advice on making sure your payment is handled as soon and accurately as possible.

Follow the steps in this article if you wish to make manual payments to accounts that automatically Pay manually or in advance.

Keep this in mind

  • Have your bill at the ready. You can find banking information at the bottom, along with a description of your possible payment choices. Find out more about receiving your bill.
  • Don't forget to mention the credit memo and invoice numbers when making payments. This may speed up the application of payments to your account.
  • Email the address listed at the bottom of your invoice with any queries you may have regarding invoice numbers or payment processing.

When to pay

When you sign up for monthly invoicing, you pay according to the terms and circumstances you accept. These conditions will specify how many days you have to pay your invoice.

How to pay

You have a few options for paying your invoice:

  • Wire transfer, ACH, or EFT
  • Payment by check or cheque: within the United States; outside the United States 
  • (India only) Apps with UPI (Unified Payment Interface) support

Pay using an ACH, EFT, or wire transfer.

You must set up electronic payments with your bank to make payments electronically using an Automated Clearing House (ACH), wire transfer, or other Electronic Fund Transfer (EFT).

In the additional information box of the electronic payment, enter the invoice numbers and credit memo numbers (if any), following the pattern indicated below (space before and after a slash, but no spaces within the invoice numbers).

Example: 3360000000 / 3360000001 / 3360000002 / 1000000009

If the electronic payment form cannot fit all of the invoice numbers, take the following action:

  • On the same day as the payment transfer, send the invoice and credit memo numbers (if applicable) to the email address listed on your Google invoice.
  • Please use the subject line "Remittance <your firm name> <total amount>" in the email.

Pay using a check/cheque within the United States.

Include all the invoice and credit memo numbers (if any) along with the check or cheque. Please include all invoice numbers and their corresponding amounts if you pay for more than one invoice.

Pay using a check/cheque outside of the United States

  • On the same day as the money transfer, send the invoice and credit memo numbers (if applicable) to the email address shown on your Google invoice.
  • Please use the subject line "Remittance <your firm name> <total amount>" in the email.

(India only) Pay using a Unified Payment Interface (UPI)-enabled app

When you download the PDF version of your invoice starting on July 1, 2021, it comes with a UPI QR code. Any UPI-capable app can be used to pay your invoice by scanning the QR code.

When to contact collections

If you have inquiries regarding any of the following subjects, do get in touch with collections:

  • ACH, EFT, or wire transfer payments to billed Cloud Billing accounts
  • certifying the receipt of a payment for an account that has been invoiced.
  • Reporting or handling payment-related complaints for a Cloud Billing account that has been billed.
  • Confirm the address to which collection notices should be sent.

Please send an email to collections@google.com to reach collections.

When to contact billing support

If you require assistance with any of the following subjects, kindly get in touch with Cloud Billing Support:

  • Finding a document.
  • Knowing the costs or transactions connected to a Google Cloud service or the Google Maps Platform API.
  • Your self-service Cloud Billing account from a self-service account to an invoiced account.

Frequently Asked Questions

What are the main characteristics of cloud computing?

To put it simply, cloud computing (CC) is the distribution of computing services, such as servers, storage, and databases. Internet-based networking, software, analytics, and intelligence. This broad term spans the various hardware and software technology fields.

Which five essential aspects of cloud computing?

On-demand self-service, broad network access, resource pooling, rapid elasticity, and measured service are the five fundamental components of this cloud paradigm.

How does cloud computing function?

Through data centers, cloud technology operates. Your information is kept on virtual servers rather than taking up space on your phone, computer, or tablet. These virtual servers are linked to sizable data centers with the facilities needed to store and safeguard your data.

Who makes use of the cloud?

A wide range of use cases, including data backup, disaster recovery, email, virtual desktops, software development, and testing, big data analytics, and customer-facing web apps, are being used by businesses of every size, type, and sector.

What are Google Cloud's characteristics and advantages?

It liberates you from taxing duties like infrastructure management, server provisioning, and network configuration. Innovators now have a clear path to travel down in order to innovate, while coders can only code anymore. The Google cloud platform is extremely safe, convenient, economical, accessible worldwide, and always being updated.

Conclusion

In this article, we have extensively discussed the Features of Cloud Billing. We have also explained how to verify the bank account, make manual payments, make a payment to an invoiced cloud billing account, and more in detail.

We hope this blog has helped you enhance your features of cloud billing knowledge. If you would like to learn more, check out our articles on introduction to cloud computingcloud computing technologiesall about GCP and AWS Vs. Azure Vs. Google Cloud. Practice makes a man perfect. To practice and improve yourself in the interview, you can check out Top 100 SQL problemsInterview experienceCoding interview questions, and the Ultimate guide path for interviews.

Do upvote our blog to help other ninjas grow. Happy Coding!

thank you image
Live masterclass