Do you think IIT Guwahati certified course can help you in your career?
Introduction
If we are making some food, an important part of it is the spices that we put in it. Wouldn't it get really easy if we could have an all-purpose spice which would have all the spices in it? We could put it into any food we want and use them in the same way. We could use it anywhere, and it would give the best taste too. A composite control in ATL somewhat works in a similar way. Let us take a look at it and find out.
ATL Composite Control Fundamentals
Let us get a brief idea about ATL Composite Control Fundamentals first. First, we should know that a composite control is a type of ActiveX control. It is something that can contain other ActiveX controls or Windows controls as well. We can take it is as similar to a dialog box.
We should know that once the composite control has been developed or built, we can put it at any place where we can host an ActiveX control.
The ATL Project Wizard and Add Class dialogue box automate the process of creating and implementing a composite control project. This is much like what the Application Wizard does for constructing an MFC application framework.
Steps to the Development Process
Similar to all systematic things, there are a few steps to the Development process. The simply goes in order of five. Let us take a look at them below.
Step 1: First, we have to make an ATL project.
Step 2: We will need to be adding or insert a composite control.
Step 3: We have to modify or make changes to the ATL project.
Step 4: Now, we have to increase and add more functionality to the composite control.
Step 5: Finally comes the step of creating and testing our ATL project.
However, as we are talking about inserting a composite control in ATL, we will see the steps to do that below.
Inserting a Composite Control
Now it is time to insert a Composite Control. These are the simple steps:
The "Add Class" dialog box lets us insert an ATL object into a project.
Now will access this dialog box. To do this, we will right-click the project name. There we will find the project name in the Solution Explorer.
In the "Solution Explorer", we will point to Add and then there, we will click on "Add Class". This will take us to the "Add Class" dialog box.
Once in the Add Class dialog box, we will select "ATL Control". The ATL Control Wizard get started now.
Now, it is time to create a composite control. We will have to select the Options tab and click on the Composite control check bot.
Once we do the above steps, a default HTML page will get created. It can be used for viewing the control.
ATL Control Wizard
As we talked about ATL Control Wizard in the above steps, we will read a bit more about it below. The ATL Control Wizard inserts an ATL control in an ATL project. The same is done for the MFC project that has ATL support.
We should know that we can insert one of these three types of controls using the ATL Control Wizard.
Standard control
Composite control
DHTML control
Along with that, we can also set minimal control. This will remove the interfaces from the Interfaces list that are offered as defaults for controls to open in most containers. In the Interfaces page of the wizard, we may specify the interfaces we wish the control to support.
Parts of the ATL Control Wizard
There are some elements that we need to fill up in the ATL control wizard. Let us find out more about them.
Names
The names for an element lets us find it out more easily.
We have to give the name of the objects, interfaces, and classes that will be added to our project. All other boxes, with the exception of Short name, can be updated freely. Changes to the text for the Short name get reflected and shown in the names of all other boxes on this. Changes to the Coclass name in the COM section get reflected in the Type box. However, we should know that the Interface name and ProgID remain unchanged. This naming strategy is planned to make all of the names clearly recognised as we gain our control.
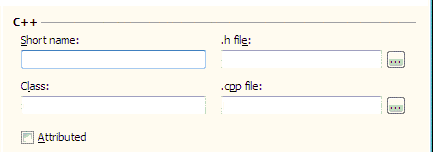
C++
Below we will see information for the C++ class that gets generated to implement the object.
Short name: This sets the object's shortened name. Unless we modify those fields individually, the name that we specify defines the class and Coclass names, the file names (.CPP and.H), the interface name, and the Type names.
Class: This Sets the name of the class that implements the object. The name is based on the name we supply in Short name, preceded by 'C,' the customary prefix for a class name.
.h file: It specifies the name of the header file for the class of the new object. This name is based on the name that we enter in Short name by default. For saving the file name to a specific location or for adding the class declaration to an existing file, click the ellipsis button. If we choose an existing file, the wizard will not save it to the location we choose until we click on Finish.
A file does not get overwritten by the wizard. Suppose the user enters or selects the name of an existing file. In that case, the wizard will allow them to indicate whether the class declaration should be attached to the file's contents when a user clicks on Finish. Click Yes to append the file. They also have the option to click on "No" to come back to the wizard and enter or give a different file name.
.cpp file: This is the name of the implementation file for the new object's class. This name is based on the name that we enter in Short name by default. Now to save the file name to the location of our choice, we have to click the ellipsis button. The file does not get saved to the specified location until we click on Finish in the wizard.
The wizard does not overwrite any files. When we click Finish after selecting the name of an existing file, the wizard prompts us to determine whether the class implementation should be attached to the file's contents. We have to click on Yes to append the file; we can click on No to return to the wizard. There we can specify and give another file name.
Attributed: Indicates whether or not the item makes use of attributes. This option is selected and cannot be changed when adding an item to an associated ATL project. That is, only attributed objects can be added to a project that has been made with attribute support.
An attributed object can only be added to an ATL project which employs attributes. If users choose this option for an ATL project that lacks attribute support, the wizard invites us to choose whether we wish to add attribute support to the project.
By default, all objects added after we enable this option are marked as attributed (This means if the check box is selected). o add an object that does not use attributes, we have to uncheck this box.
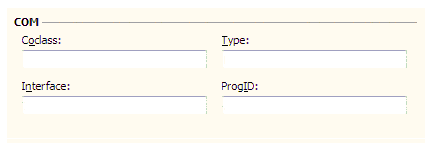
COM
This gives us the details or tells us about the COM functionality for the object.
Coclass: Defines or sets the name of the component class that holds a list of the interfaces that the object supports.
Interface: Defines or sets the name of the object's interface. An interface name is prefixed with "I" by default.
Type: Defines or sets the object description that will be displayed and will appear in the registry.
ProgID: This Sets the name that containers can use instead of the object's CLSID. This field does not get populated automatically. If we do not manually populate this field, other tools may not be able to access the control. For Example, ActiveX controls developed or generated without a ProgID are not available in the Insert ActiveX Control dialog box.
Frequently Asked Questions
How does ATL help in programming COM objects?
Microsoft's Active Template Library (ATL) is a collection of template-based C++ classes. It is designed to make programming Component Object Model (COM) objects easier. Microsoft Visual C++'s COM support enables developers to create a wide range of COM objects, ActiveX controls and OLE Automation servers.
What exactly is the dialog option?
The Options dialog box lets users to configure the integrated development environment (IDE) to their specific requirements. Users can, for example, choose a default save location for their projects. It also lets them change the appearance and behaviour of windows and create shortcuts for frequently used actions.
Can we use Visual Studio to write MFC or ATL programmes?
Yes, Users can use Visual Studio Community Edition or higher to write MFC or ATL programmes. The Active Template Library (ATL) is a wrapper library for COM programming that is widely used to create ActiveX controllers.
Conclusion
In the article, we read about Inserting a composite control in ATL. We found out about the steps and the elements relating to them. We also found out about ATL Control Wizard and its parts. Refer to our courses and explore Coding Ninjas Studio to find more exciting stuff. You can also look into the interview experiences and solve different problems. Look into our Guided paths, test series, libraries and resources to know more.


 9+ registered

