Do you think IIT Guwahati certified course can help you in your career?
Introduction
JMS providers in ReadyAPI are the messaging system that implements JMS interfaces and provides administrative and management capabilities. A JMS provider is part of a Java EE platform implementation. JMS clients are components developed in Java to produce and consume messages.
In this article, we will discuss the introduction to JMS, JMS Providers in readyAPI, types of JMS providers in readyAPI, ActiveMQ, and WebSphere MQ.
JMS
The Java Message Service (JMS) API is a communication standard that allows Java Platform Enterprise Edition (Java EE) application components to generate, transmit, receive, and read messages. It provides loosely connected, dependable, and asynchronous distributed communication.
Types of JMS Providers in ReadyAPI
There are two types of JMS Providers in ReadyAPI with a brief description of how to install and run it on your local computer.
ActiveMQ
WebSphereMQ
Before we move to the installation of the above two JMS Providers in readyAPI, we need to install the ReadyAPI on our computer. Now, let’s discuss one by one a brief installation procedure for both of them.
ActiveMQ
In this section we are providing you the brief information about the installation of ActiveMQ in the Windows Operating System.
To install the activeMQ for your computer, click on the respective link.
Now extract the zip file to the computer.
You will find a folder in which the files are stored. Depending on your system configuration we have chosen the win64 folder but you can use win32 also according to the requirements.
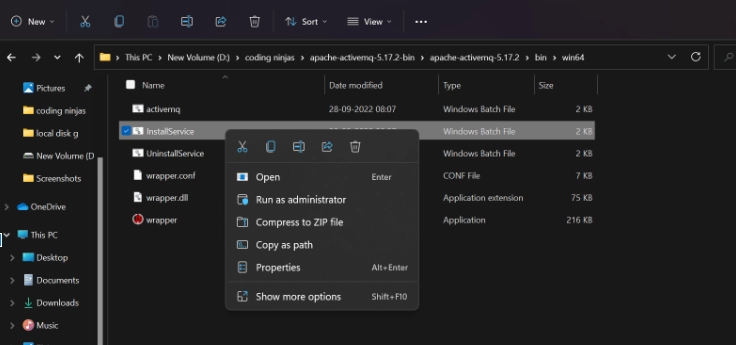
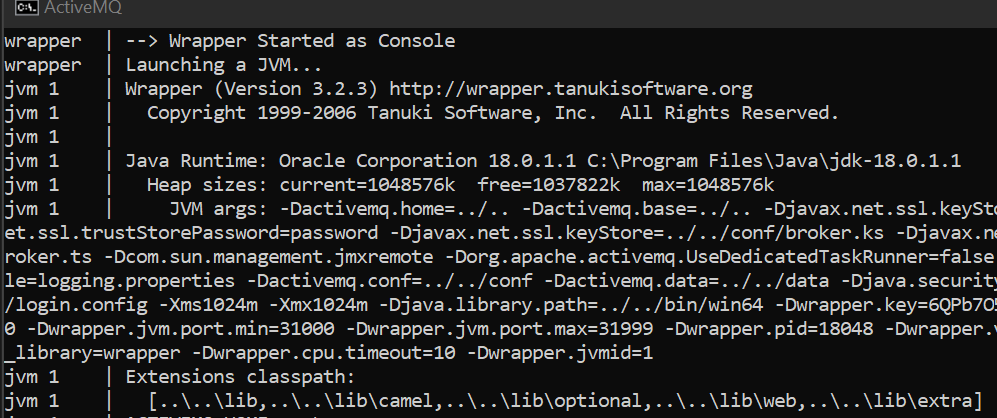
Now we will run the install service file as an administrator to run.
It will start executing then.
WebSphereMQ
Installation
Let’s first install the Websphere by clicking on the respective link.
When you complete the installation, open the WebSphere MQ file explorer. You will see a window as shown below. Now follow these steps so that you can configure the basic application.
After installation, we will try to understand the basic behavior of MQ for the message exchange.
We will assume that we have a requirement where the “java application is used for generating messages and those messages are consumed by X-based application”.
To complete the above requirements, we need to set up a Queue Manager.
So let’s start the Queue Manager
Queue Manager
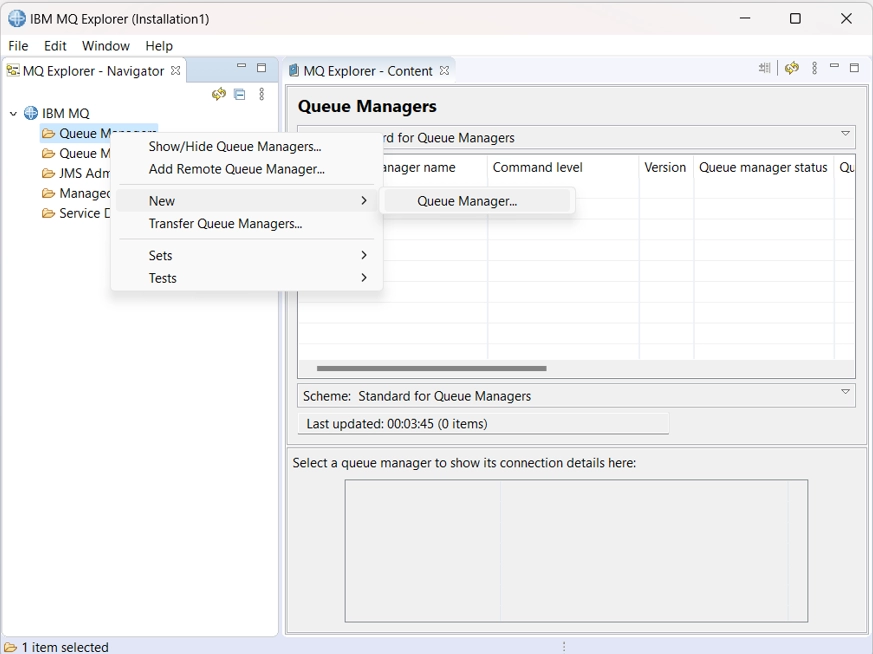
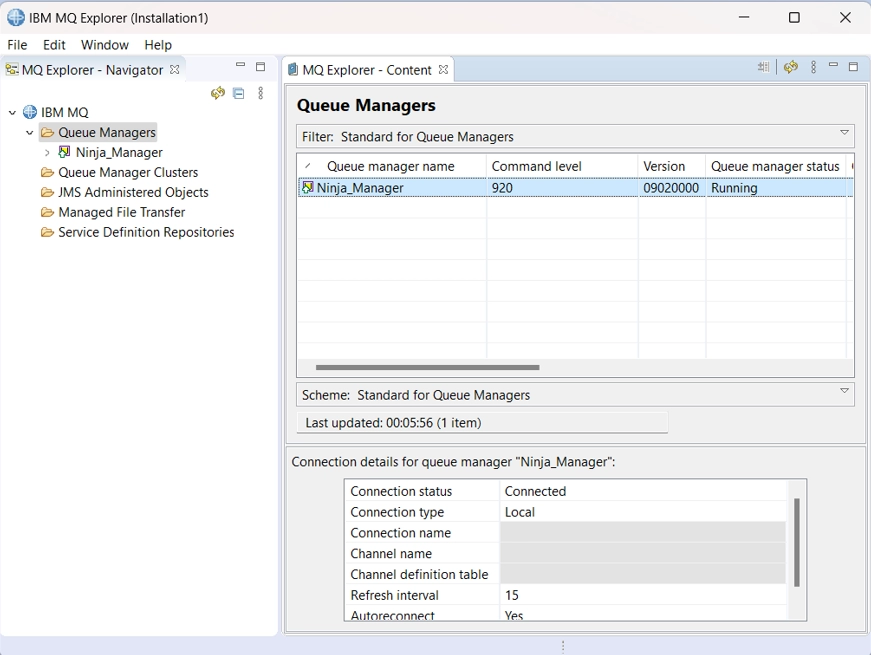
We need to first create a queue manager so that we can establish a queue. Queue managers manage the queue and handle application connections to queues that are listed in the manager. They guarantee that the commands are properly executed, events occur, and messages are added to the relevant queues. To make a queue manager, we need to follow these steps:
🔺Right-click on the Queue Managers in the navigator panel, then select New > Queue Manage.
🔺Suggest a name for a queue manager.
🔻Click on Next > Next > Next, then specify the port number in the Listen on port number field. We can leave a default port number and can move to the next step.
🔻Click on Finish so that the queue manager is created.
Disable Authentication
To make a simple connection process, we need to disable the authentication for a queue manager:
Note: Disable Authentication step is not compulsory, we can still connect to the WebSphereMQ easily.
🔺Right-click on a created queue manager, then select properties.
🔺Now click on the Communication tab, then disable the channel authentication records option in the subsequent dialog.
🔺Now close the dialog window.
🔺Keep in your mind that there should be no items in the QueueManagerName > Channels > Channel Authentication Records panel.
Queue
Queues in Websphere MQ are the message containers. When the application is connected to a queue manager, it retrieves messages from a queue or adds them to the queue. To create a queue, follow the steps:
🔺Right-click on the QueueManagerName in the navigator panel, then select New > Local Queue.
🔺Suggest a name for a queue.
🔻Click on Finish so that the queue is created with a default parameter, or you can click on Next to configure advanced queue properties.
Initial Context
An initial context provides a context for applications that connect to WebSphere MQ as well as a starting point for name resolution. It is required for an application to connect to a queue.
To add the initial context:
🔺Right-click on JMS Administered Objects, then select Add Initial Context.
🔺Select the File System option in a subsequent dialog.
🔺Specify a path to an empty folder in a Binding directory field.
🔺Click on Finish.
Create a ConnectionFactory
A connection factory is a Java object that is used by a client to establish a connection to a JMS provider. To make it in WebSphere MQ, follow these steps:
Right-click on Initial Context > Connection Factories then select New > Connection Factory.
Suggest a name for a connection factory in a subsequent dialog.
Select WebSphere MQ in a Messaging provider drop-down list.
Click on Next > Next.
Select MQ Client in a Transport drop-down list.
Create a destination for the queue
Destinations add the queues to an initial context so that an application can locate them when it connects to WebSphere MQ and obtains a context.
Right-click on Initial Context > Destinations then select New > Destination.
Suggest a destination name in a subsequent dialog.
Click on Next > Next.
Specify the name of a queue manager that you created earlier in a Queue manager field.
Specify the name of the queue you created earlier in a Queue field.
Close a dialog. If you find it necessary then create a destination for other queues that you created.
What are the advantages that organizations can gain from IBM Websphere MQ?
Bulk messages can be sent easily over-complicated networks by organizations and enterprises. There are no specific protocols that must be followed. Even if they are, the situation is manageable. Enterprises should ensure that information is delivered quickly to its destinations and also that tasks are completed as efficiently as possible.
What are your views on the Message Driven Process?
When there is a lot of traffic, a lot of messages arrive in the queue. When this happens, an automatic process related to the triggering starts. After the application finishes its task, it can be stopped with a simple command.
Is there any limit on a message length supported by an MQ in WebSphere?
Generally, the default length of the message is 4MB. However, it is not compulsory that all of the messages should be of the 4MB size. In some of the special cases, it can reach up to 100 MB. In case a message is of large size, the message will be divided into different parts then these parts are sent in the sequence order.
Conclusion
In this blog, you learned JMS providers in ReadyAPI. All the important topics related to JMS providers in ReadyAPI were covered in detail.
Also, do refer to other API testing-related articles:


 12+ registered