Introduction
Vue.js is a free, open-source JavaScript framework for creating user interfaces and single-page apps. Vue 3 is now in beta and may change later onwards. The latest version of the Vue front-end framework is Vue 3. It builds on Vue 2's popularity and simplicity of usage.
The most intriguing aspect of Vue is how simple it is to learn.
A non-prop attribute in vue is provided to a component but not defined equivalent prop. While using a 3rd-party custom-input component that requires a data-tooltip attribute on the input, we can add a non-prop attribute to the component instance.
<custom-input data-tooltip="Enter the input" />
This blog post will detail the non-prop attributes in Vue.js.
What are Non-Prop Attributes?
An attribute or an event listener provided to a component but does not have a corresponding property defined in props or emits is referred to as a non-prop attribute. The class, style, and id properties are typical examples of non-prop attributes in Vue.js. The $attrs property gives us access to those values.
The component inherits the non-prop attributes in vue.js. For example, if we pass a data attribute to a component:
<!DOCTYPE html>
<html lang="en">
<head>
<title>Application</title>
<script src="https://unpkg.com/vue@next"></script>
</head>
<body>
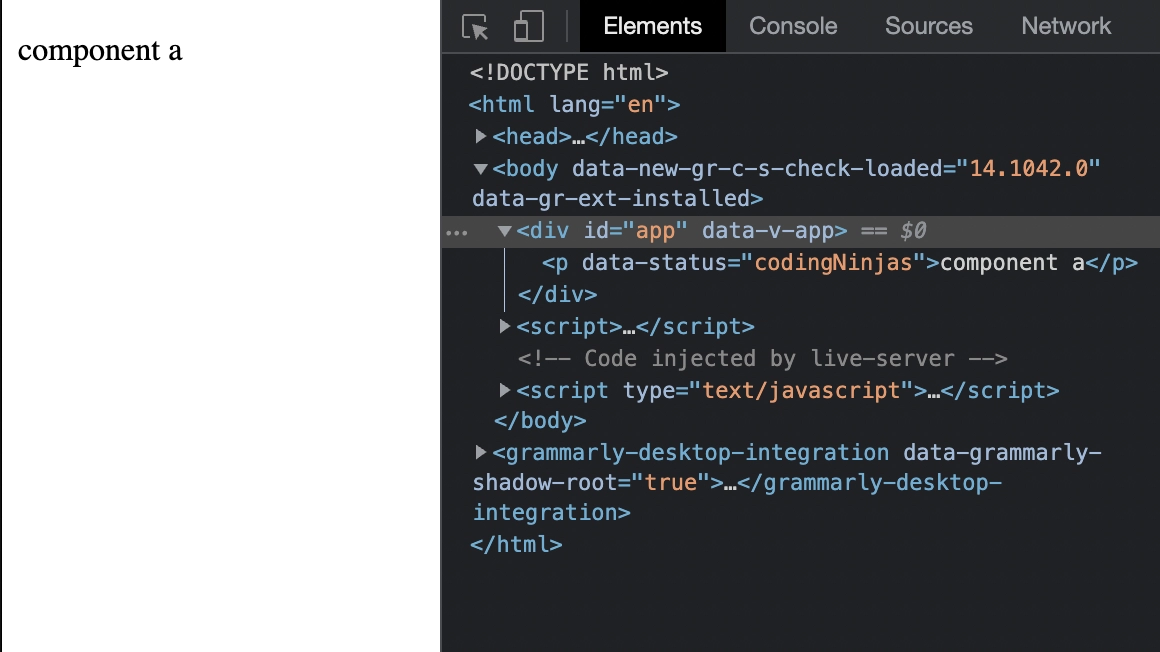
<div id="app">
<component-a data-status="codingNinjas"></component-a>
</div>
<script>
const app = Vue.createApp({});
app.component("component-a", {
template: `<p>component a</p>`
});
app.mount("#app");
</script>
</body>
</html>The rendered HTML would then be:
The component's ability to inherit characteristics automatically can be disabled.
We can accomplish this by setting the component's inheritAttrs attribute to false.
For instance, we could write:
<!DOCTYPE html>
<html lang="en">
 <head>
  <title>Application</title>
  <script src="https://unpkg.com/vue@next"></script>
 </head>
 <body>
  <div id="app">
    <component-a data-status="codingNinjas"></component-a>
  </div>
  <script>
    const app = Vue.createApp({});
    app.component("component-a", {
      inheritAttrs: false,
      template: `<p>component a</p>`
    });
    app.mount("#app");
  </script>
 </body>
</html>
The rendered HTML would then be:
The $attrs variable, however, allows us to access the attributes.
It contains all attributes not available in the props or emits properties of the component.
As a result, $attrs would have properties such as style, class, v-on listeners, etc.
Using v-bind='$attrs', we can add the attributes to a non-root component.
For instance, we could write:
<!DOCTYPE html>
<html lang="en">
 <head>
  <title>Application</title>
  <script src="https://unpkg.com/vue@next"></script>
 </head>
 <body>
  <div id="app">
    <component-a data-status="codingNinjas"></component-a>
  </div>const app = Vue.createApp({});
    app.component("component-a", {
      inheritAttrs: false,
      template: `
        <div>
          <p v-bind="$attrs">component a</p>
        </div>`
    });
    app.mount("#app");

  <script>
        </script>
 </body>
</html>
The rendered HTML would then be:
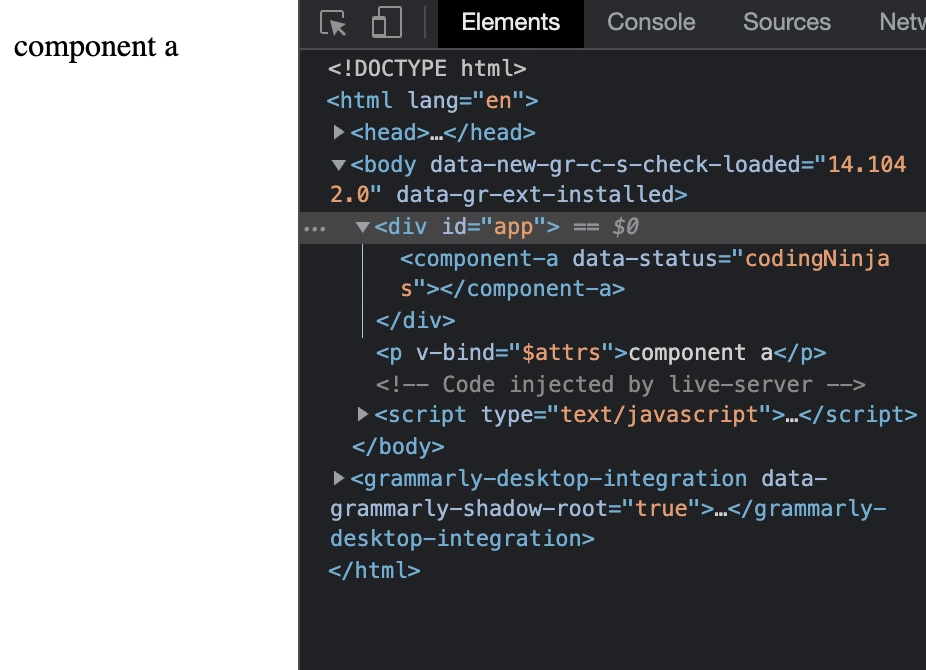
Since we disabled the automatic inheritance by setting inheritAttrs to false, the data-status attribute is on the p tag instead of the outer div.
We also used v-bind='$attrs' to add the parent's attributes to component-a's p element.


 32+ registered