destroy() Method In tkinter
When we make any GUI application using tkinter, we create a lot of widgets that have different functionalities. The destroy method is used to remove the widgets from the screen or, in other words, destroy the widgets. We can also destroy the entire tkinter application using the destroy() method.
Example:
from tkinter import *

#create close method that includes the root.destroy command
def close():
    root.destroy()

#to create the tkinter window
root = Tk()
root.geometry('200x100')


#create the button and pass the close method as the command.
# the close method contains the root.destroy
# we can directly pass the destroy command instead of creating a close method
button = Button(root, text='Close the window', command=close)
button.pack(pady=20)

root.mainloop()

You can also try this code with Online Python Compiler
Output:
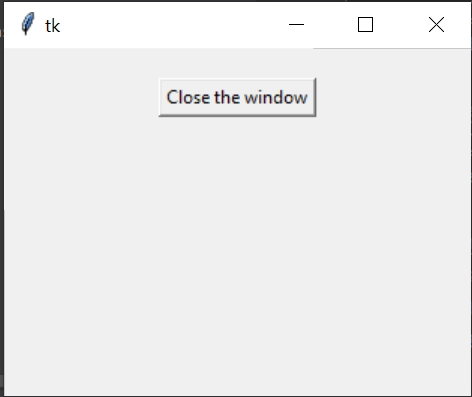
On clicking the button, the entire "tk" window vanishes.
Example 2:
from tkinter import *
from tkinter.ttk import *
#tkinter window
root = Tk()
#This button can close the window
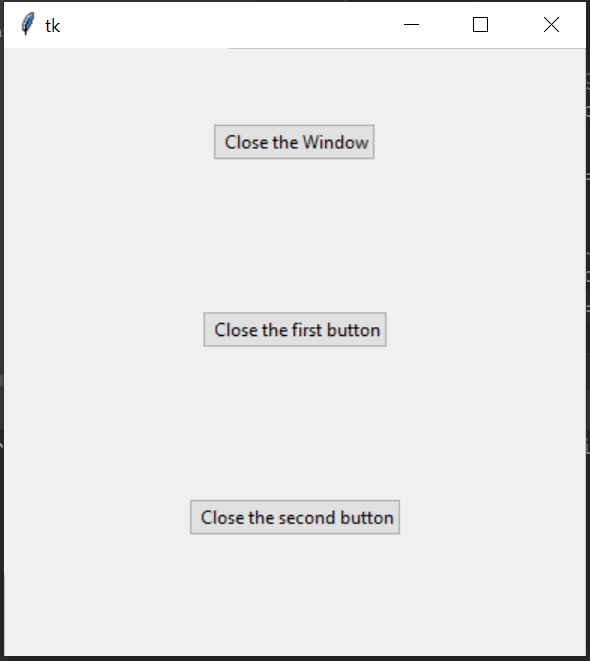
button_1 = Button(root, text =" Close the Window", command = root.destroy)
button_1.pack(pady = 50)
#This button closes the first button
button_2 = Button(root, text =" Close the first button", command = button_1.destroy)
button_2.pack(pady = 50)
#This button closes the second button
button_3 = Button(root, text =" Close the second button", command = button_2.destroy)
button_3.pack(pady = 50)
mainloop()
You can also try this code with Online Python Compiler
Output:
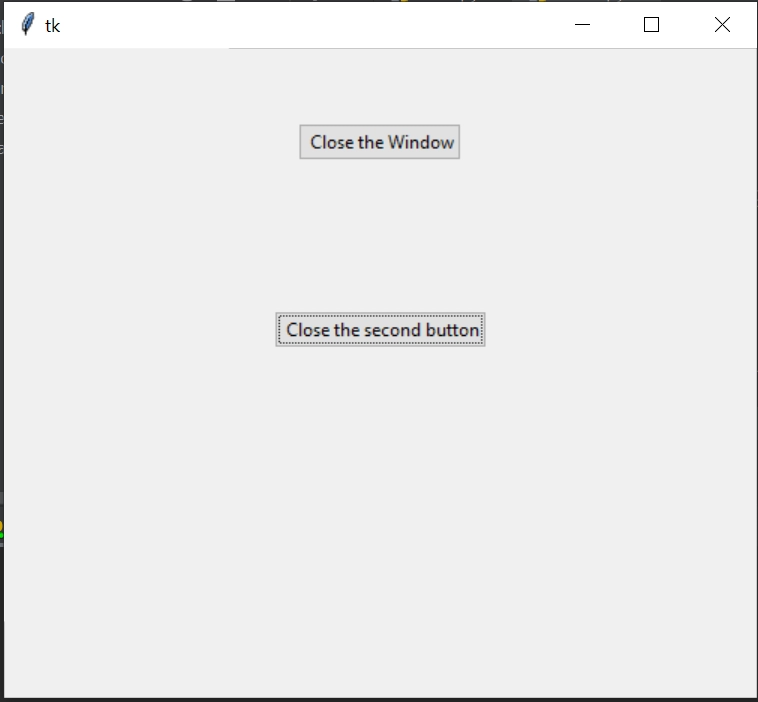
When the third button is clicked, the output is:
Explanation:
When the third button (it says "close the second button") is clicked, it destroys the second button. Now the erstwhile third button takes the position of the second button. Similarly, if we click the first button, it will destroy the tkinter window itself.
You can compile it with online python compiler.
after() Method In tkinter
The after() method is used to call a function after some delay.
Syntax:
after(delay,callback=None)
Example:
from tkinter import *
from time import time
#create tkinter window
ws = Tk()
button1 = Button(ws, text = 'Click Here to demonstrate after()')
button1.pack(side = TOP, pady = 10)
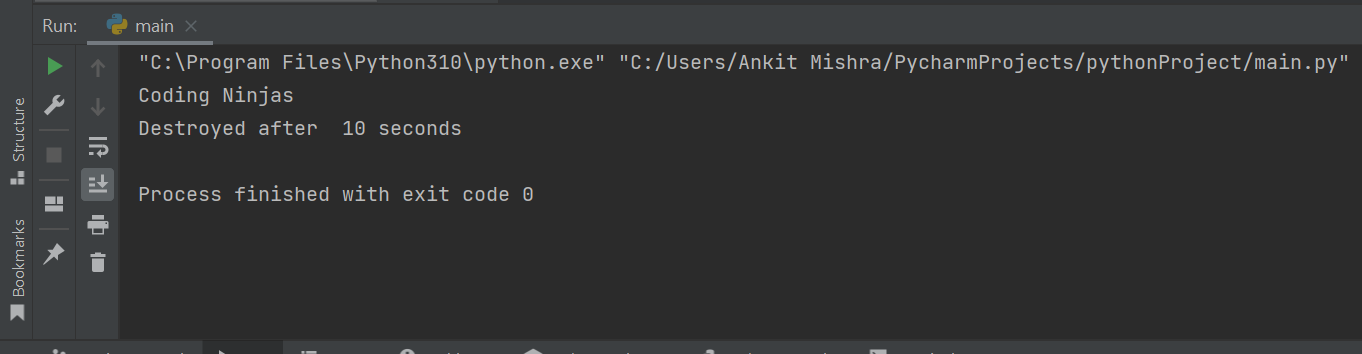
print('Coding Ninjas')
#startTime to track the time when after() is called.
startTime = time()
#after() method is called.
# after 10 seconds ws.destroy() will be triggered, destroying the tkinter window
ws.after(10000, ws.destroy)
ws.mainloop()
#endTime to keep track of the end time
endTime = time()
print('Destroyed after % d seconds' % (endTime-startTime))
You can also try this code with Online Python Compiler
Output:
Cryptography Using tkinter
Making a Cryptography GUI application using tkinter in Python becomes relatively easy because of the built-in modules provided in the Python programming language.
Working
The working of the cryptography GUI application can be divided into two parts.
Encryption
- This step involves encrypting the message in order to get the ciphertext. At first, each letter in the text (message) is mapped with its corresponding numerical value. For example, A is mapped with 0, B with 1, and so on.
- Key: A key is generated by the onetimepad, which is an inbuilt python module. The key is shared with both the person who is sending and receiving the message.
- The characters of the key are combined with the characters of the message such that we get the sum of the numeric values of corresponding characters. The sum must be modulo 26.
Example:
message= CODER
key= NINJA
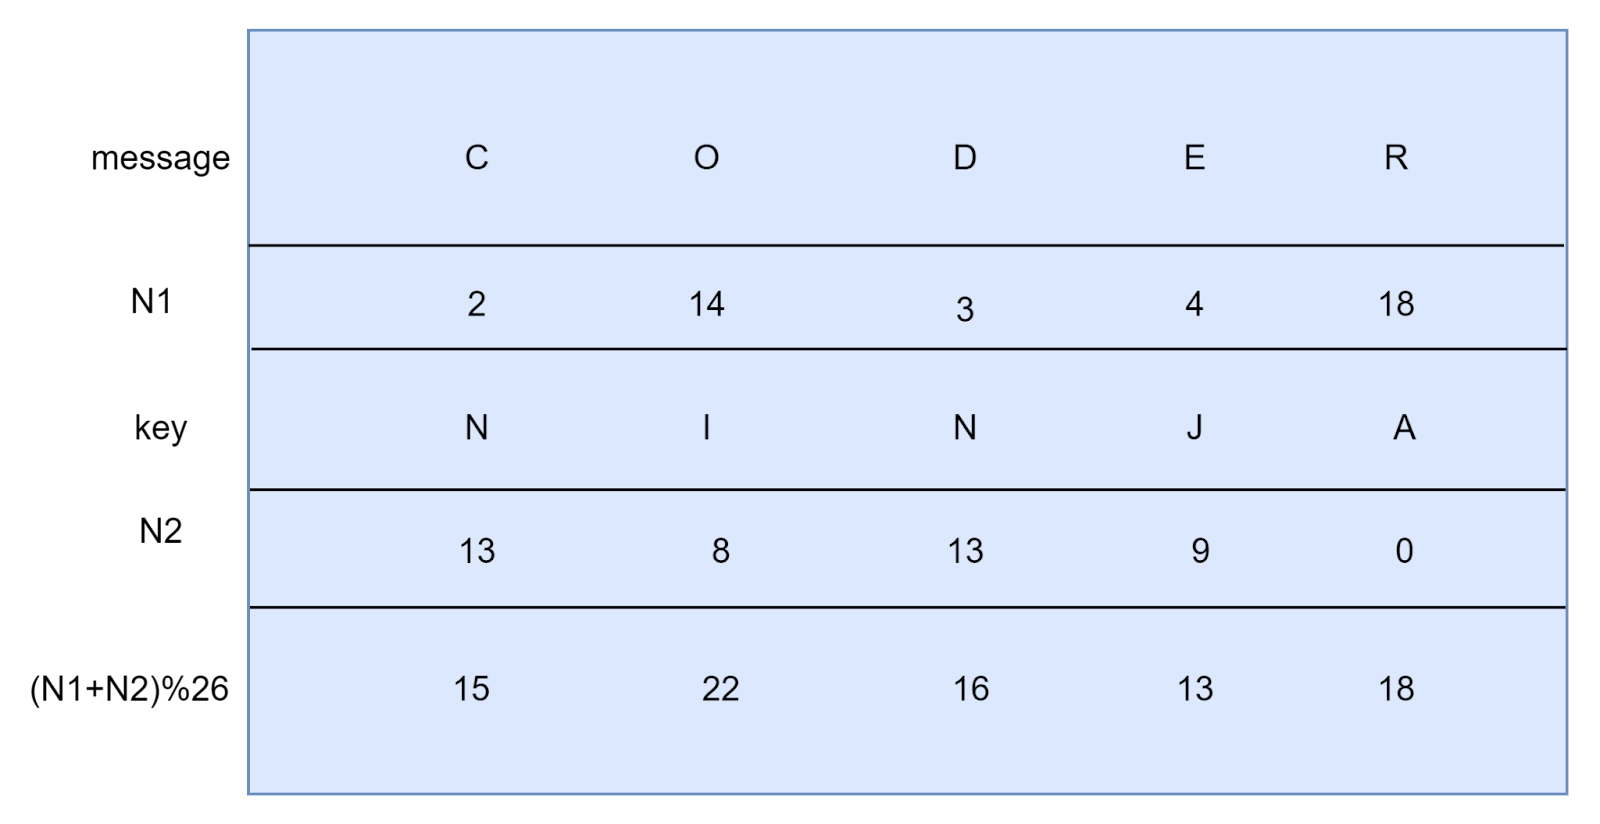
The ciphertext will be the combination of the letters which have the corresponding (N1+N2)%26 values.
Ciphertext= PWQNS
Decryption
- The numeric value of the characters in the key is subtracted from the numeric value of the corresponding characters in the ciphertext.
- If the value after subtraction turns out to be negative, we add 26 to that value.
- For each character, we have a (ciphertext-key) value such that it is positive.
- We decrypt the ciphertext by simply evaluating the characters that map to the value of ciphertext-key.
The below diagram will make things crystal clear.

Code
# python module for onetimepad
import onetimepad
# python module to create GUI
from tkinter import *


root = Tk()
root.title("Cryptography GUI application")
root.geometry("900x700")


def encryptMessage():
    message = e1.get()


    # inbuilt function to encrypt a message
    ciphertext = onetimepad.encrypt(message, 'random')
    e2.insert(0, ciphertext)


def decryptMessage():
    ciphertext = e3.get()


    # inbuilt function to decrypt a message
    decryptedMessage = onetimepad.decrypt(ciphertext, 'random')
    e4.insert(0, decryptedMessage)


# creating labels and positioning them on the grid
label1 = Label(root, text='Enter your message')
label1.grid(row=10, column=1)
label2 = Label(root, text='Encrypted message')
label2.grid(row=11, column=1)
l3 = Label(root, text="Ciphertext")
l3.grid(row=10, column=10)
l4 = Label(root, text="Decrypted message")
l4.grid(row=11, column=10)


# creating entries and positioning them on the grid
e1 = Entry(root)
e1.grid(row=10, column=2)
e2 = Entry(root)
e2.grid(row=11, column=2)
e3 = Entry(root)
e3.grid(row=10, column=11)
e4 = Entry(root)
e4.grid(row=11, column=11)


# encryption button to produce the output
encryptionButton = Button(root, text="Encrypt my message", bg="black", fg="white", command=encryptMessage)
encryptionButton.grid(row=13, column=2)


# decryption button to produce the output
decryptionButton = Button(root, text="Decrypt the ciphertext", bg="black", fg="white", command=decryptMessage)
decryptionButton.grid(row=13, column=11)


root.mainloop()
You can also try this code with Online Python Compiler
Output:
Encryption

Decryption

FAQs
-
What is tkinter?
Tkinter is a built-in Python module used to create graphical user interface (GUI) applications.
-
What is the destroy() method in tkinter?
The destroy method is used to remove the widgets from the screen or, in other words, destroy the widgets. It can be used to destroy the entire tkinter window also.
-
What is the after() method in tkinter?
The after() method is used to call a function after some delay.
-
Which Python modules must be imported while making cryptography GUI?
The tkinter module and the onetimepad module.
Key Takeaways
- In this article, we learned about tkinter advanced.
- One of the popular advanced methods in tkinter is destroy() which is used to destroy the widgets.
- We also learned about the application of tkinter by creating a cryptography GUI application that uses the tkinter and onetimepad modules of Python.
Never stop learning. Explore more here!
Happy learning!


 16+ registered

