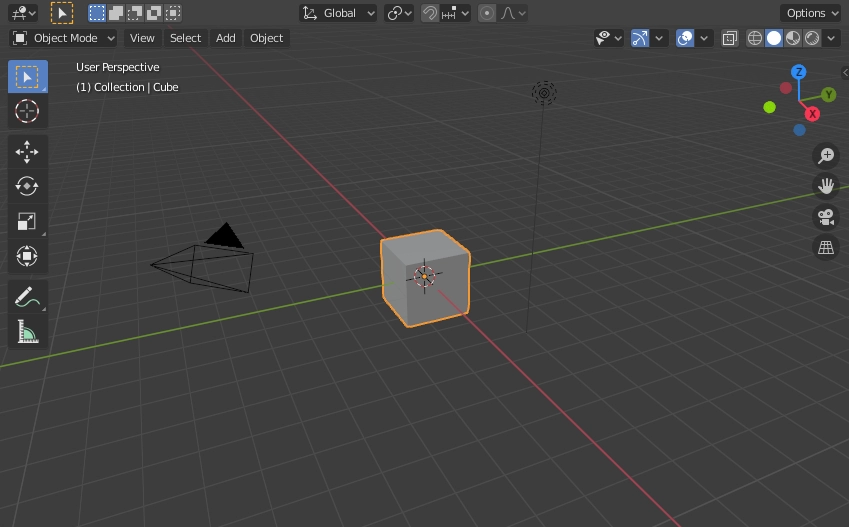
Startup Scene
Startup Scene is only displayed when no other blend file is loaded. A customized startup can be saved in the memory as a part of the startup file.
Source
Some of the elements in the startup scene are:
Elements
It contains the elements which help in changing the object. It can be done by cube, light, and camera.
Cube
A mesh object is a grey cube placed in the center of the viewport, we have selected the cube, so it is covered with an orange line.
Object Origin
It is an orange dot displayed as the object's origin and marks the cube's relative.
Light
The cube is illuminated by the light source from the circle with a thin line to the bottom.
Camera
The point of view of the rendering is the pyramid with a big triangle pointing upwards.
Text info
We can set the visibility and settings of the overlays in the viewport overlays.
View name
If the name is not aligned, it is named as the" user" plus the perspective of the viewport camera.
Object info
It is the information shown in the bracket of the current frame.
Object modes
Mode is an object-oriented feature, which means that available modes variation depends upon the type of selected active object - most of which allows the default Object Mode (such as cameras, lights, etc.). Each mode is designed to edit a feature of the selected Item.
Number of Ways which can affect object in Blender:
They can change the panels and/or controls found in other Properties tabs.
They can change the behavior of the whole editor, e.g., UV Editor and 3D Viewport.
They can modify available main tools (menus and/or menu entries and other controls). For example, In the 3D viewing hole, the Item in the Object menu switches to the Mesh menu in editing mode (with an active match!), And the paint menu in Vertex Paint Mode
They can change the shortcuts available.
Multi-object editing
Multi-object editing is easy if you want to do the same editing on multiple objects or animate various characters at once. To use multiple items at once, select multiple entities and enter the mode for editing. Outlines can also be used to add/remove items while in mode, by setting or deleting mode in the context menu, or by Ctrl-LMB by clicking on the object's data icon. The only active element will be used to display structures such as shape keys, UV layers, etc. Selecting any component of an item will set this up as valid. There are limits to the types of operations that can work on many objects.
Navigation
It is done with the help of both mouse movements and keyboard shortcuts to navigate the object about the actions.
Navigation Gizmo
It can be found in the top right corner of the editor.
Orbit
It is used to rotate the view around the point of interest. You have to use Numpad8 and Numpad2 to turn the scene to change the viewing angle.
Roll
It is used to rotate the viewport camera around its Z-axis.
Pan
It moves the view up, down, left, and right.
Zoom In/Out
It moves the camera forward and backward.
Dolly Zoom
In most cases, it is enough to zoom in to see something. However, you can see that you cannot zoom in at some point because Blender retains the viewing area used to rotate and zoom. It works well in most cases, but sometimes you want to move the viewing area to a different location. Dolly supports this, which allows you to move views from one place to another.
3D Cursor
It is a point in 3D space used for many different purposes, like formatting the size of the object and increasing the length of the object.
Placement
There are a few methods by which you can position the 3D Cursor.
source
Direct Placement with the Mouse
We can use the mouse pointer directly by LMB in the 3D Viewport. The 3D Cursor can be used as the origin for any added object, can be used and moved with the help of the snap tool, and is an option for the pivot point.
Selecting
3D Viewport uses some general select tools, which are described below
Centre point
It selects the object by its center point instead of its contents.
Menu
A menu of objects under the Cursor can be used if the objects overlap in the view.
Edit mode
It is a mode available for all rendered objects as it is dedicated to the shape of the object in the viewport.
Curve Edit Mode
This mode is used to curve the objects/lines in the viewport for getting the required curve.
Mesh Edit Mode
This mode allows you to edit the object directly from the model.
Surface Edit Mode
A surface can be edited by transforming the control points' location.
Text Edit Mode
A text can be edited with the help of this edit mode.
Lattice Edit Mode
It deforms the shape of the object to the original lattice.
Pose Mode
This mode is purely dedicated to the process of posing, i.e., motion to the object.
Particle Edit Mode
In this mode, we can edit the particle path and the keyframes.
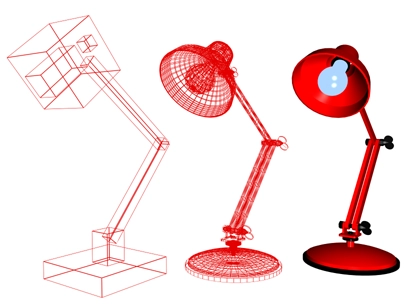
Viewport Rendering
It allows us to inspect the animations like object movements. It uses the 3D Viewport for quick preview renders.
source
Frequently Asked Questions
What is rendering?
It is the process by which a 3D scene can be turned into a 2D image. It is used because when we have to create a final image or animation, the computer wants knowledge about the scene shown in the image or animation.
Why are different modes used in Blender?
Modes can affect different things in Blender. They can modify the panels or controls available in some properties tabs. They can modify the available header tools also.
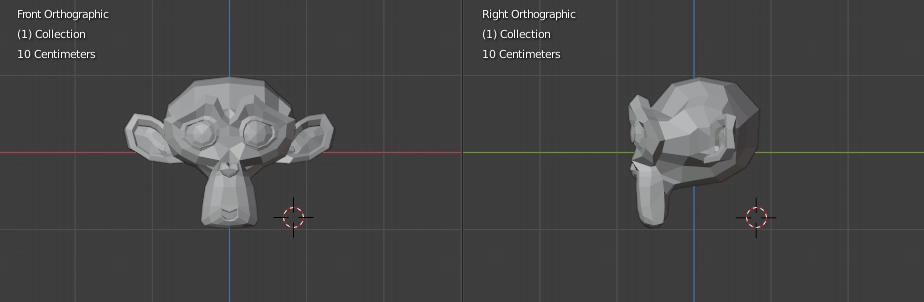
What is a viewport?
It is the main view that users can see when they start Blender. It's not an object, but it is like a window that allows you to look around at the scene that contains your model.
Conclusion
In this article, we discussed the introduction to the 3D Viewport in Blender, its modes, navigations, and rendering, which help change the object's position and look.
We hope that this blog has helped you enhance your knowledge regarding the topic of running 3D Viewport in Blender, and if you would like to learn more, check out our article here.
For peeps out there who want to learn more about Data Structures, Algorithms, Power programming, JavaScript, or any other upskilling, please refer to guided paths on Coding Ninjas Studio. Enroll in our courses, go for mock tests and solve problems available and interview puzzles. Also, you can put your attention towards interview stuff- interview experiences and an interview bundle for placement preparations. Do upvote our blog to help other ninjas grow.
Thank you for reading.
Until then, Keep Learning and Keep improving.


 9+ registered

