


Introduction
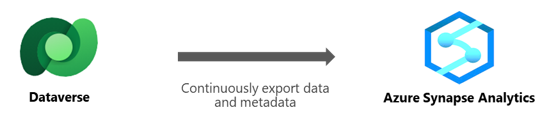
In this blog, we will discuss Synapse Link in Azure in detail. Azure Synapse Link was formerly known as Export to the data lake. With Azure Synapse Link for Dataverse, you can analyze your Microsoft Dataverse data in real-time. You can execute analytics, business intelligence, and machine learning scenarios on your data with Azure Synapse Link by having an interface between Dataverse and Azure Synapse Analytics.
Using Azure Synapse Link, you can export data from:
- Dataverse to Azure Synapse Analytics.
- Dataverse to Azure Data Lake Storage Gen2.
It provides scalable, high availability, and disaster recovery features for big enterprise analytics. The Common Data Model format for data storage provides semantic consistency across apps and deployments.
Source: Azure
The Azure Synapse Link provides these features for Dataverse:
- Connecting the environment's connection to Azure Synapse Analytics in Azure Subscription.
- Tables in your Azure Subscription are replicated continuously to Azure Synapse Analytics and/or Azure Data Lake Storage Gen2.
- Replicating creating, updating, and deleting (CUD) operations and replicating standard and customized tables.
- Fewer clicks are required with Azure Synapse Analytics to analyze, transform, and display your data.
- Azure Synapse Analytics's serverless big data processing, data integration, and lake exploration.
- Between data producers and consumers, including Apache Spark, Power BI, Azure Data Factory, Azure Databricks, and Azure Machine Learning, has been made easier.
For writes, table data, and metadata, the Azure Synapse Link for Dataverse service offers both initial and incremental writes. Depending on the setup, any data or metadata updates in Dataverse are sent to the Azure Synapse metastore and Azure Data Lake. Instead of a pull operation, this one is push-based. Without your intervention, changes are transmitted to the target. Exported from Dataverse to the data lake are all create, update, and delete activities. For instance, the transaction is replicated at the target location when a user deletes a row from the Account table in Dataverse.
Analyzing the Dataverse data in Azure Synapse Analytics
Data integration, enterprise data warehousing, and big data analytics are combined into one unrestricted analytics solution called Azure Synapse Analytics. It allows you to freely and at scale query data utilizing serverless or dedicated resources. Additionally, it enables you to construct analytics-based applications on top of the Apache Spark engine. You can ingest, analyze, prepare, manage, and deliver data with Azure Synapse from a single service for your urgent business intelligence and machine learning needs.
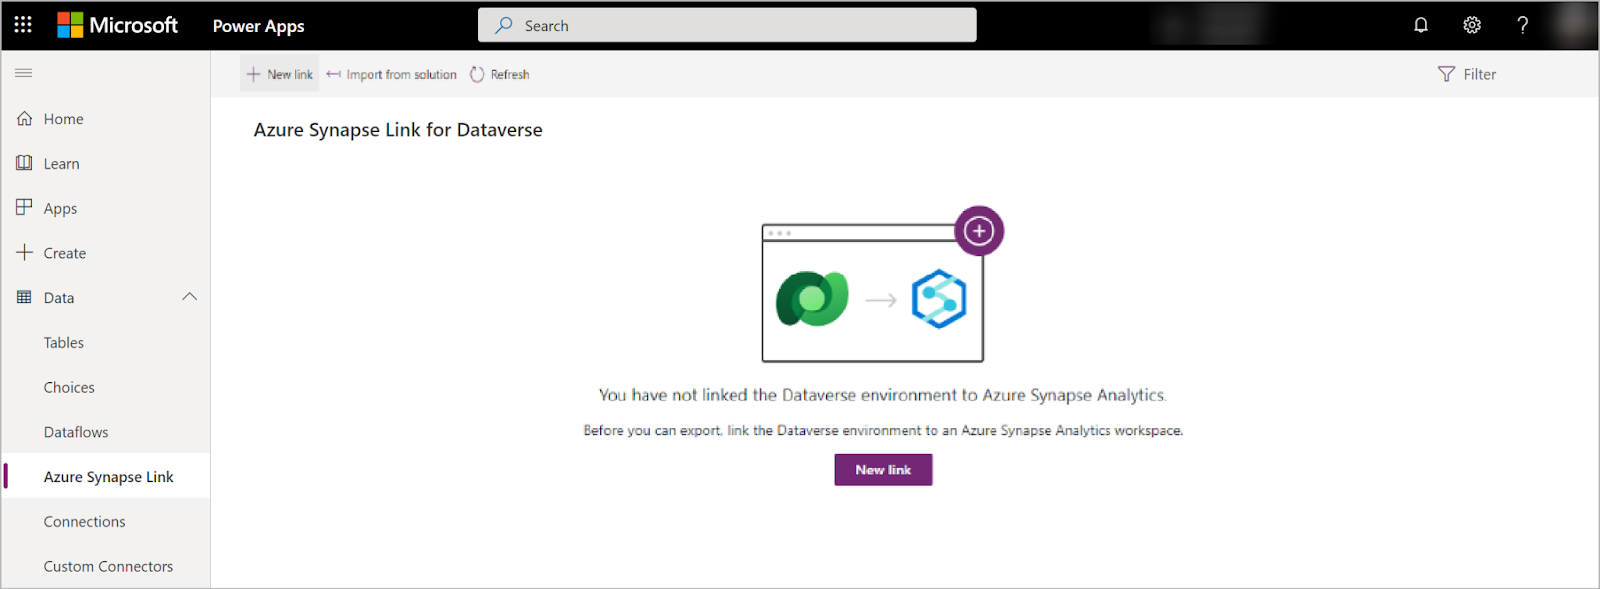
Creation of Azure Synapse Link for Dataverse with Azure Data Lake
To allow multiple analytics scenarios, you can connect your Microsoft Dataverse data to Azure Data Lake Storage Gen2 via the Azure Synapse Link. You can learn how to carry out the following actions below:
- Utilize the Azure Synapse Link service to connect your Dataverse data to your Azure Data Lake Storage Gen2 account.
- Control the Dataverse tables that are a part of the Azure Synapse Link.
- Take a look at your Azure Synapse Link.
- Unlink your Azure Synapse Link.
- Link your Azure Synapse once more.
- View your data in Azure Data Lake and understand the file architecture.
Source: Creation
Connect Dataverse to Azure Data Lake Storage Gen2
- Login with Power Apps and choose your preferred configuration.
- Choose Data from the left navigation pane, then choose Azure Synapse Link. On the command bar, select + New link to the data lake.
- Choose the Storage account, Resource group, and Subscription. Verify that the storage account satisfies the requirements listed in the Prerequisites section. Select Next.
- After adding the tables, you wish to export and choose Save. It is only possible to export tables that have change tracking enabled.
- These procedures above can integrate various Azure data lakes in your Azure Subscription from a single environment. You can also make links from several environments within the same tenant to the same Azure Data Lake.
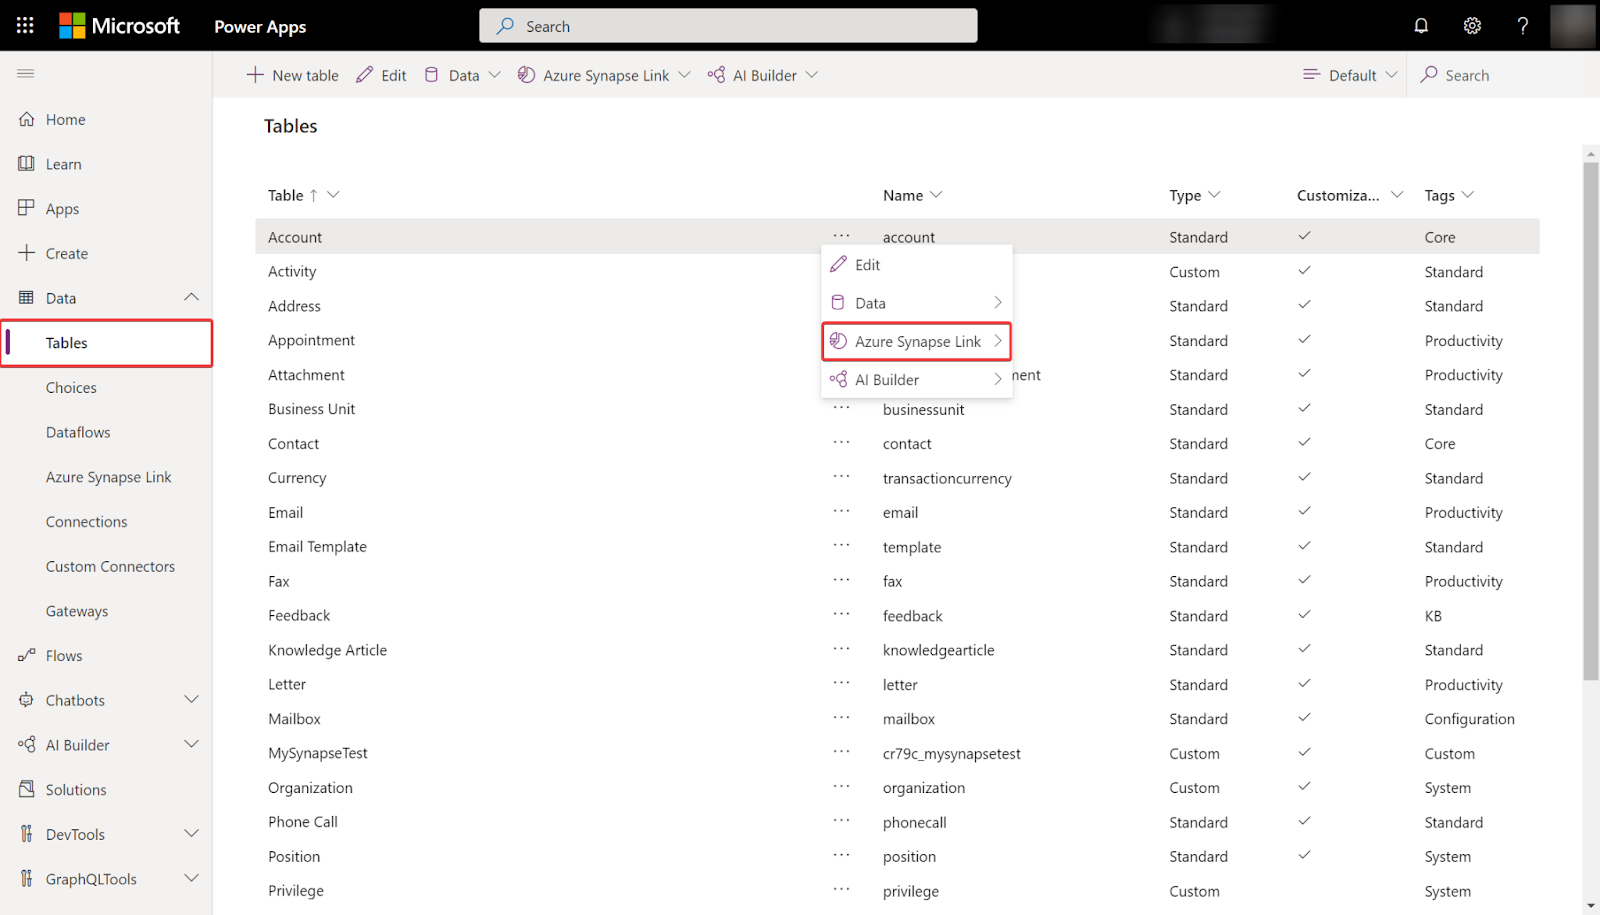
Manage table data to the data lake
You have two options for managing the exported tables once the Azure Synapse Link has been configured:
- Choose to Manage tables from the command bar in the Azure Synapse Link section to add or remove one or more linked tables.
- Choose... next to a table on the Power Apps maker site, and then choose the associated data lake from which to export table data.
Source: TableData
Monitor your Azure Synapse Link
The Azure Synapse Link may be monitored in the Tables tab once it has been configured.
- A list of the tables that join the selected Azure Synapse Link.
- The sync status will go through several phases. The table is awaiting sync while the status is not started. After the first table sync is finished, there will be a post-processing phase during which incremental changes won't be made. Depending on the extent of your data, this might take many hours. The latest sync date will be routinely updated when the incremental updates occur.
- The count column displays how many rows have been written. The total number of records is when the Append Only setting is set to No. It represents all modifications made when Append Only is set to Yes.
- The columns for "Append only" and "Partition strategy" illustrate how various advanced setups are used.
Unlinking an Azure Synapse Link
- To delink, choose the preferred Azure Synapse Link.
- From the command bar, choose Unlink data lake.
- Select delete data lake file system to remove the data lake file system.
- Choose Yes, then wait a few minutes while everything is disconnected and removed.
Relinking an Azure Synapse Link
If the file system was removed during the unlinking process, repeat those procedures to relink the same data lake. You must clear the data to relink when you do not erase the file system when you are unlinking it:
- Visit Azure Data Lake now.
- Dispose of the Dataverse container.
- Restore the data lake's connectivity by going to Power Apps.
Watching your data in Azure Data Lake Storage Gen2
- Choose Go to Azure data lake from the top panel after selecting the relevant Azure Synapse Link.
- Select dataverse-environmentName-organizationUniqueName after expanding File Systems.

Source: Watch
A list of the tables exported to the data lake is provided in the model.json file with information about their name and version. The initial sync status and sync completion time are also included in the model.json file. Each table exported to the data lake has a subdirectory that contains snapshot comma-delimited (CSV format) files.


 9+ registered

