Do you think IIT Guwahati certified course can help you in your career?
Introduction
Chef is an open-source cloud configuration management and deployment application. It is meant to help anyone orchestrate servers in a cloud or just in a departmental data center. Chef-shell is a recipe debugging tool that uses breakpoints within recipes. A recipe is a file that contains a set of instructions (resources) to be executed. Chef-shell runs as an Interactive Ruby (IRb) session. It supports recipe and attributes file syntax and interactive debugging features.
The chef-shell executable is run as a CLI or command-line tool.
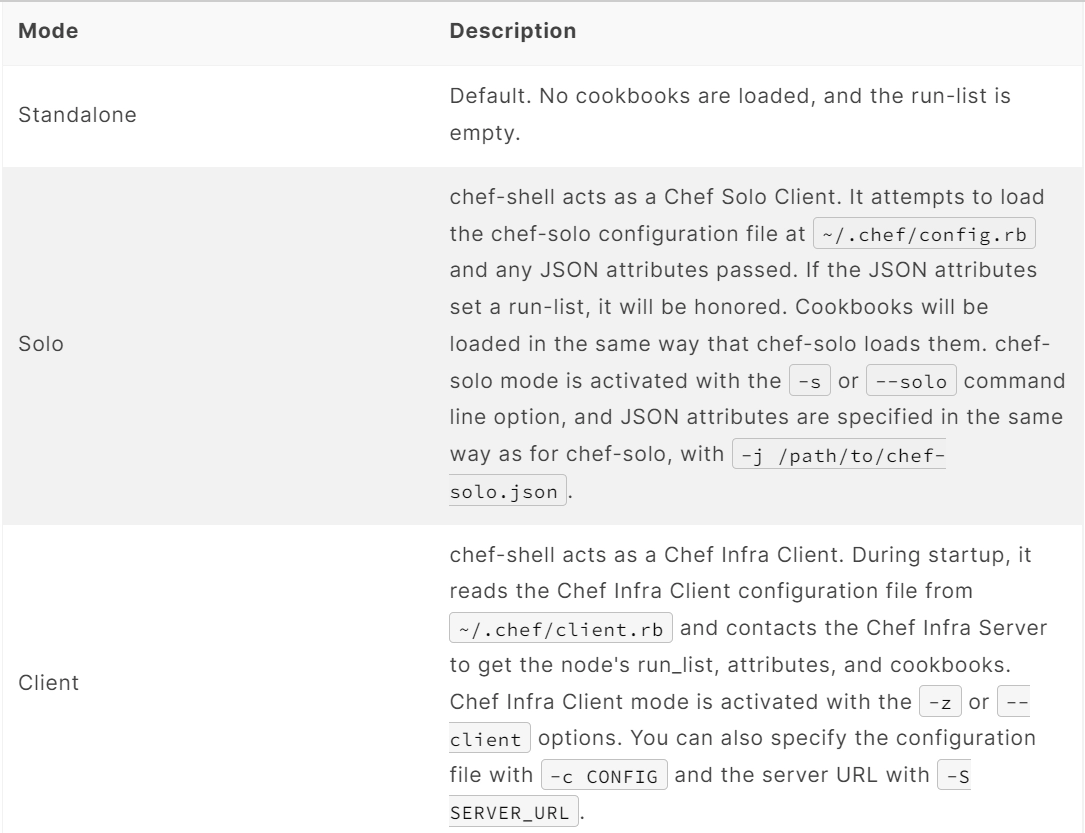
Modes
Chef-shell is a tool that is run with the help of an Interactive Ruby (IRb) session. Chef-shell currently supports recipe and attribute file syntax and interactive debugging features. Chef-shell has three run modes:
Options
This command has the following syntax:
chef-shell OPTION VALUE OPTION VALUE ...
This command has the following options:
-a, --standalone
Run chef-shell in standalone mode.
-c CONFIG, --config CONFIG
The configuration file to use.
-h, --help
Show help for the command.
-j PATH, --json-attributes PATH
The path to a file that contains JSON data. Use this option to define a run_list object. For example, a JSON file similar to:
may be used by running chef-shell -j path/to/file.json.
In certain situations, this option may be used to update normal attributes.
Configure
chef-shell determines which configuration file to load based on the following:
If a configuration file is specified using the -c option, chef-shell will use the specified configuration file
If a NAMED_CONF is given, chef-shell will load ~/.chef/NAMED_CONF/chef_shell.rb
If no NAMED_CONF is given chef-shell will load ~/.chef/chef_shell.rb if it exists
If no chef_shell.rb can be found, chef-shell falls back to load:
/etc/chef/client.rb if -z option is given.
/etc/chef/solo.rb if –solo-legacy-mode option is given.
.chef/config.rb if -s option is given.
.chef/knife.rb if -s option is given.
Debugging Cookbooks
Chef-shell enables the current position in a run list to change during a Chef Infra Client run. We can add breakpoints to a recipe to take benefit of this functionality.
Step Through Run-list
To explore how to use the breakpoint to manually step through a Chef Infra Client run, create a simple recipe in chef-shell:
chef > recipe_mode
 chef:recipe > echo off
 chef:recipe > file "/tmp/before-breakpoint"
 chef:recipe > breakpoint "foo"
 chef:recipe > file "/tmp/after-breakpoint"
and then run Chef Infra Client:
chef:recipe > run_chef

 [Fri, 15 Jan 2020 14:17:49 -0800] DEBUG: Processing file[/tmp/before-breakpoint]
 [Fri, 15 Jan 2020 14:17:49 -0800] DEBUG: file[/tmp/before-breakpoint] using Chef::Provider::File
 [Fri, 15 Jan 2020 14:17:49 -0800] INFO: Creating file[/tmp/before-breakpoint] at /tmp/before-breakpoint
 [Fri, 15 Jan 2020 14:17:49 -0800] DEBUG: Processing [./bin/../lib/chef/mixin/recipe_definition_dsl_core.rb:56:in 'new']
 [Fri, 15 Jan 2020 14:17:49 -0800] DEBUG: [./bin/../lib/chef/mixin/recipe_definition_dsl_core.rb:56:in 'new'] using Chef::Provider::Breakpoint
Chef Infra Client ran the first resource before the breakpoint (file[/tmp/before-breakpoint]), but then stopped after execution. Chef Infra Client attempted to name the breakpoint after its position in the source file, but Chef Infra Client was confused because the resource was entered interactively. From here, chef-shell can resume the interrupted Chef Infra Client run:
chef:recipe > chef_run.resume
 [Fri, 15 Jan 2020 14:27:08 -0800] INFO: Creating file[/tmp/after-breakpoint] at /tmp/after-breakpoint
A quick view of the /tmp directory shows that the following files were created:
after-breakpoint
before-breakpoint
You can rewind and step through a Chef Infra Client run:
chef:recipe > Chef::Log.level = :debug # debug logging will not turn on automatically in this case
   => :debug
 chef:recipe > chef_run.rewind
   => 0
 chef:recipe > chef_run.step
 [Fri, 15 Jan 2020 14:40:52 -0800] DEBUG: Processing file[/tmp/before-breakpoint]
 [Fri, 15 Jan 2020 14:40:52 -0800] DEBUG: file[/tmp/before-breakpoint] using Chef::Provider::File
   => 1
 chef:recipe > chef_run.step
 [Fri, 15 Jan 2020 14:40:54 -0800] DEBUG: Processing [./bin/../lib/chef/mixin/recipe_definition_dsl_core.rb:56:in 'new']
 [Fri, 15 Jan 2020 14:40:54 -0800] DEBUG: [./bin/../lib/chef/mixin/recipe_definition_dsl_core.rb:56:in 'new'] using Chef::Provider::Breakpoint
   => 2
 chef:recipe > chef_run.step
 [Fri, 15 Jan 2020 14:40:56 -0800] DEBUG: Processing file[/tmp/after-breakpoint]
 [Fri, 15 Jan 2020 14:40:56 -0800] DEBUG: file[/tmp/after-breakpoint] using Chef::Provider::File
   => 3
From the output, the rewound run-list is shown, but when the resources are executed again, they will repeat their checks for the existence of files. If they exist, Chef Infra Client will skip creating them. If the files are deleted, then:
Rewind, and then resume your Chef Infra Client run to get the expected results:
chef:recipe > chef_run.rewind
 chef:recipe > chef_run.resume
 [Fri, 15 Jan 2020 14:48:56 -0800] DEBUG: Processing file[/tmp/before-breakpoint]
 [Fri, 15 Jan 2020 14:48:56 -0800] DEBUG: file[/tmp/before-breakpoint] using Chef::Provider::Fil
 [Fri, 15 Jan 2020 14:48:56 -0800] INFO: Creating file[/tmp/before-breakpoint] at /tmp/before-breakpoint
 [Fri, 15 Jan 2020 14:48:56 -0800] DEBUG: Processing [./bin/../lib/chef/mixin/recipe_definition_dsl_core.rb:56:in 'new']
 [Fri, 15 Jan 2020 14:48:56 -0800] DEBUG: [./bin/../lib/chef/mixin/recipe_definition_dsl_core.rb:56:in 'new'] using Chef::Provider::Breakpoint
 chef:recipe > chef_run.resume

 [Fri, 15 Jan 2020 14:49:20 -0800] DEBUG: Processing file[/tmp/after-breakpoint]
 [Fri, 15 Jan 2020 14:49:20 -0800] DEBUG: file[/tmp/after-breakpoint] using Chef::Provider::File
 [Fri, 15 Jan 2020 14:49:20 -0800] INFO: Creating file[/tmp/after-breakpoint] at /tmp/after-breakpoint
Debug Existing Recipe
chef-shell can be used to debug existing recipes. The recipe first needs to be added to a run-list for the node, so that it is cached when starting chef-shell and then used for debugging. chef-shell will report which recipes are being cached when it is started:
loading configuration: none (standalone session)
Session type: standalone
Loading.............done.

Welcome to the chef-shell 15.8.23

For usage see https://docs.chef.io/chef_shell.html
run `help' for help, `exit' or ^D to quit.
chef (15.8.23)>
To just load one recipe from the run-list, go into the recipe and use the include_recipe command. For example:
To load all of the recipes from a run-list, use code similar to the following:
node.run_list.expand(node.chef_environment).recipes.each do |r|
 include_recipe rz
end
After the recipes that are to be debugged have been loaded, use the run_chef command to run them.
Advanced Debugging
In chef-shell, we can get verbose debugging with the help of the tracing feature in Interactive Ruby (IRb). chef-shell provides a shortcut for turning tracing off and on. For example:
chef > tracing of
tracing is on
=> nil
chef >
and:
chef > tracing off
#0:(irb):2:Object:-: tracing off
#0:/opt/chef-workstation/embedded/lib/ruby/gems/2.6.0/gems/chef-15.8.23/lib/chef/shell/ext.rb:109:Shell::Extensions::ObjectCoreExtensions:>:       def off
#0:/opt/chef-workstation/embedded/lib/ruby/gems/2.6.0/gems/chef-15.8.23/lib/chef/shell/ext.rb:110:Shell::Extensions::ObjectCoreExtensions:-:         :off
#0:/opt/chef-workstation/embedded/lib/ruby/gems/2.6.0/gems/chef-15.8.23/lib/chef/shell/ext.rb:111:Shell::Extensions::ObjectCoreExtensions:<:       end
#0:/opt/chef-workstation/embedded/lib/ruby/gems/2.6.0/gems/chef-15.8.23/lib/chef/shell/ext.rb:272:main:>:       def tracing(on_or_off)
#0:/opt/chef-workstation/embedded/lib/ruby/gems/2.6.0/gems/chef-15.8.23/lib/chef/shell/ext.rb:273:main:-:         conf.use_tracer = on_or_off.on_off_to_bool
#0:/opt/chef-workstation/embedded/lib/ruby/gems/2.6.0/gems/chef-15.8.23/lib/chef/shell/ext.rb:162:Shell::Extensions::Symbol:>:       def on_off_to_bool
#0:/opt/chef-workstation/embedded/lib/ruby/gems/2.6.0/gems/chef-15.8.23/lib/chef/shell/ext.rb:163:Shell::Extensions::Symbol:-:         to_s.on_off_to_bool
#0:/opt/chef-workstation/embedded/lib/ruby/gems/2.6.0/gems/chef-15.8.23/lib/chef/shell/ext.rb:149:Shell::Extensions::String:>:       def on_off_to_bool
#0:/opt/chef-workstation/embedded/lib/ruby/gems/2.6.0/gems/chef-15.8.23/lib/chef/shell/ext.rb:150:Shell::Extensions::String:-:         case self
#0:/opt/chef-workstation/embedded/lib/ruby/gems/2.6.0/gems/chef-15.8.23/lib/chef/shell/ext.rb:154:Shell::Extensions::String:-:
#0:/opt/chef-workstation/embedded/lib/ruby/gems/2.6.0/gems/chef-15.8.23/lib/chef/shell/ext.rb:158:Shell::Extensions::String:<:       en
#0:/opt/chef-workstation/embedded/lib/ruby/gems/2.6.0/gems/chef-15.8.23/lib/chef/shell/ext.rb:164:Shell::Extensions::Symbol:<:       end
tracing is off
=> nil
chef >
Manipulating Chef Infra Server Data
In chef-shell, we can get verbose debugging with the help of the tracing feature in Interactive Ruby (IRb). chef-shell provides a shortcut for turning tracing off and on. For example:
The syntax for managing objects on the Chef Infra Server is as follows:
chef-shell -z named_configuration
Where:
named_configuration is an existing configuration file in ~/.chef/named_configuration/chef_shell.rb, such as production, staging, or test.
Once in chef-shell, commands can be run against objects as follows:
chef (preprod) > items.command
Where:
items is the type of item to search for: cookbooks, clients, nodes, roles, environments or a data bag.
command is the command: list, show, find, or edit.
For example, to list all of the nodes in a configuration named “preprod”, enter:
Which format is used when providing credentials on AWS from the Chef inSpec target option?
The INI format is used when providing credentials on AWS from the Chef inSpec target option.
Explain the major components of Chef.
The major components of the Chef are the chef server, chef node, and Chef
Workstation.
What Distinguishes a Recipe from a Cookbook?
A recipe is a group of resources that, in most cases, configures a piece of infrastructure or a software program. A cookbook organizes recipes and other information in a more comprehensible way than merely having recipes.
Conclusion
To conclude this blog, we discussed the basics of Chef Executable- debugging tools, various modes, options, and configure types. We also saw cookbooks and steps used to go through run- list and advanced debugging.


 5+ registered