The Logback logging-config file
The logback.xml file, whose location is specified by the logging-config parameter, is used to customize logging. If you modify PuppetDB's log settings while it is already running, no restart is necessary for the changes to take effect.
The PuppetDB configuration file(s)
The configuration file for PuppetDB (s)
Several [sections] of an INI-style configuration file are used to set up PuppetDB. This closely corresponds to the Puppet format. Each section and parameter listed below should be in the PuppetDB configuration file (s).
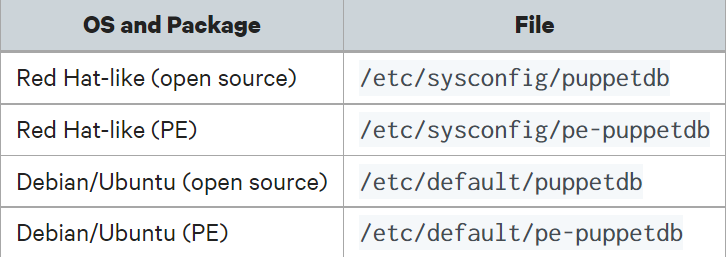
The init script configuration file lets you modify the primary configuration file's location. This location may reference a single configuration file or a collection of.ini files. The.ini files in a directory will be merged in alphabetical order by PuppetDB if you indicate it (in conf.d style).
The conf.d config style will be used by default if you installed PuppetDB from a package /etc/puppetlabs/puppetdb/conf.d is the default configuration directory. If you are running from source, you may utilize the -c command-line argument to specify your config file or directory.
An example configuration file:
[global]
vardir = /var/lib/puppetdb
logging-config = /var/lib/puppetdb/logback.xml

[database]
subname = //localhost:5432/puppetdb

[puppetdb]
certificate-allowlist = /path/to/file/containing/certnames
disable-update-checking = false

[jetty]
port = 8080
Configuring a Puppet/PuppetDB connection
The hostname and port of the PuppetDB server are listed in the puppetdb.conf file. It is only utilized if you have connected your Puppet Server to PuppetDB and are utilizing PuppetDB.
To store catalogs, facts, and new reports, the puppet server establishes HTTPS connections with puppetDB. To respond to queries, such as those required to support exported resources, it also leverages PuppetDB. Depending on how the Puppet Server is configured, a down PuppetDB instance can result in a failed Puppet run. On this page, configuration options for the puppetdb.conf file are covered, including options for increasing the PuppetDB terminus's tolerance for errors.
Location
The puppetdb.conf file is always present at $confdir/puppetdb.conf. Its location is not configurable.
The location of the confdir differs, depending on the OS, Puppet distribution, and user account.
Example
[main]
server_urls = https://puppetdb.example.com:8081
Format
The puppetdb.conf file uses the same INI-like format as puppet.conf, but only uses a [main] section.
[main] Settings
All of the PuppetDB terminal settings are described in the [main] section.
server_urls
This parameter outlines the Puppet Server's preferred method of connecting to PuppetDB. Server_urls should be set to https://puppetdb.example.com:8081 in the settings.
The secure HTTPS port for PuppetDB must be used with Puppet. The HTTP port that is not encrypted cannot be used.
If several PuppetDB instances are available, you can provide a list of URLs separated by commas. Two PuppetDBs can be supported by the following server urls configuration: server urls = https://puppetdb1.example.com:8081,https://puppetdb2.example.com:8081
https://puppetdb:8081 is the default setting.
The first PuppetDB instance given will always be the one the PuppetDB terminal tries to connect to (listed above as puppetdb1). The PuppetDB terminal will attempt the same action on the following instance in the list if a server-side exception occurs or the request takes too long.
server_url_timeout
The server_url_timeout setting sets the maximum time (in seconds) the PuppetDB-termini will wait for PuppetDB to respond to HTTP requests. If the user has specified multiple PuppetDB URLs and a timeout has occurred, it will attempt the same request on the next server in the list.
The default value is 30 seconds.
soft_write_failure
In the event of a PuppetDB outage, this configuration may allow the Puppet Server to continue operating in part. If true is specified, Puppet will continue building and serving catalogs even if PuppetDB is not reachable for command submission. (However, any catalogs that require PuppetDB export resource queries will continue to fail.)
‘False’ is the default setting.
Using PostgreSQL
Before using the PostgreSQL backend, you must set up a PostgreSQL server. Note that users installing PuppetDB via the module will already have PostgreSQL configured properly and these steps should not be necessary.
Please note, if you are not using the module, and you are running PostgreSQL on a different server from your PuppetDB node, you must configure the SSL connection between PuppetDB and PuppetSQL to secure your database connections. Otherwise, your PuppetDB communication with Postgres will be going over a network in plaintext.
If you are not using the module, you will need to configure a PostgreSQL server, version 11 or newer, to include a user and an empty database for PuppetDB, and the server must accept incoming connections to that database as that user.
Completely configuring PostgreSQL is beyond the scope of this guide, but an example setup is described below. First, you can create a user and database as follows. Then, to have a secure installation you must create a read-only user to configure the [read-database] config section. This limits the PostgreSQL permissions of PuppetDB queries and prevents them from writing, updating, or deleting any data.
sudo -u postgres sh
createuser -DRSP puppetdb
createuser -DRSP puppetdb_read
createdb -E UTF8 -O postgres puppetdb
psql puppetdb -c 'revoke create on schema public from public'
psql puppetdb -c 'grant create on schema public to puppetdb'
psql puppetdb -c 'alter default privileges for user puppetdb in schema public grant select on tables to puppetdb_read'
psql puppetdb -c 'alter default privileges for user puppetdb in schema public grant usage on sequences to puppetdb_read'
psql puppetdb -c 'alter default privileges for user puppetdb in schema public grant execute on functions to puppetdb_read'
If you already have PuppetDB installed and running and are adding a read-only user, you will need to grant the same privileges as above to existing objects.
psql puppetdb -c 'grant select on all tables in schema public to puppetdb_read'
psql puppetdb -c 'grant usage on all sequences in schema public to puppetdb_read'
psql puppetdb -c 'grant execute on all functions in schema public to puppetdb_read'
exit
Install the pg_trm extension. PuppetDB makes use of this extension to improve the performance of queries that use regular expression filters (e.g. certname ~ "abc\d+.example.com"). This may require installing the postgresql-contrib (or equivalent) package, depending on your distribution:
$ sudo -u postgres sh
$ psql puppetdb -c 'create extension pg_trgm'
$ exit
Next, you will most likely need to modify the pg_hba.conf file to allow for MD5 authentication from at least local host. To locate the file you can either issue a locate pg_hba.conf command (if your distribution supports it) or consult your distribution's documentation for the PostgreSQL confdir.
The following example pg_hba.conf file allows MD5 authentication from localhost for both IPv4 and IPv6 connections:
# TYPE  DATABASE   USER   CIDR-ADDRESS  METHOD
local   all        all                  md5
host    all        all    127.0.0.1/32  md5
host    all        all    ::1/128       md5
Restart PostgreSQL and ensure you can log in by running:
$ sudo service postgresql restart
$ psql -h localhost puppetdb puppetdb
To configure PuppetDB to use this database, put the following in the [database] section:
subname = //<HOST>:<PORT>/<DATABASE>
username = <USERNAME>
password = <PASSWORD>
Replace <HOST> with the DB server's hostname. Replace <PORT> with the port on which PostgreSQL is listening. Replace <DATABASE> with the name of the database you've created for use with PuppetDB.
Setting up SSL for PostgreSQL
Talking to PostgreSQL using SSL/TLS
This guide will help you configure SSL/TLS-secured connectivity between PuppetDB and PostgreSQL.
When configuring SSL, you need to decide whether you will use:
- A self-signed certificate on the PuppetDB server (for example, the Puppet CA)
- A publicly signed certificate on the PuppetDB server
Both methodologies are valid, but while self-signed certificates are far more common in the real world, this type of configuration must be set up with care.
Using Puppet Agent certificates for database authorization
To use Puppet's signed certificates to authenticate PuppetDB's database connection (instead of using a password in the database config section), you need to follow the above instructions for setting up an SSL connection between PuppetDB and Postgres and then change the pg_hba.conf and pg_ident.conf settings to allow your PuppetDB service to access the puppetDB database using its certificate. Also, your PostgreSQL server will need to be able to validate the certificate of your PuppetDB server, so copy the ca.pem (which can be found with puppet config print local alert over to the directory of your ssl_cert_file and ssl_key_file, and set the ssl_ca_file in your postgresql.conf.
Frequently Asked Questions
Which language is puppet written in?
Puppet itself is written in Ruby, while Facter is written in C++, and Puppet Server and Puppet DB are written in Clojure.
What is Puppet used for?
To automate and centralise configuration management, it is a free management solution. One of the most popular configuration management tools for deploying, setting up, and administering servers is Puppet.
What is Puppet IT automation?
An open-source system management tool called Puppet is used to automate and centralize configuration management. The detailed logging and updating of data that specifies the hardware and software of an organization is known as configuration management.
Conclusion
To conclude this blog, firstly we discussed what is puppetDb and its configuration features. Along with this we also learned about the log back logging- configuration, its [main] setting configurations along with postgre sql and its setting.
For more content, Refer to our guided paths on Coding Ninjas Studio to upskill yourself. If you want to explore more, feel free to see our courses, interview experiences, problems to solve, test series, libraries, and resources.
Do upvote our blogs if you find them helpful and engaging!
Happy Learning!


 8+ registered

