Table of contents
1.
Introduction
2.
Cookies
2.1.
Working of Cookies
2.2.
Cookies in Functional Tests 
2.2.1.
Adds Cookies Manually
2.2.2.
Store Received Cookies
2.3.
Cookies in Performance Tests
3.
Webhooks
3.1.
Add a Webhook
3.2.
Testing Webhooks
3.3.
Catching Webhook Messages
4.
Frequently Asked Questions
4.1.
What type of data sources can be used in Ready API?
4.2.
How do I pass cookies in soapUI?
4.3.
What is test runner ReadyAPI?
5.
Conclusion
Last Updated: Mar 27, 2024
Easy

Cookies and Webhooks in Ready API

Author Sagar Mishra
1 upvote
Career growth poll
Do you think IIT Guwahati certified course can help you in your career?

Introduction

Have you ever noticed how signing up for a website once allows you to stay signed up even after closing your browser? 🤔 Or did you add something to your shopping cart without ever signing in?🧐 So, the answer is Cookies 😲. Cookies hold some data packages even after you close the program. 

Cookies and Webhooks in Ready API

This article will tell you about Cookies and Webhooks in Ready API.

Cookies

Cookies

Cookies are files that are produced by websites you visit. By saving browsing info, they refine your online experience. With the help of cookies, websites can keep you logged in, save your preferences, and serve you with content that fits your spot.

In Ready API, a cookie is a name-value pair represented as plain text. Web browsers use it to store the data and reuse the info in the next visit to the same web server.

Working of Cookies

Working of Cookies

A web service includes the Set-Cookie header in the response when it needs to save data for later use. A cookie's name and value are stored in the header's value.

The Set-Cookie header sends a cookie from the server to the user agent. So the user agent can send it back to the server later. Multiple Set-Cookie headers should be sent in the same response to send multiple cookies.

The syntax of sending cookies is as follows:

<cookie-name>=<cookie-value>


A client should save the cookie after it receives this header in one of the responses. After this, the Cookie header specifying saved cookies will be included in all client requests to the same server. The client stores cookies until they are lost, or the HTTP connection is closed. These are some examples of the sent cookies:

Cookie: sessionid=001q2w3; cart=df86se2

Cookies in Functional Tests 

This section will teach how to use cookies in functional tests. Let's start.

Adds Cookies Manually

We can add cookies manually by following these simple steps.

⭐ Add a new header.

⭐ Now, specify the Cookie header.

⭐ Enter the cookie in name value format.

Cookies in Functional Tests

You can add more than one cookie at a time, separating by a semicolon. 

Store Received Cookies

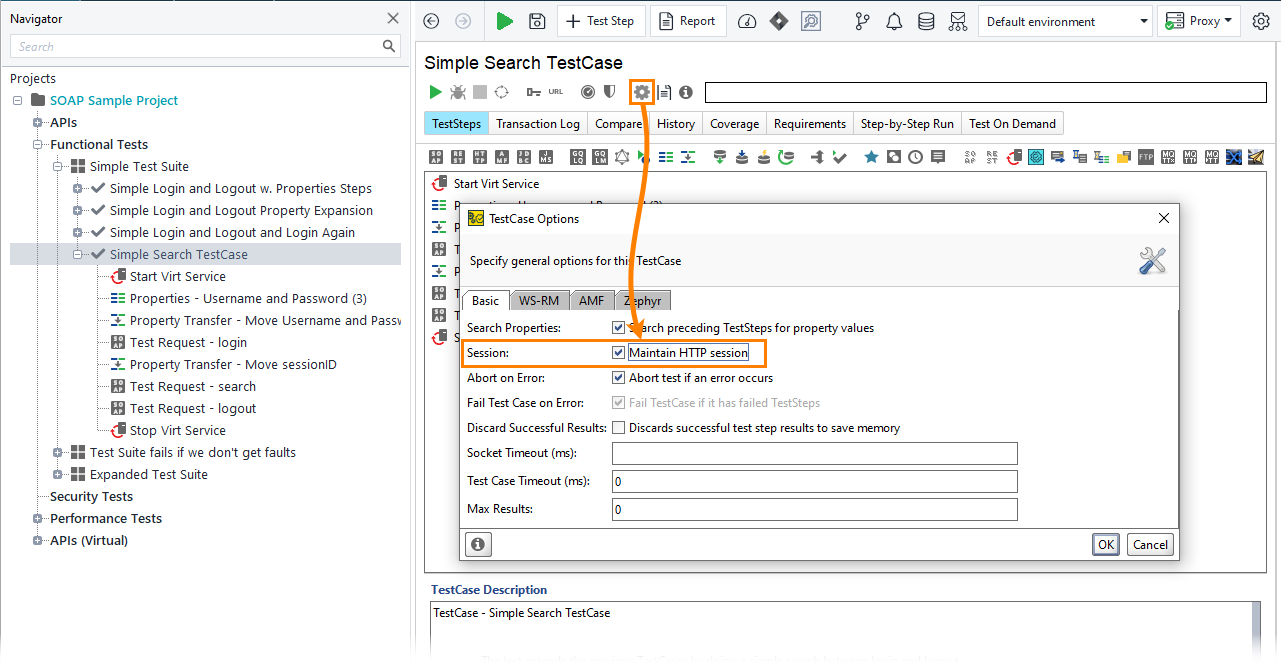
Ready API does not save or store any cookie by default. But you can change this by enabling the session test case option. Follow the two steps below.

Step 1: Go to Setting in the toolbar.

Step 2: Manually tick the checkbox of the Session option.

Session option

Cookies in Performance Tests

Performance Tests

To ensure your APIs can handle a huge volume of visitors, you can use Ready API to create and run load or performance tests. You can distribute load generation across some computers. This includes cloud machines or performing load tests locally. Ready API stores cookies received during the sessions if the Session test case option is enabled.

Webhooks

A webhook sends a POST request to a given URL every time an API is saved or published in SwaggerHub. You can use webhooks to alert external systems when your API definitions are updated. And to start your own actions depending on events from SwaggerHub.

Webhooks transmit data via an HTTP POST request with any useful content. The application/JSON content type is used by most webhooks.

Add a Webhook

Note: You can only add or change the Webhook if you are the API coordinator.

Follow the below steps to add a Webhook.

Step 1: In the SwaggerHub editor, open the API.

Step 2: Select the version you want to add to the Webhook.

Step 3: Click on the API name and select the Integrations tab. Now, click on the Add New Integration button.

Add a Webhook


Step 4: Select the Webhook from the list.

Step 5: Now, configure the Webhook like Name, content type, etc.

Step 6: Click on Create and done.

Testing Webhooks

Testing Webhooks

Using VirtResponse test steps, Ready API can handle webhook requests. Set up the REST VirtResponse or SOAP VirtResponse test step to receive a request through a webhook. Assertions can also analyze a request and verify if your webhook is sending the correct message.

Catching Webhook Messages

Catching Webhook Messages

In this section, we will use GitHub Webhook to learn the Catching Webhook Messages. Follow the below steps.

Step 1: Create a Webhook.

Step 2: To make your local host accessible over the Internet, use ngrok.

Step 3: Run ngrok using the command given below.

ngrok http 4567


Step 4: The Forwarding line should look like this.

Forwarding http://8a6f5e6e.ngrok.io -> localhost:4567


Step 5: Go to Setting and copy the Payload URL.

Step 6: Using this URL, open ReadyAPI and create a new project.


http://localhost:4567/payload


Step 7: The service you built at port 4567 should be used in a REST VirtResponse test step:

REST VirtResponse test step

Step 8: Set the VirtResponse's POST request method.

Step 9: Start the test case after boosting the value of the Timeout property.

Frequently Asked Questions

What type of data sources can be used in Ready API?

There are a lot of data sources that can be used in Ready API. Examples are JDBC, Grid, Groovy, Excel, File, and Using Data Sources. A user can use any of these methods as a data source.

How do I pass cookies in soapUI?

Create a header attribute in soapUI with the same value as the one you got from the browser, then send the request. The same session id (JSESSIONID) kept in the cookie will be used to execute the request. 

What is test runner ReadyAPI?

The test runner lets you run functional tests and export results. The runner can be started using the ReadyAPI user interface or the command line. When you need to build the command line and check the settings, the latter method is helpful.

Conclusion

We have discussed the topic of Cookies and Webhooks in Ready API in this article. In detail, we have seen working, functional, and performance tests, along with adding, testing, and catching Webhook.

We hope this blog has helped you enhance your knowledge of Cookies and Webhooks in Ready API. If you want to learn more, check out our articles.

⚡ Running tests in ReadyAPI.

⚡ Managing test items in Ready API.

⚡ What are the test steps in Ready API?

And many more on our platform Coding Ninjas Studio.

But suppose you have just started your learning process and are looking for questions from tech giants like Amazon, Microsoft, Uber, etc. In that case, you must look at the problemsinterview experiences, and interview bundles for placement preparations.

However, you may consider our paid courses to give your career an edge over others!

Happy Learning!

Live masterclass