Do you think IIT Guwahati certified course can help you in your career?
Introduction
ReadyAPI is an API testing tool which offers a wide range and variety of testing services. For anyone who is developing any sort of API, Ready API is a comprehensive and powerful tool to test the API in various ways. You can perform functional tests, security tests, performance tests, and more.
We perform security tests to ensure that our API cannot be accessed or harmed by any malicious actors. ReadyAPI provides us with automated testing tools that can run the most common yet sophisticated attacks against our API. These are carefully configured not to cause any actual harm but to simply detect security vulnerabilities.
In this blog, we will see from the beginning how to create and run security tests in ReadyAPI.
So let's get started!
Installing and Running ReadyAPI
The first step is to - of course, install ReadyAPI. ReadyAPI offers a 14-day trial service for anyone just experimenting with it. For full-time users, they offer a paid license. You can choose either of these, depending upon your needs.
So, head to the downloads page of ReadyAPI, and choose the installer based on your operating system. Make sure you have either signed up for the free trial or purchased the license key.
Once the installer has finished installing, run it, and go through the steps. You can leave everything as the default.
Once it is installed, run it! If you have taken the free trial, it should detect that automatically. Otherwise, you may be prompted for a license key.
The starting screen should look like this - completely empty. Don't worry, we will soon fill it up!
Creating and Configuring Security Tests
Without further ado, let's create our very first security test.
Creating a security test
On the top left corner, click on File->New Security Test.
You should see this window:
Choose the URL option.
Enter the URL you want to test, and click next.
Choose all the tests that you want to run against your API. In another article, we have explained the meaning and nature of all the tests mentioned above. For this example, we will be choosing all of these.
Our security test has been created! Now it's time to configure it.
Configuring our security test
On the left panel, expand the API section of your project. You should see the URL you wrote in the security test. Expand that as well. Keep expanding until there's no option for expanding anymore. You should see something like this:
Click on the Request 1 option (it might be named differently for you). You should now see this screen:
Here, we can now configure our request. For now, the only configuring we will do is add request parameters. You can see that other options are also there, such as Authentication, Attachments, Headers, and more.
To add a parameter, click on Add Parameter button and fill in the table.
You can choose the name and value for the parameters. Set the type as QUERY. You can hit the send button above to test if the link is correct, but your security test won't run from here. Let's see where we can run it from.
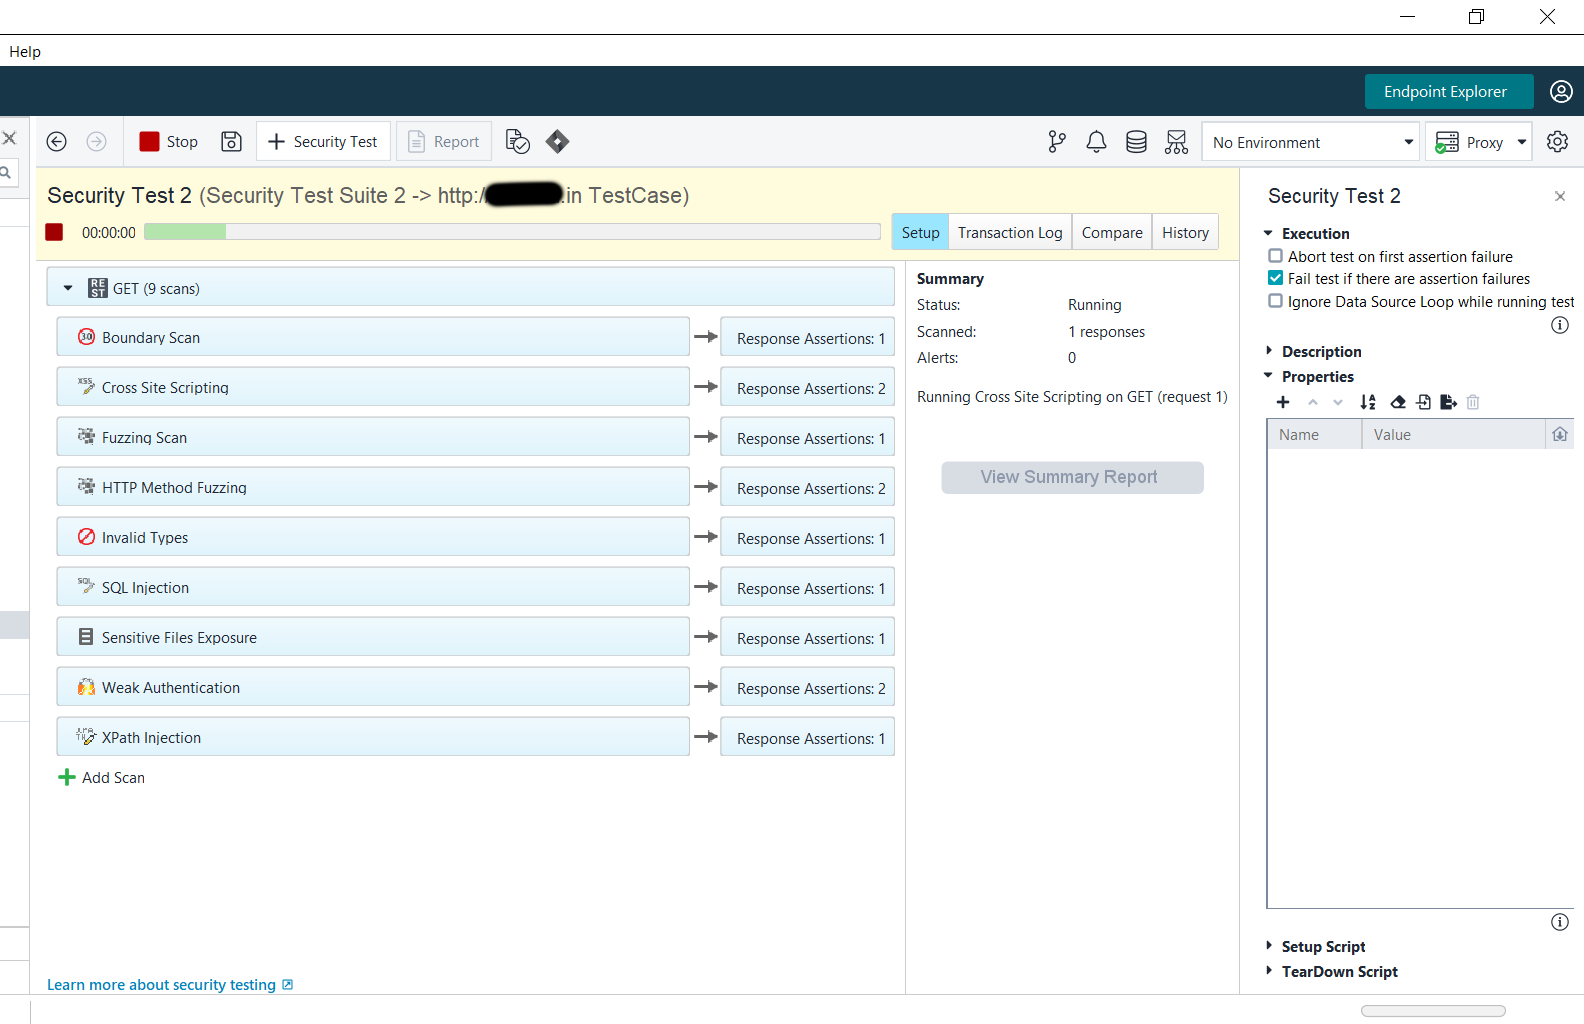
Running the Security Test
It's finally time to run the security test and see if our API is safe against hackers!
In the left-hand panel, click on the security test you created earlier.
You should see this screen.
Click on the green play button, and the test will start running!
Based on the number of parameters entered, the types of tests chosen, and the API itself, the security test can take a lot of time. Be patient!
6 minutes into the test running, ReadyAPI has managed to find a security flaw! We don't know what it is yet, but we can see the bar has become orange. Earlier it had been green.
On the middle panel, we can see that ReadyPAI is currently running the Invalid Type scan and has already scanned 415 responses! 22 of these have been marked as Alerts, which is probably why our bar turned orange.
7 minutes into the test, and now ReadyAPI is running SQL injection scan
ReadyAPI ran all the tests one by one like this, and finally, after a long wait of one hour, our tests finished.
Let's now evaluate the results.
Evaluate the Results
Let's now see what caused the test to fail by clicking View Summary Report.
The issue seems to be in HTTP Fuzzing. Let's click on View Full Report to see the exact cause of the problem.
In HTTP Fuzzing, we send different HTTP requests than the one that is specified. For example, while creating the test, we specified that the request was a GET request. ReadyAPI tested HTTP Fuzzing by sending various other HTTP methods to the same endpoint to see what response is sent.
There are two reasons mentioned for the failure:
The status code sent back is 301 (which means the endpoint has been moved to another URL)
The nginx (which is a server software) version was exposed in the response.
Now that I know the vulnerabilities in my API, I can go ahead and fix them! This is what makes ReadyAPI such a helpful tool.
Every other test, however, has passed! Let's look at the Transaction Logs for a better understanding. We see the various requests ReadyAPI sent to our API.
Cross-Site Scripting
Various JavaScript scripts were sent in the request body instead of the parameter values:
Fuzzing Scan
Randomly generated data was sent in parameter values:
Invalid Types Scan
Different data types were sent in parameter values - which we had defined as all strings.
We can see booleans, numbers, and date-time objects being sent instead.
SQL Injection
SQL queries were sent to expose database schemas, secrets, or just the data. The API we sent the requests to doesn't use SQL, so this had no effect.
Sensitive Files Exposure
ReadyAPI tried to change the endpoint to some common folder structures that store private data.
You can see, they tried to access api/events/.ssh/known_hosts, and .ssh/authorized_keys, among others. These are standard files found in many web applications. We must ensure that our API cannot expose these.
XPath Injection
Various XML strings that could have caused data to leak were sent. The API used in this case doesn't use XML, so there was no data loss.
We can see that ReadyAPI covers all the bases in all of these attacks and offers sophisticated protection against malicious attacks.
Frequently Asked Questions
Are ReadyAPI default security tests enough for a secure website?
We cannot assuredly say that any combination of tests will be enough for a secure website. You must follow many security guidelines and best practices for a truly secure website. We can say that ReadyAPI offers testing against the most common malicious attacks. It is a reliable way to ensure that your API is not open to hacking.
Can I run my own attack against my website?
Yes, ReadyAPI also offers CustomScript attacks, which means you can write the code for the attack yourself and ensure that your website is protected against it.
What is the point of securing my API if only I am going to use it?
A rule to be consistently followed is - never to assume all the calls to your backend will come from your frontend. As we have seen, someone might figure out the API URLs and call them using malicious, invalid, or harmful data.
Conclusion
This blog has explored what ReadyAPI is and what security tests it offers. We have downloaded and installed ReadyAPI and created and configured security tests on it. We have run those tests and evaluated the results as well.
We hope you leave this article with a broader knowledge of ReadyAPI, Internet security and network attacks. We recommend that you explore our different articles on these topics as well, such as:


 9+ registered

