Do you think IIT Guwahati certified course can help you in your career?
Introduction
In this article, we will discuss how to Get ready to use System Center DPM to backup workloads to Azure, Back up an Exchange server to Azure Backup with System Center 2012 R2 DPM, and recover data from an azure backup server.
What is DPM and why back DPM to Azure?
A business company and disaster recovery (BCDR) strategy are essential for every organization to ensure that resources are accessible during both scheduled and unplanned outages and that you can quickly return to normal operations when something goes wrong. Your BCDR plan calls for maintaining the security and recoverability of your data and the continuous availability of your business workloads, applications, and services. System Data Protection Manager (DPM) is a capable enterprise backup and recovery system that supports the Backup and recovery of corporate data as part of your BCDR strategy.
System Center DPM backs up data for files and applications. The following is how DPM works with Azure Backup:
DPM is running on a real server or on-premises virtual machine - In addition to disc and tape backup, you can back up data to a backup vault in Azure.
DPM operating on an Azure VM: DPM can be deployed on an Azure VM starting with System Center 2012 R2 with Update 3 or later.
The data can be backed up using Azure Backup to a Backup vault or Azure discs linked to the VM.
The following are some commercial advantages of backing up DPM servers to Azure:
Azure Backup offers a substitute for long-term deployment on tape for on-premises DPM.
Azure Backup lets you offload storage from the Azure disc for DPM operating on an Azure VM. You can expand your business by putting new data into the disc while storing older data in a backup vault.
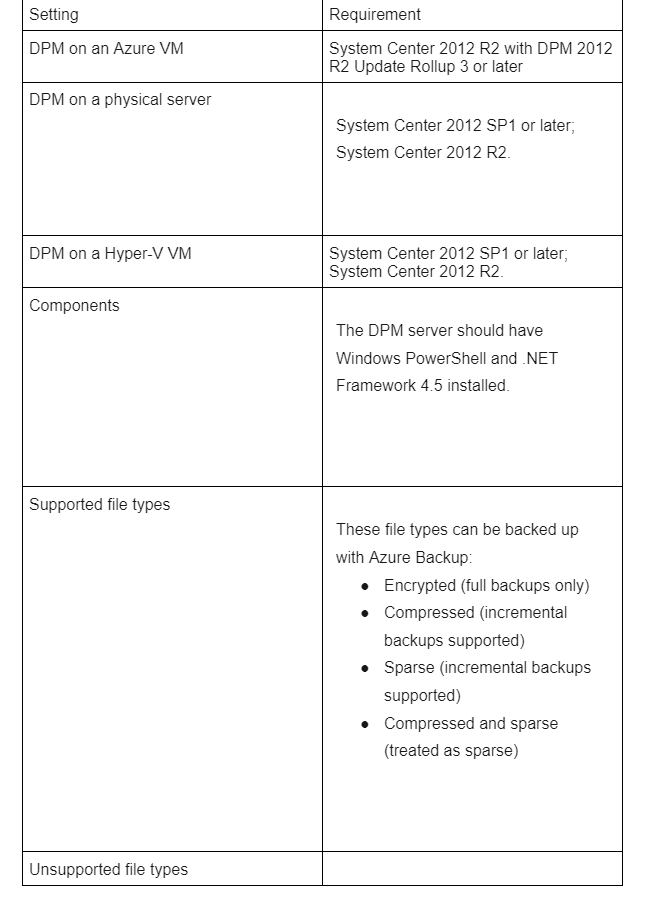
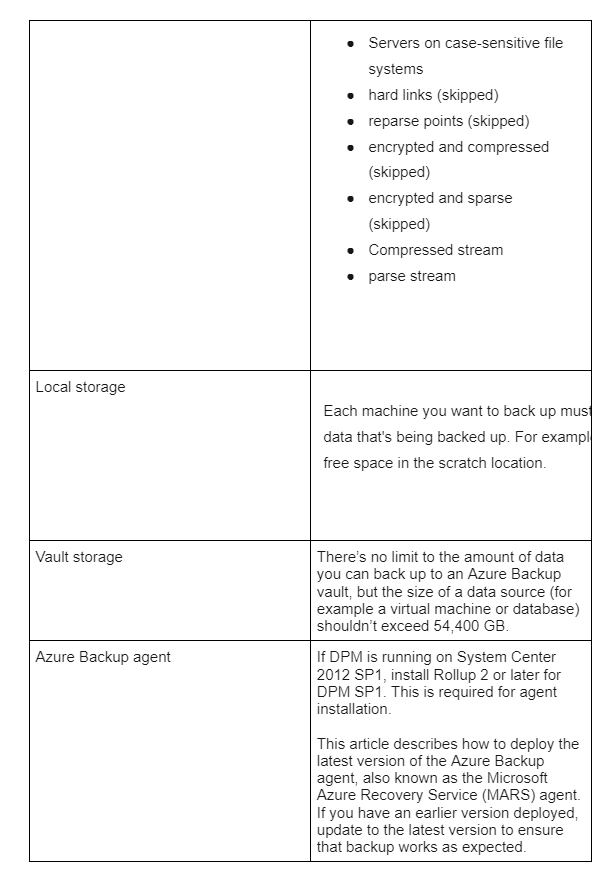
Prerequisites and Limitations
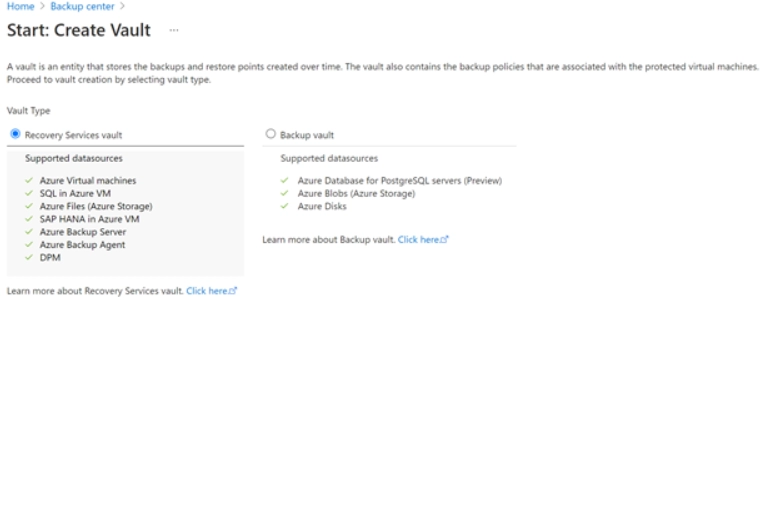
Create a recovery services vault
A management object known as a Recovery Services vault serves as a repository for recovery points generated over time and as an interface for managing backup-related tasks. On-demand backups, restorations, and the development of backup rules are some of these procedures.
To set up a vault for Recovery Services:
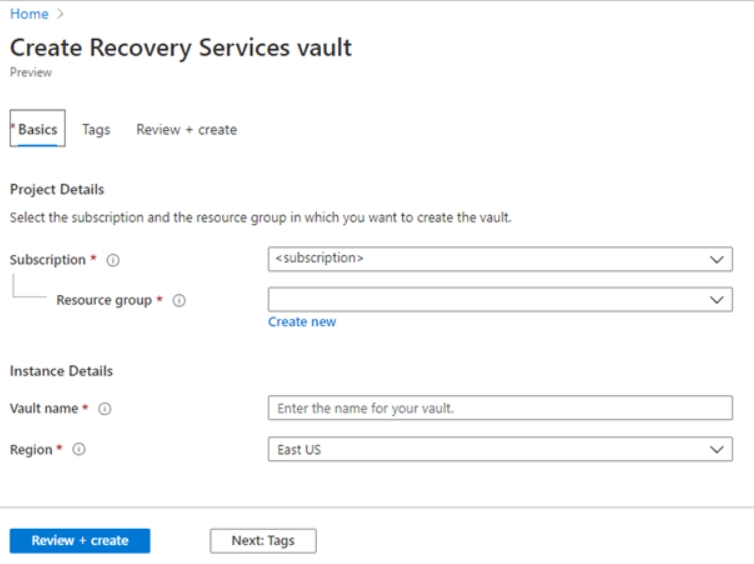
Log in to the Azure portal using your subscription.
Go to the Backup Center dashboard by searching for Backup center in the Azure portal.
5. A dialogue box for the Recovery Services vault appears. Give the aforementioned values.
Select the subscription you want to utilize. You'll see that name if you only have one subscription. Choose the default (recommended) subscription if you're unsure which one to use. Only if your business or school account is linked to more than one Azure subscription are their various options.
Resource group: Create a new resource group or use an existing one. Select Use existing, then pick a resource from the dropdown box to view the list of resource groups accessible with your subscription. Select Establish new and type a name to create a new resource group. See Azure Resource Manager overview for more details on resource groups.
Name of the vault: Give the vault a recognizable name. An Azure subscription-specific name is required. Enter a name at least 2 characters long but not more than 50. Only letters, digits, and hyphens may be used in the title, which must also begin with a letter.
Region: Choose the area where the vault will be located. Any data source you want to help protect must be in the same part as the vault, which must be created.
7. Select Construct when you're prepared to create the Recovery Services vault.
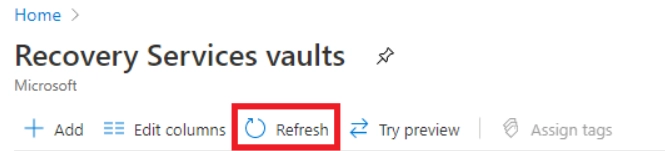
8. The Recovery Services vault creation process can be lengthy. Keep an eye on the status updates under the Notifications section in the portal's upper right corner. Your vault appears in the list of Recovery Services vaults once it has been created. Select Refresh if you can't view your vault.
Both locally redundant storage and geo-redundant storage are options.
Your vault has geo-redundant storage by default.
Leave the option to geo-redundant storage if the vault serves as your primary Backup. Use the following steps to configure locally redundant storage if you desire a less expensive but unreliable solution.
Learn about the geo-redundant, locally redundant, and zone-redundant storage solutions available with Azure storage.
Before the first Backup, make changes to the storage settings. Before you change the storage settings, stop backing up any items that you have previously done so in the vault.
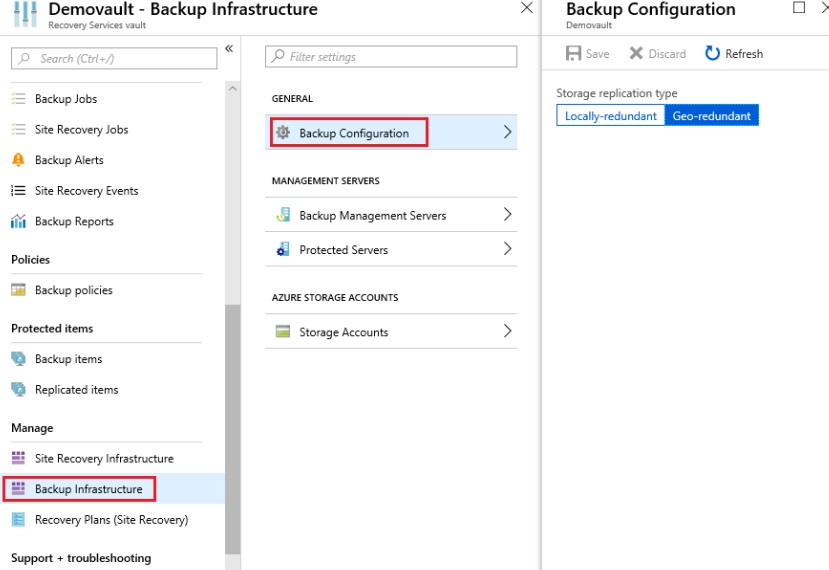
To modify the replication storage setting:
Open the dashboard for the vault.
Choose Backup Infrastructure under Manage.
Choose a storage option for the vault from the Backup Configuration menu.
It primarily serves as a central interface to design, provision, and maintain API for web and cloud applications and services. Utilizing Azure API Management, a user can;
Check the health of APIs, spot issues, set throttle, rate limitations, and other options for each API.
It gives information about how APIs are used.
Establishing end-to-end API usage policies and creating and managing user roles enables the ManagementManagement of tens of thousands of APIs across numerous platforms using a unified interface.
To govern and guarantee the security of API access and Use, provide an authentication and access control method.
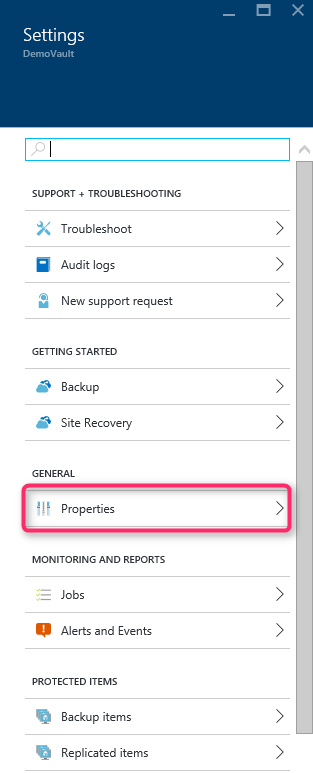
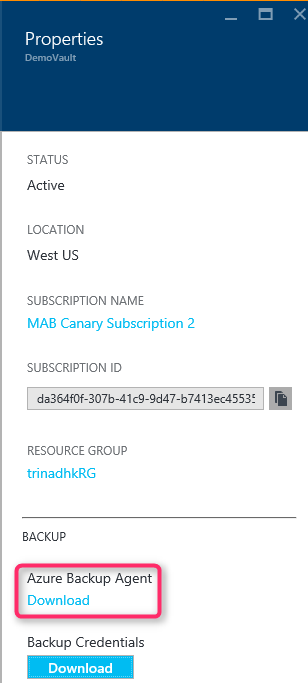
Download Vault Credentials
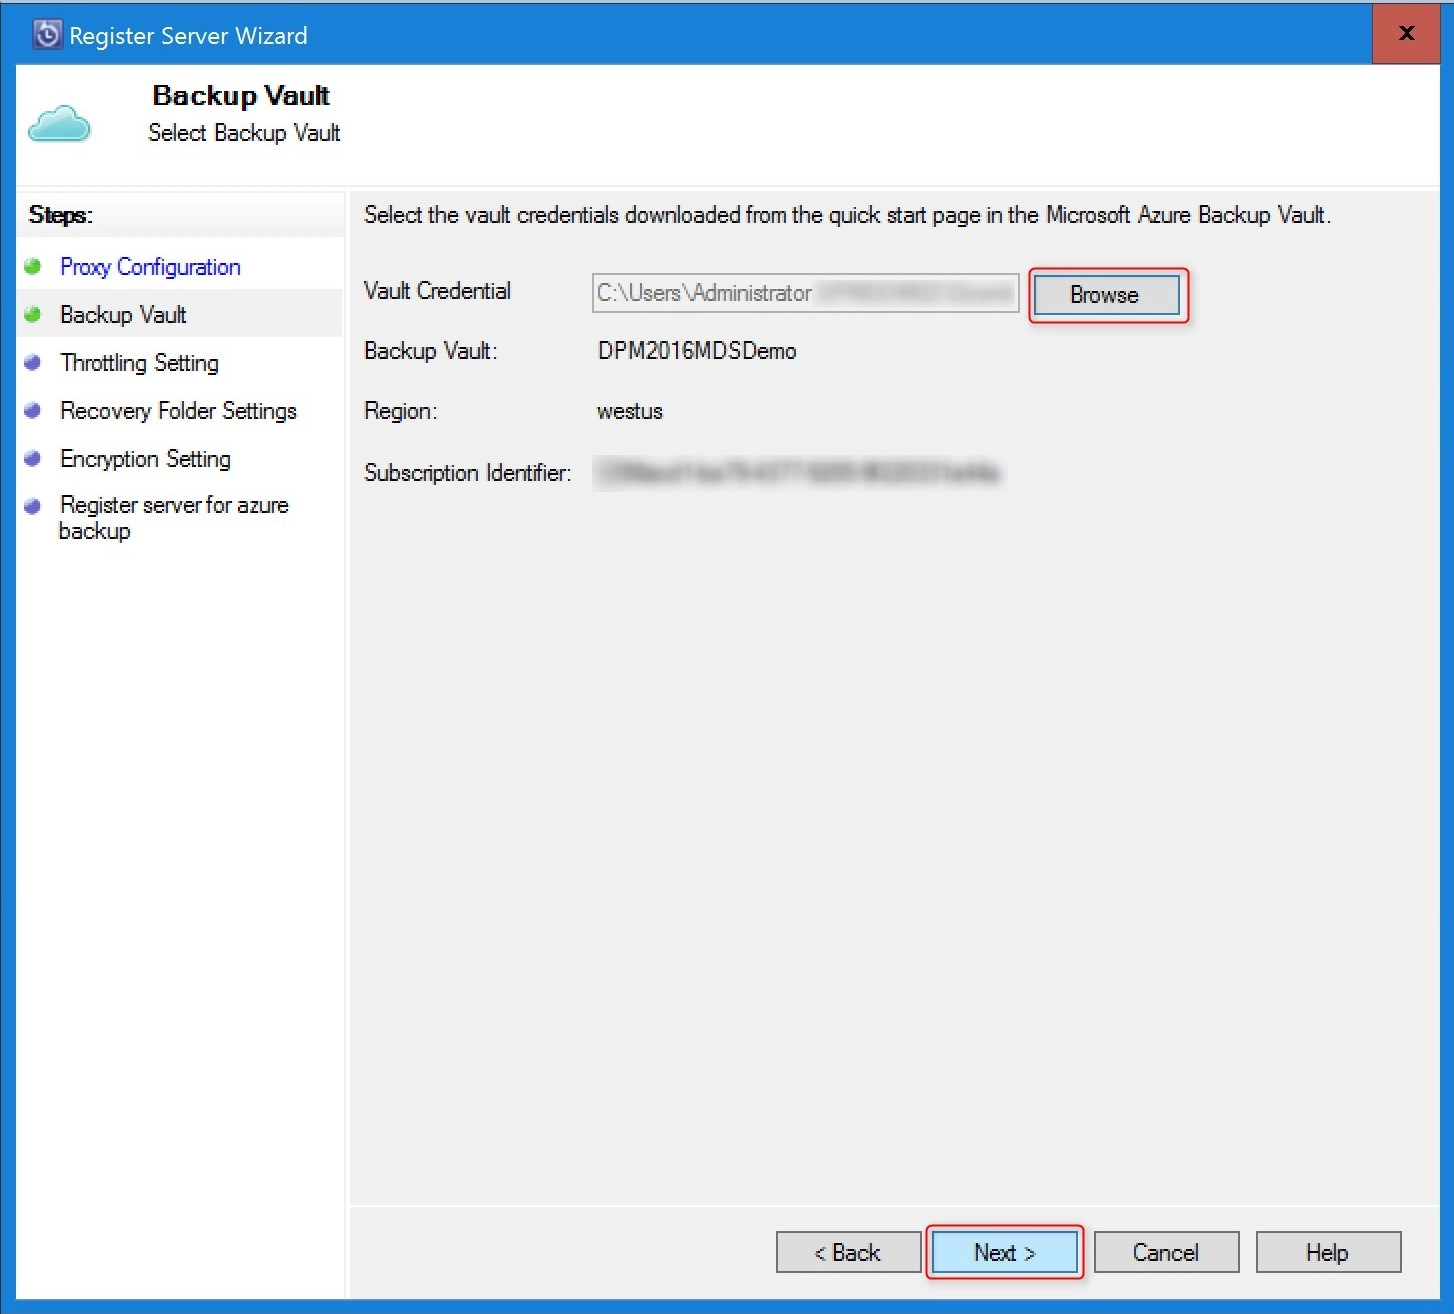
When you register the DPM server in the vault, you utilize your vault credentials.
Each backup vault's vault credentials file is a certificate created by the gateway.
The Access Control Service then receives the public key from the portal (ACS).
The user is given access to the certificate's private key during the machine registration phase, which authenticates the machine.
The Azure Backup service transmits data to the specified vault based on the authentication.
Best practices for vault credentials
Download the vault credential file from the Azure site using a secure method to acquire the credentials:
The registration workflow is the only time the vault credentials are needed.
You are responsible for ensuring the vault credentials file is secure and unharmed.
The vault credentials can be used to register more machines to the vault if control of the certificates is lost.
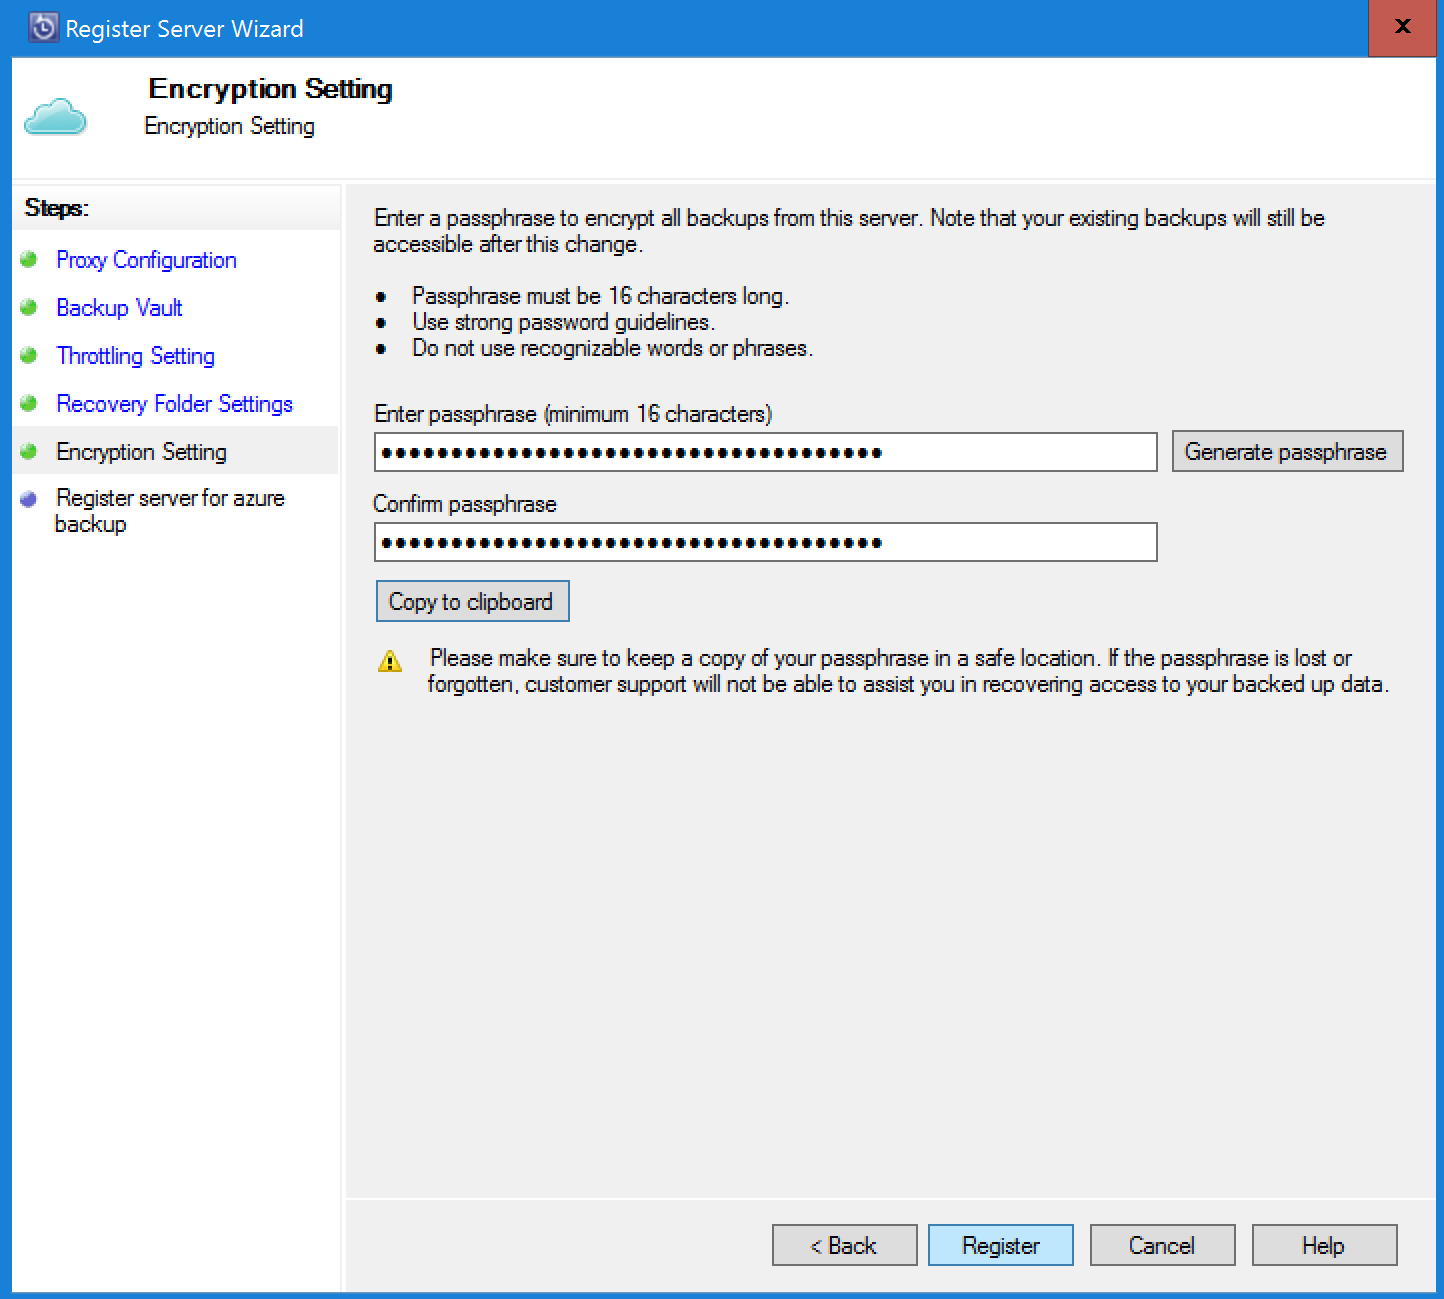
Existing backup data cannot be hacked because it is encrypted with a passphrase that you own.
Make sure the file is saved where the DPM server can access it. Check the access permissions if the file is stored in a file share or SMB.
After 48 hours, vault credentials become invalid. As often as necessary, you can download new vault credentials. The registration routine can only use the most recent vault credential file.
The certificate's private key is unknown to the Azure Backup service, and neither the service nor the portal has access to it.
To a local machine, download the credentials for the vault as follows:
Log in to the Azure website.
The vault where you want to register the DPM server should be opened.
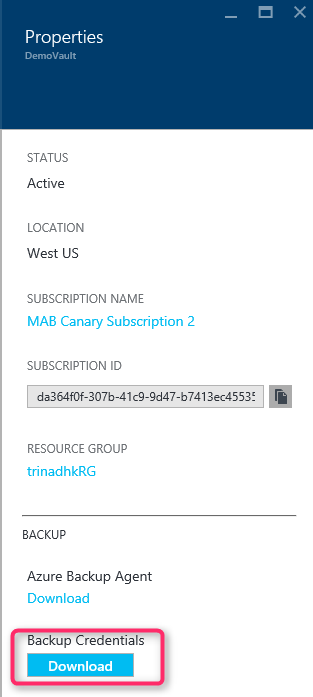
4. Select Download under Properties > Backup Credentials. By combining the vault name and current date, the portal generates the vault credential file and makes it available for download.
5. Choose Save or Save As and enter a place to download the vault credentials to. The generation of the file could take up to a minute.
Install the Backup Agent
The Backup agent, also known as the Microsoft Azure Recovery Service (MARS) agent, must be installed on every machine that Azure Backup backs up. Install the agent as follows on the DPM server
You should first access the vault where you wish to add the DPM server.
3. Download the Azure Backup Agent from the Properties page.
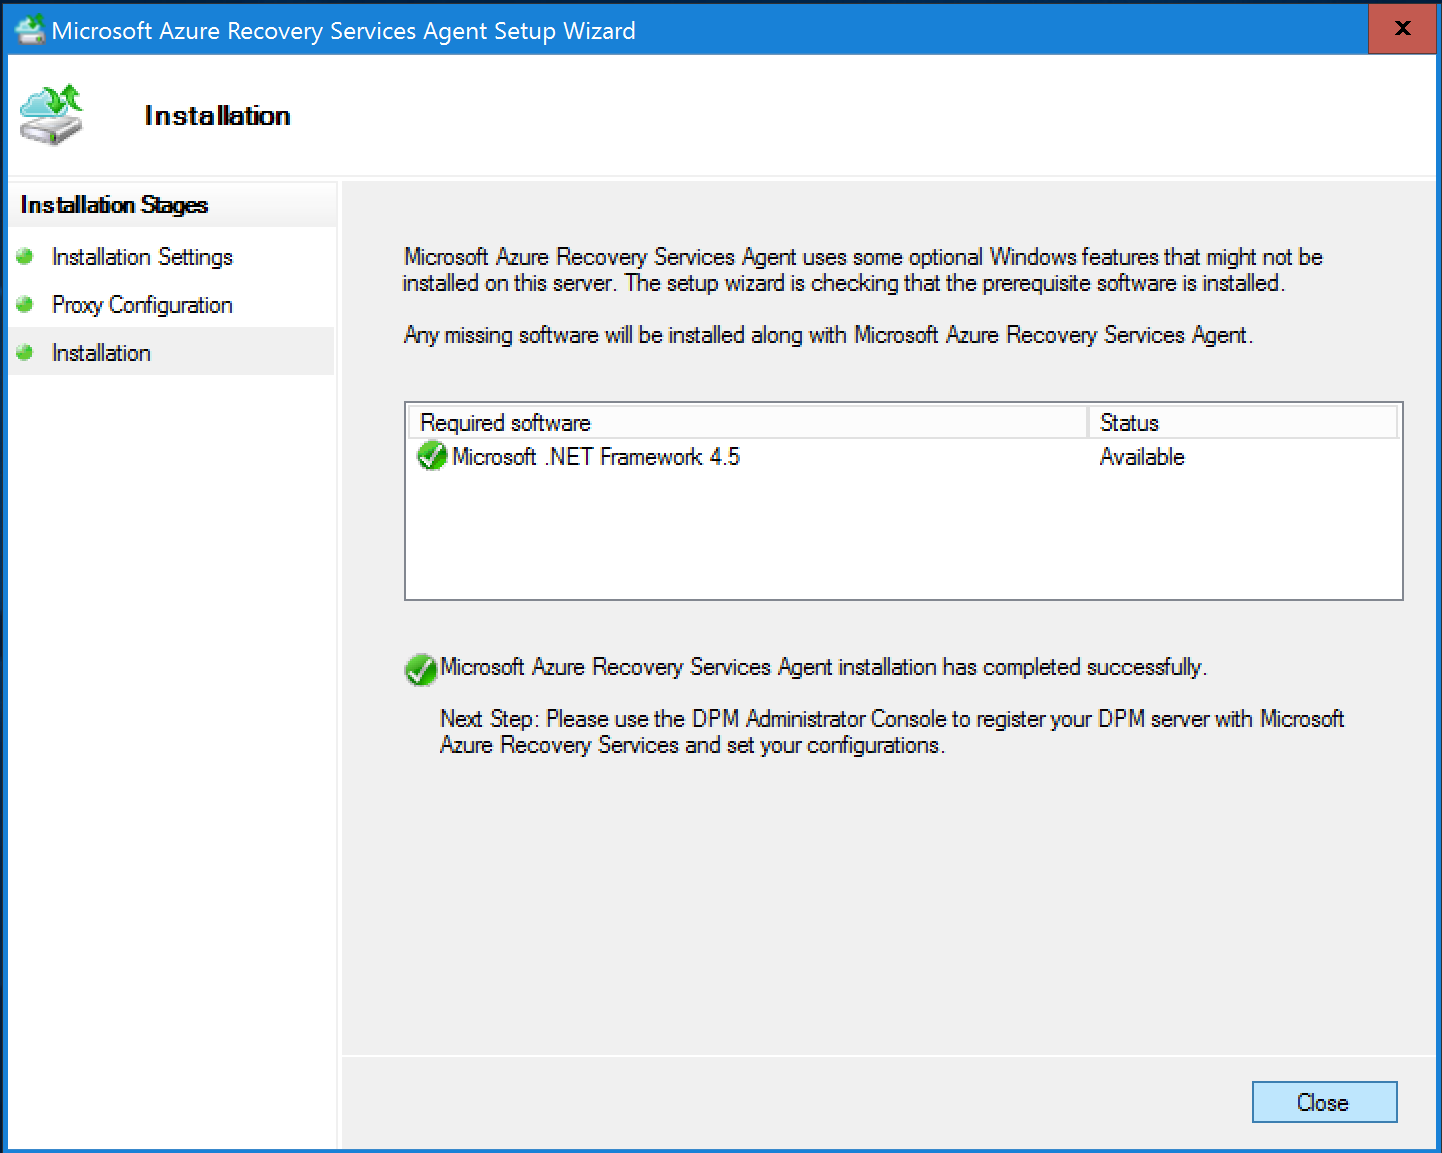
4. Run MARSAgentInstaller.exe to install the agent on the DPM system after downloading.
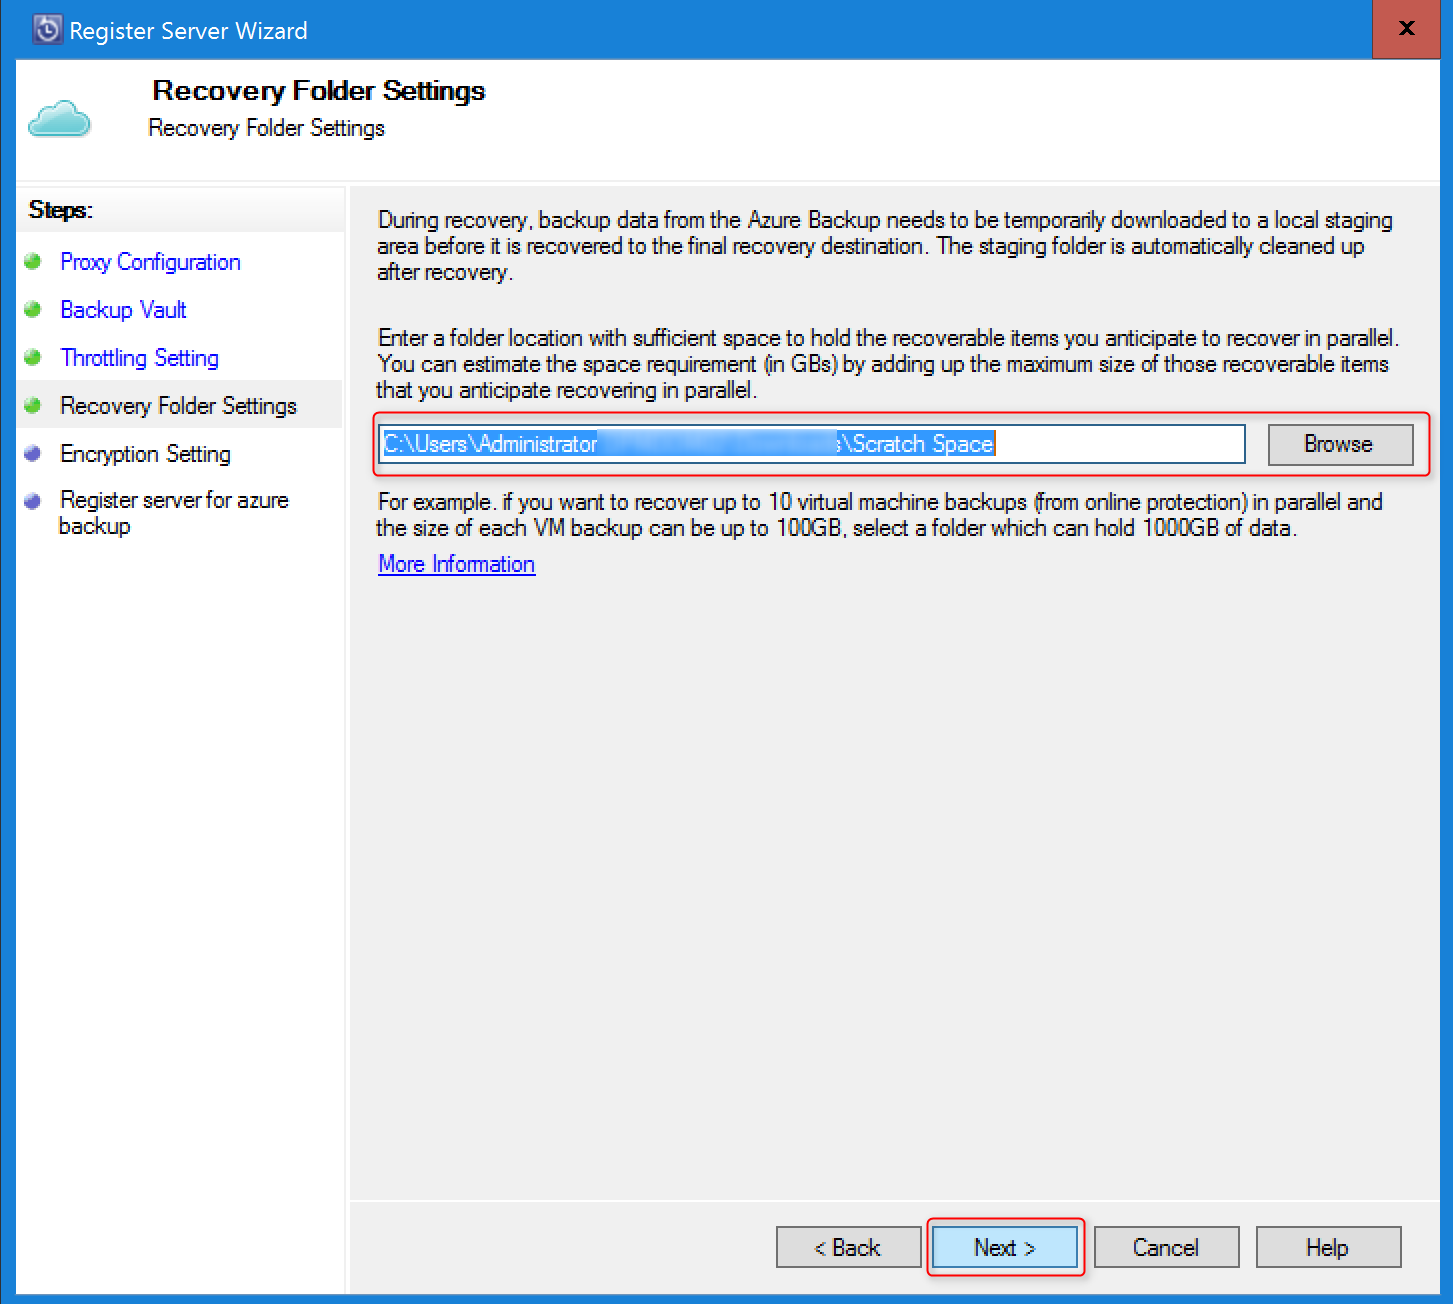
5. Choose a cache folder and an installation folder for the agent. At least 5% of the backup data must be available in the cache location.
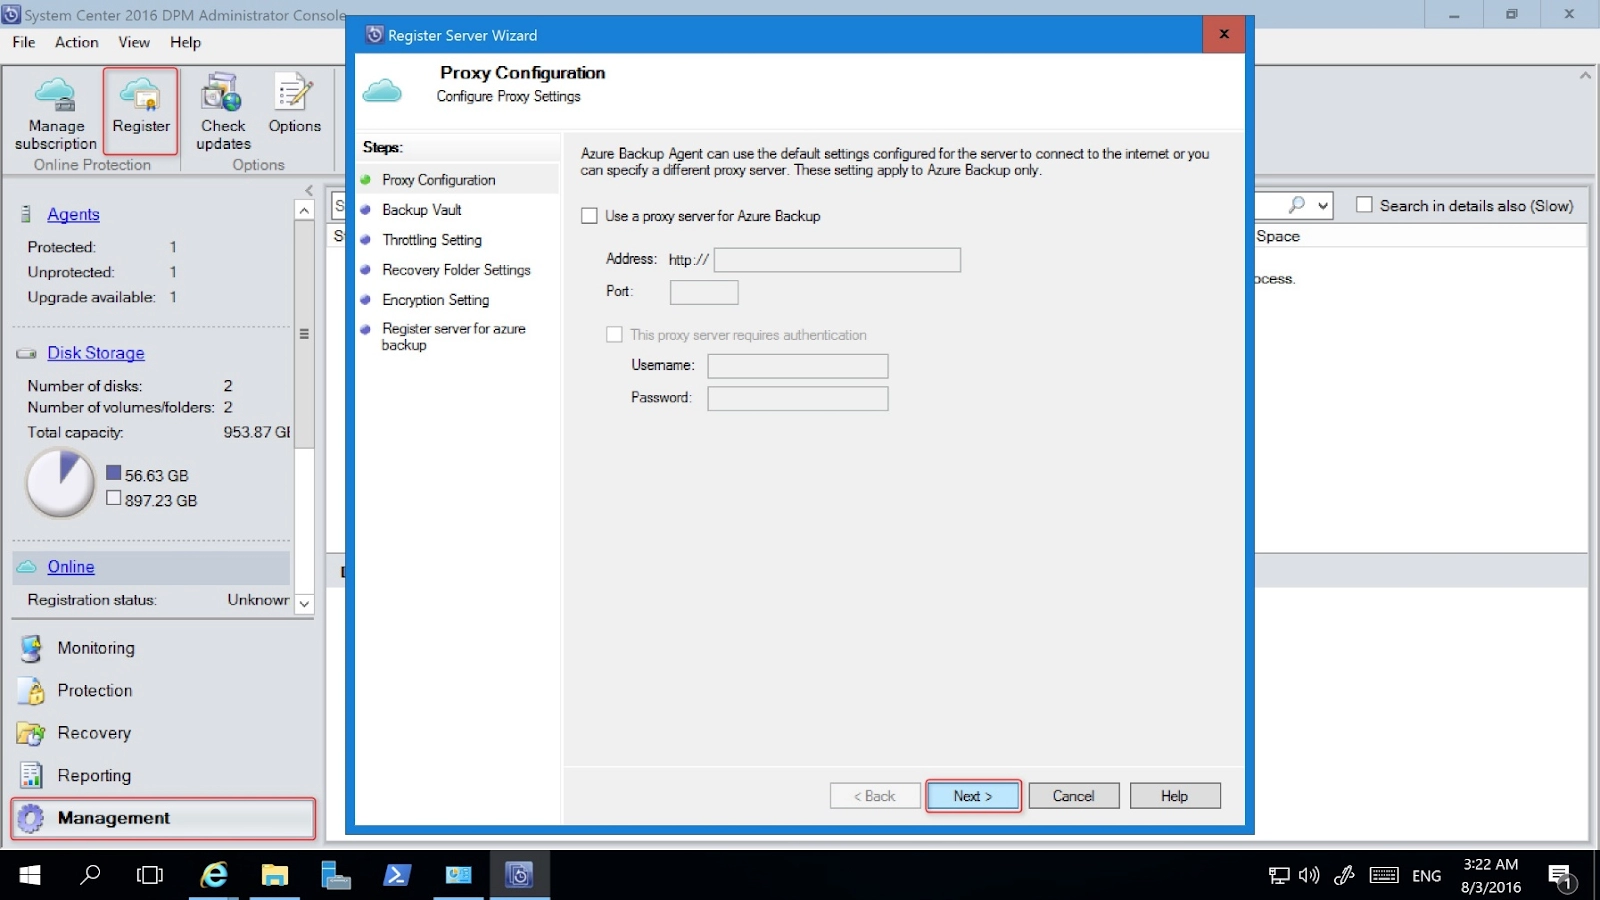
6. Enter the proxy server information in the Proxy settings screen if you use one to access the internet. Enter the user name and password on this screen if you use an authorized proxy.
7. The Azure Backup agent installs the.NET Framework 4.5 and Windows PowerShell (if necessary) to complete the installation.
8. Close the window once the agent has been installed.
4. You can choose whether to enable bandwidth throttling for backups under Throttling Settings. For specific work hours and days, you can set speed limits.
7. To add the DPM server to the vault, select Register.
You are now prepared to begin backing up to Microsoft Azure after the server has been successfully registered to the vault. To back up workloads to Azure, you must configure the protection group in the DPM panel.
Troubleshoot Vault Credentials
Expiration Error
After downloading through the site, the vault credentials file is only available for 48 hours. Sign in to the Azure portal and download the vault credentials file again if you have any errors on this screen, such as "Vault credentials file given has expired."
Access Error
Make that the setup application can access the vault credentials file where it is located. Copy the vault credentials file to a temporary directory on this machine and try the operation again if you see access-related issues.
Invalid Credentials Error
The file is either corrupted or doesn't have the most recent credentials linked to the recovery service if you have an invalid vault credential error, such as "Invalid vault credentials provided."
After obtaining a new vault credential file from the portal, retry the process.
This problem usually appears when you quickly pick the Download vault credential option twice in the Azure portal. Only the second vault credential file is legitimate in this situation.
Back up an Exchange server to Azure Backup with System Center 2012 R2 DPM
Prerequisites
Verify that all requirements for using Microsoft Azure Backup to secure workloads have been satisfied before moving on. The following are some of these requirements:
On the Azure website, a backup vault has been established.
The DPM server has downloaded the agent and vault credentials.
The DPM server has the agent installed.
The DPM server registration process involved using the vault credentials.
Upgrade to DPM 2012 R2 UR9 or later if you're safeguarding Exchange 2016.
DPM Protection Agent
Follow these procedures to install the DPM protection agent on the Exchange server:
Ensure that the firewalls are set up correctly. To configure firewall exceptions for the agent, go to that page.
You may install the agent on the Exchange server by choosing ManagementManagement> Agents > Install in the DPM Administrator Console. For a step-by-step guide, see Install the DPM protection agent.
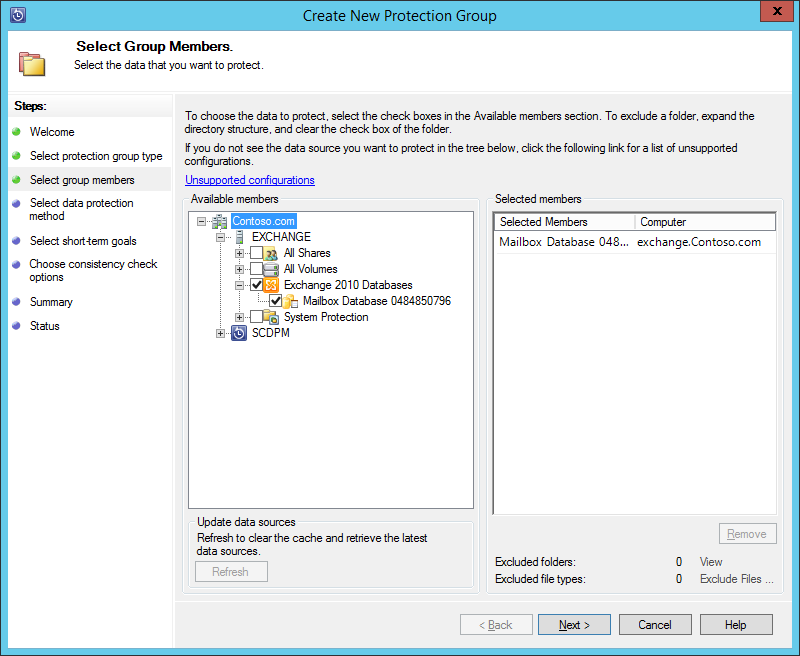
Create a protection group for the exchange server
To launch the Create New Protection Group wizard in the DPM Administrator Console, choose Protection, then New on the tool ribbon.
Select Next on the wizard's Welcome screen.
Select Servers and then click Next on the Select protection group type screen.
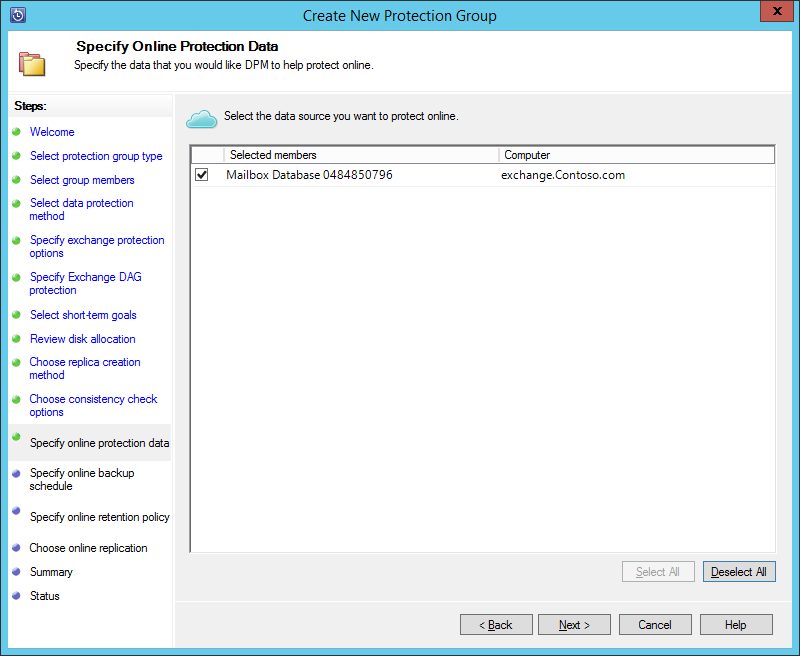
Choose Next after selecting the Exchange server database you wish to protect.
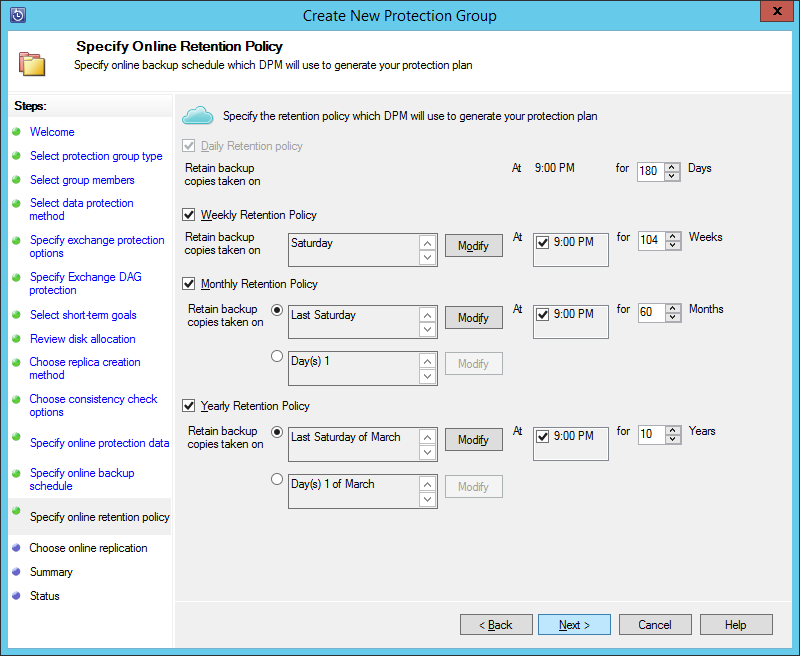
15. Select Next after configuring the Azure Backup retention policy.
16Select Next after selecting an online replication option.
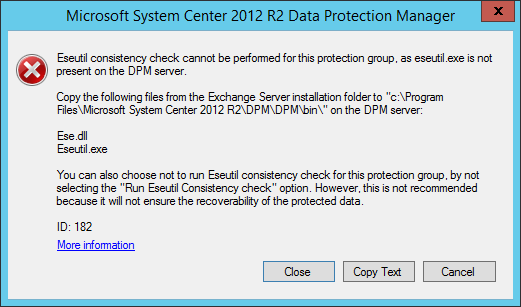
17. It can take a while for the initial backup to be created over the network if your database is big. You can make an offline backup to get around this problem.
18. Select Create Group after verifying the settings.
19. Choose Close.
Recover the exchange database
Select Recovery in the DPM Administrator Console to restore an Exchange database.
The Exchange database that you want to recover should be found.
From the recovery time drop-down menu, choose an online recovery point.
To launch the Recovery Wizard, select Recover.
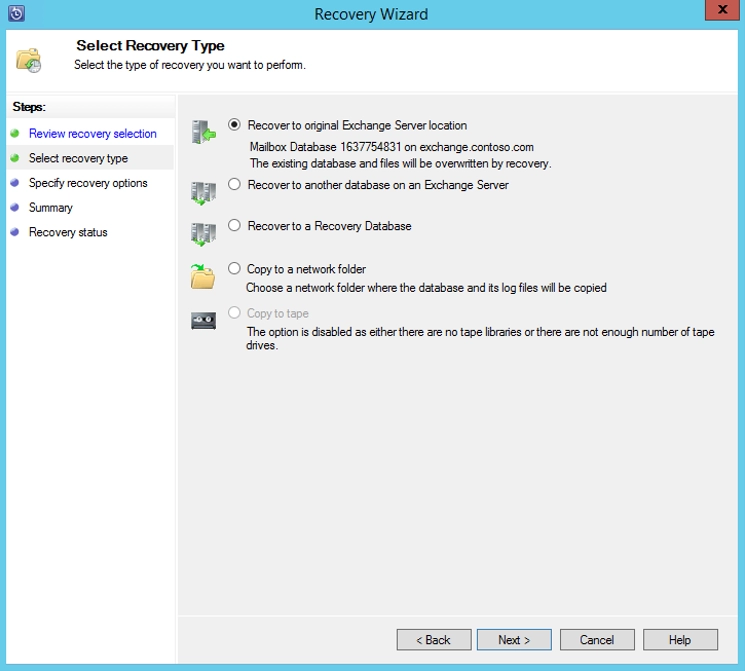
There are five different recovery types for online recovery points:
Return of data to original Exchange server: The data will be returned to the original Exchange server.
Data recovery to a different database on an Exchange server: The information will be transferred to a different database on an additional Exchange server.
Data will be restored to an Exchange Recovery Database through the process of recovery (RDB).
The data will be retrieved to a network folder and copied there.
Copy to the tape: The recovery point will be copied to a free tape if you have a tape library or standalone tape drive connected to and configured on the DPM server.
The data you've backed up to a Recovery Services vault can be recovered using Azure Backup Server. Similar to the recovery workflow for other Azure Backup components, the procedure is built within the Azure Backup Server management console.
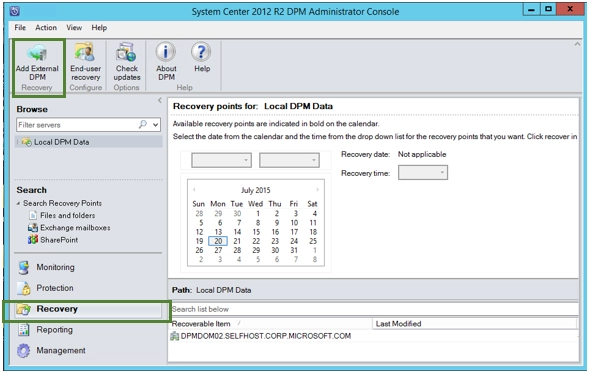
To get data from a backup server for Azure:
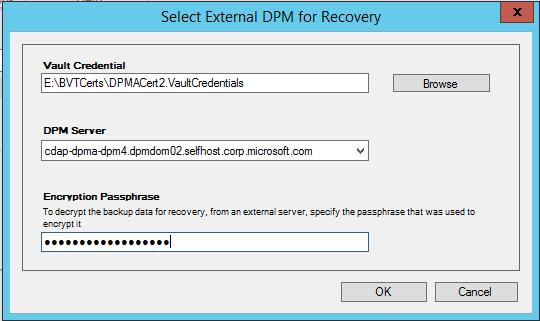
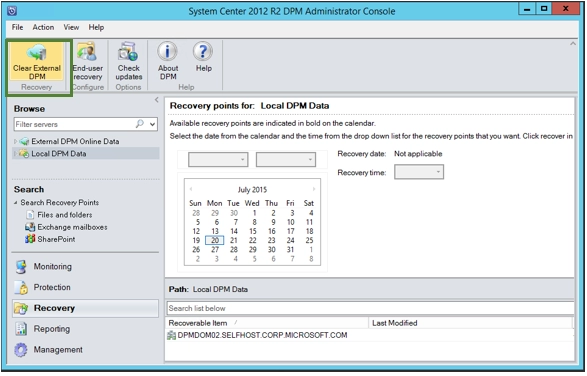
Choose "Add External DPM" from the Recovery tab of the Azure Backup Server control console (at the top left of the screen).
2. Choose the Azure Backup Server from the list of Azure Backup Servers registered with the Recovery Services vault, download fresh vault credentials from the vault linked with the server whose data is being recovered, and enter the encryption passphrase for that server.
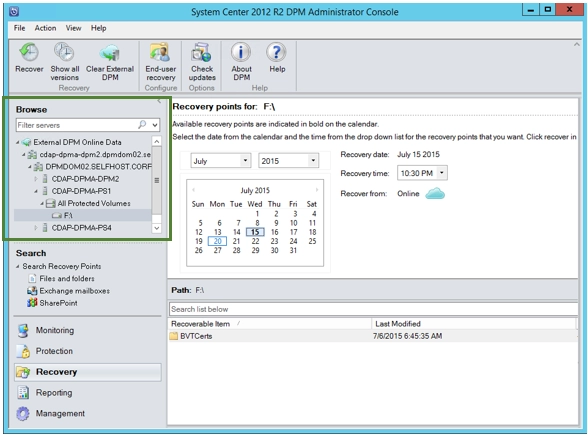
You can browse the data of the local Azure Backup Server and the external server from the Recovery page once the External Azure Backup Server has been successfully added.
3. Select the appropriate data source from the list of production servers that the external Azure Backup Server is able to backup.
4. From the Recovery points drop-down menu, choose the month and year, the necessary Recovery date for when the recovery point was produced, and the Recovery time.
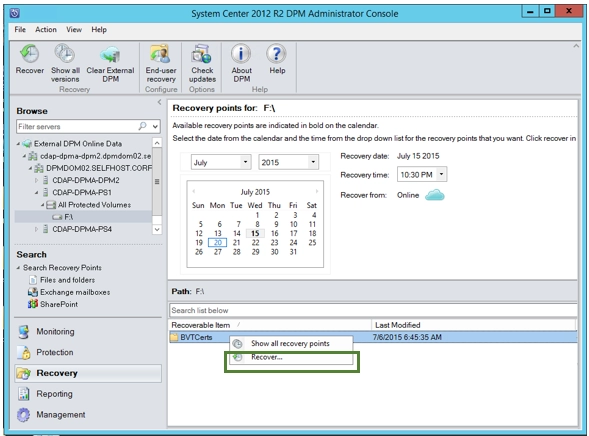
The bottom pane displays a list of files and folders that may be browsed and recovered to any location.
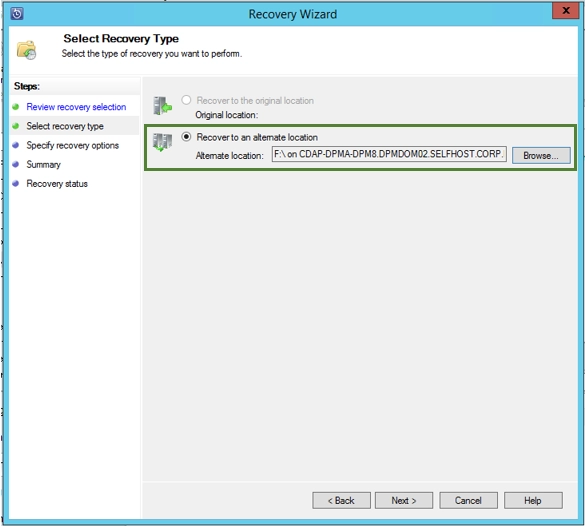
6. Examine the Recovery Option. Verify the data, the recovery time, the source from which the backup copy was made, and the backup copy's contents. Select Cancel to return to the recovery tab and choose the proper recovery point if your choice was incorrect. Select Next if the choice is accurate.
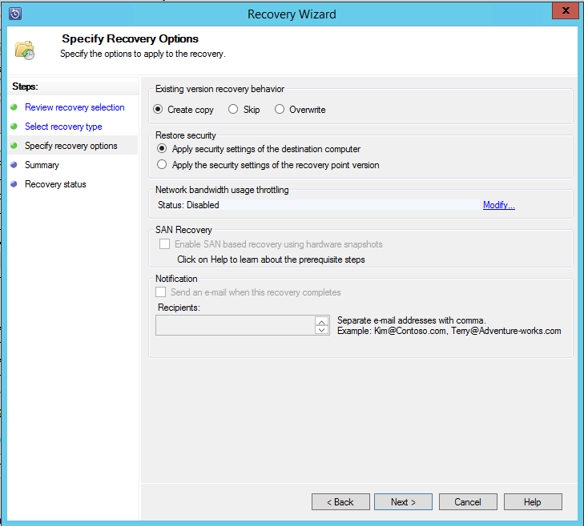
8. Select the Skip, Overwrite, or Create Copy option.
If there is a name conflict, the create copy command makes a copy of the file.
If there is a name collision, Skip doesn't attempt to recover the file, leaving the original file alone.
In the event of a name collision, overwrite overwrites the current copy of the file.
To restore security, select the appropriate option. You can either use the security settings that were in effect for the product at the time the recovery point was established or the security settings of the destination computer where the data is being retrieved.
Once the recovery has been successful, determine whether a notification has been delivered.
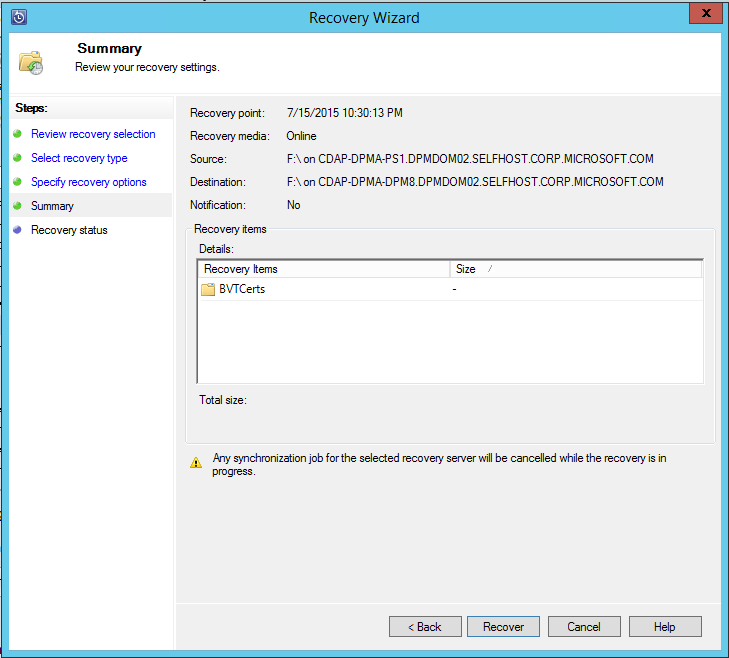
9. The selections selected thus far are listed on the Summary screen. The data is recovered to the appropriate on-premises location once you choose Recover.
Does each Azure subscription have a maximum amount of vaults that can be created?
Yes. Per supported area of Azure Backup and per subscription, you can establish a maximum of 500 Recovery Services vaults. Create an additional subscription if you require more vaults.
Do each vault's registered servers and computers have a maximum number that can be used?
1000 Azure Virtual Machines can be registered per vault. You can register up to 50 MARS agents per vault if you're using the Microsoft Azure Backup Agent. Additionally, 50 MABS servers or DPM servers can be registered to a vault.
How many datasources or things can a vault safely store?
Up to 2000 datasources/items from all workloads (such IaaS VM, SQL, and AFS) can be stored in a vault for protection. For instance, you can only protect up to 1100 SQL databases in the vault if 500 VMs and 400 Azure Files shares have already been protected there.
Per vault, how many policies can I create?
Each vault is limited to 200 policies. The number of new backup rules that can be added or updated per day either Azure Resource Manager (ARM) templates or Azure automation clients like PowerShell is 50.
How can I isolate data from many servers in my organization's single vault while recovering data?
When creating a backup, all server data that you want to restore together should have the same passphrase. Use a passphrase unique to that server or those servers only if you want to limit recovery to a certain server or servers. For instance, accounting servers, human resources servers, and storage servers might all have a different encryption passphrase.
Is the retention schedule used by an on-demand backup process the same as that for scheduled backups?
No; for an on-demand backup process, specify the retention period. When triggered through the portal, it is automatically preserved for 30 days.
I have a lock on all the resources connected to my virtual machine at the level of the resource group. Can I use my backup?
To save ResourcePointCollections objects, Azure Backup creates a unique resource group with the syntax AzureBackupRG geo> number>. Locking this resource group, which belongs to the service, will stop backups from happening. Only customer-created resource groups are eligible for locks.
Conclusion
In this article, we discussed how to Get ready to use System Center DPM to backup workloads to Azure, Back up an Exchange server to Azure Backup with System Center 2012 R2 DPM, and how to recover data from an azure backup server.


 9+ registered

