


Introduction
GWT (Google Web Toolkit) is a development toolkit for optimizing and building browser-based applications. Google uses GWT in many products, including Google Adwords and Orkut.

GWT is free, open-source, and used by thousands of developers worldwide. GWT is licensed under the Apache License of version 2.0.
GWT asserted reusable approaches to common web-app tasks like bookmarking, UI abstraction and cross-browser portability, etc. In this article, we will discuss a particular widget, Hyperlink, which does history management and token creation by writing code.
GWT Bookmarking Example
GWT permits browser history management using a History class. GWT uses the term "token," a string that the app can parse to return to a particular state. The application will save this token in the browser's History as a URL fragment.
The following steps will take us through simple steps to demonstrate Bookmarking of a GWT application.
| Step | Description |
| 1 | Create a project named HelloWorld under a package com.codingninjas. |
| 2 | Change Helloworld.gwt.xml, HelloWorld.css, Helloworld.html, and HelloWorld.java as below. We need to keep unchanged the remaining files. |
| 3 | Compile and run the app to verify the result of the logic implemented. |
📘 Below code is the content of the modified module descriptor src/com.codingninjas/HelloWorld.gwt.xml
<?xml version = "1.0" encoding = "UTF-8"?>
<module rename-to = 'helloworld'>
   <!-- Inherit the core Web Toolkit stuff.                        -->
   <inherits name = 'com.google.gwt.user.User'/>


   <!-- Inherit the default GWT style sheet.                       -->
   <inherits name = 'com.google.gwt.user.theme.clean.Clean'/>


   <!-- Specify the app entry point class.                         -->
   <entry-point class = 'com.codingninjas.client.HelloWorld'/>
   <!-- Specify the paths for translatable code                    -->
   <source path = 'client'/>
   <source path = 'shared'/>


</module>
📘 Below code is the content of the modified style sheet file war/HelloWorld.css
body {
   text-align: center;
   font-family: Verdana, sans-serif;
}


h1 {
   font-size: 2em;
   font-weight: bold;
   color: #777777;
   margin: 40px 0px 70px;
   text-align: center;
}
📘 Below code is the modified HTML host file war/HelloWorld.html
<html>
   <head>
      <title>Hello World</title>
      <link rel = "stylesheet" href = "HelloWorld.css"/>
      <script language = "javascript" src = "helloworld/helloworld.nocache.js">
      </script>
   </head>

   <body>
      <iframe src = "javascript:''"id = "__gwt_historyFrame"
         style = "width:0;height:0;border:0"></iframe>
      <h1> Bookmarking Demonstration</h1>
      <div id = "gwtContainer"></div>
   </body>
</html>
📘 Now, let’s see Java file content src/com.codingninjas/HelloWorld.java with the help of which we will demonstrate GWT Bookmarking
package com.codingninjas.client;

import com.google.gwt.core.client.EntryPoint;

import com.google.gwt.event.logical.shared.ValueChangeEvent;
import com.google.gwt.event.logical.shared.ValueChangeHandler;

import com.google.gwt.user.client.History;
import com.google.gwt.user.client.ui.HTML;
import com.google.gwt.user.client.ui.HorizontalPanel;
import com.google.gwt.user.client.ui.Hyperlink;
import com.google.gwt.user.client.ui.RootPanel;
import com.google.gwt.user.client.ui.TabPanel;
import com.google.gwt.user.client.ui.VerticalPanel;


public class HelloWorld implements EntryPoint {

   private TabPanel tabPanel;

   private void selectTab(String historyToken){
      /*  parse the history token */
      try {
         if (historyToken.substring(0, 9).equals("pageIndex")) {
            String tabIndexToken = historyToken.substring(9, 10);
            int tabIndex = Integer.parseInt(tabIndexToken);
            /* Select the specified tab panel */
            tabPanel.selectTab(tabIndex);
         } else {
            tabPanel.selectTab(0);
         }
      } catch (IndexOutOfBoundsException e) {
         tabPanel.selectTab(0);
      }
   }


   /**
    * This is the entry point method.
    */
   public void onModuleLoad() {
      /* create a tab panel to carry multiple pages */
      tabPanel = new TabPanel();


      /* create pages */
      HTML firstPage = new HTML("<h1>We are on first Page.</h1>");
      HTML secondPage = new HTML("<h1>We are on second Page.</h1>");
      HTML thirdPage = new HTML("<h1>We are on third Page.</h1>");


      String firstPageTitle = "First Page";
      String secondPageTitle = "Second Page";
      String thirdPageTitle = "Third Page";


      Hyperlink firstPageLink = new Hyperlink("1", "pageIndex0");
      Hyperlink secondPageLink = new Hyperlink("2", "pageIndex1");
      Hyperlink thirdPageLink = new Hyperlink("3", "pageIndex2");


      HorizontalPanel linksHPanel = new HorizontalPanel();
      linksHPanel.setSpacing(10);
      linksHPanel.add(firstPageLink);
      linksHPanel.add(secondPageLink);
      linksHPanel.add(thirdPageLink);


      /* If the application starts with no history token,
         redirect to a pageIndex0 */
      String initToken = History.getToken();


      if (initToken.length() == 0) {
         History.newItem("pageIndex0");
         initToken = "pageIndex0";
      }


      tabPanel.setWidth("400");
      /* add pages to tabPanel*/
      tabPanel.add(firstPage, firstPageTitle);
      tabPanel.add(secondPage,secondPageTitle);
      tabPanel.add(thirdPage, thirdPageTitle);


      /* add value change handler to History
       * this method will be called when the browser's Back button
       * or Forward button are clicked.
       * and URL of application changes.
       * */
      History.addValueChangeHandler(new ValueChangeHandler<String>() {
         @Override
         public void onValueChange(ValueChangeEvent<String> event) {
            selectTab(event.getValue());
         }
      });


      selectTab(initToken);


      VerticalPanel vPanel = new VerticalPanel();


      vPanel.setSpacing(10);
      vPanel.add(tabPanel);
      vPanel.add(linksHPanel);


      /* add controls to RootPanel */
      RootPanel.get().add(vPanel);
   }
} 
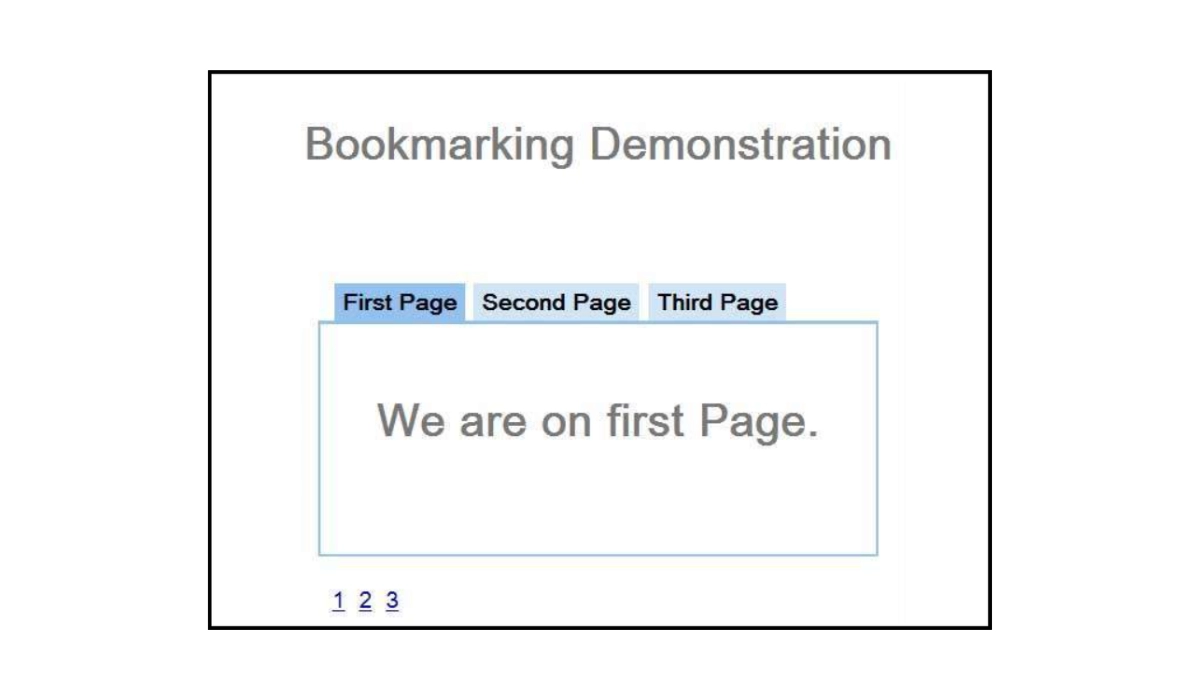
Once all the changes are done, we need to compile and run the application in development mode as we have done earlier. If everything is ok with our application, the following output will be generated:
-
Now, if we click on 1, 2, or 3. We can see that the tab changes with indexes.
-
Another thing to notice is when we click on 1, 2, or 3, the application URL changes, and #pageIndex is added to the URL.
-
We can also notice that the browser's forward and back buttons are enabled now.
-
After using the back and forward buttons of the browser, we will see the different tabs get selected, respectively.
-
If we right-click on 1, 2, or 3, we can see options such as open, open in a new window, open in a new tab, add to favorites, and many more.
-
Now go to 3 and right-click on it. Choose to add to favorites, save Bookmark as page 3.
- Now when we will open favorites and choose page 3. We will see that the third tab is selected.


 9+ registered

