


Introduction
For both novice and experienced testers, Katalon Studio is an all-in-one test automation solution for web, API, mobile, and desktop. In this article, we will be learning about Setting up Desired Capabilities in Mobile Testing in Katalon Studio.

Synchronization
A technology called synchronization enables numerous threads to operate simultaneously. In order to advance the test execution, the application under test (AUT) and the automation tool we use should communicate. We need to employ synchronization instructions to accomplish this and prevent execution problems. You may learn how to do that in this guide.
We can add synchronization instructions to runtime recording to wait for page loading, element presence, element visibility, etc.
Step 1: Open Katalon Studio and select the main toolbar's Create New Test Case button. Give your test case a name, then click OK. The creation of a blank test case.

Step 2: From the main toolbar, select Record Web.

Step 3: The Record dialogue opens and displays actions that have been recorded.
Give the application's URL that is being tested.

Step 4: Choose a browser and press Record to begin recording the test instance.

Step 5: After launching your program, place the pointer above Make Appointment and select the button. The login page needs to load before you can log in.

Step 6: In the Recorded Actions tab of runtime recording, synchronization commands can be added. Decide which stage the synchronization commands will be added at. Select Add.

Step 7: Double-click the just created term and enter the keyword "Wait For Page Load." Double-click the input cell and then enter 45 seconds as the value.

For the next command to be executed, Katalon Studio will now wait 45 seconds for the website to load fully. These synchronization instructions prevent execution errors.

Anytime you need to, you can pause and resume the recording. Let's keep on recording some additional moves. Change to the browser where you are recording, then navigate to the "Make Appointment" button and click it.
Step 8: At this point, we must add the Wait for Element Present command before selecting the Make Appointment button in order to wait for a certain element to load and take a specified action.
Right-click the element and select Katalon Studio > Wait For Element Present to accomplish this.

We have therefore inserted two wait commands here, one to wait until the page loads and the other to wait till the element is visible. These keywords were included because, occasionally, DOM elements won't be present even after the page has loaded (referring to Ajax-based applications mainly).
Step 9: All of the wait commands require the expected time as an argument. Select the Wait For Element Present step and enter a 15-second expectation time span.

Step 10: The Wait For Element Visible command can also be added to the Login button. Click Stop when finished, then save the recorded actions to Katalon Studio. When saving captured items, you are asked to store them in the Object Repository so that they can later be utilized. In order to keep page items in the proper structure, you may alternatively establish a folder.
Your test script should be recorded as shown below.
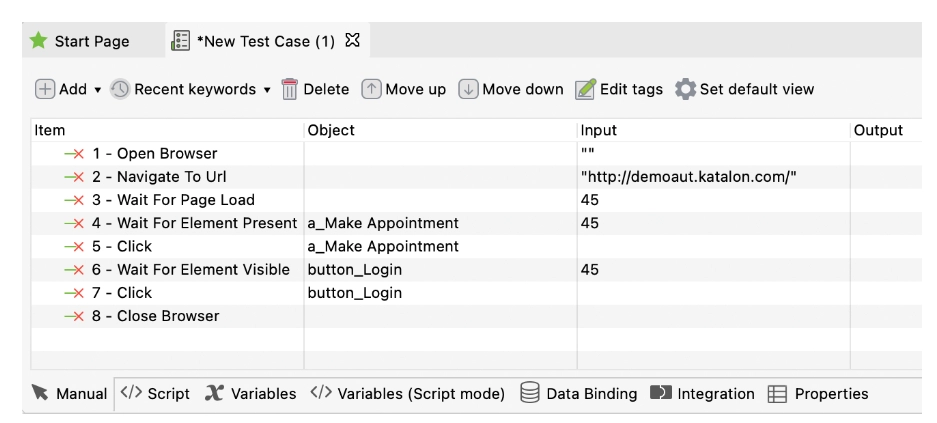
To view the created code, select the Script tab. From the script mode, you may easily change the script. In script mode, all recorded actions can be changed.
Script code:
WebUI.openBrowser('')

WebUI.navigateToUrl('http://demoaut.katalon.com/')

WebUI.waitForPageLoad(45)

WebUI.waitForElementPresent(findTestObject('Page_CURA Healthcare Service/a_Make Appointment'), 45)

WebUI.click(findTestObject('Page_CURA Healthcare Service/a_Make Appointment'))

WebUI.waitForElementVisible(findTestObject('Page_CURA Healthcare Service (1)/button_Login'), 45)

WebUI.click(findTestObject('Page_CURA Healthcare Service (1)/button_Login'))

WebUI.closeBrowser()
While recording automation test cases in manual or script mode, it is advised to include synchronization. In order to prevent execution errors, it is also a good idea to employ wait instructions.


 8+ registered

