Program Code to Create a Quad Curve
The below-given code generates a QuadCurve with the name quad curve (control point, start point and end point are passed as arguments). The QuadCurve will be produced within a scene, which will then be housed within a stage. The function setTitle() is used to give the stage a title. The quad curve is then added to the group. The group is involved in the scene. The show() function is then used to display the final findings.
Code:
import javafx.application.Application;
import javafx.scene.Scene;
import javafx.scene.shape.DrawMode;
import javafx.scene.layout.*;
import javafx.event.ActionEvent;
import javafx.scene.shape.QuadCurve;
import javafx.scene.control.*;
import javafx.stage.Stage;
import javafx.scene.Group;
public class quad_curve_0 extends Application {

    // application launch
    public void start(Stage stage)
    {
        //for setting the title for the stage
        stage.setTitle("creating quad_curve");

        // for creating a quad_curve
        QuadCurve quad_curve = new QuadCurve(10.0f, 10.0f, 120.0f, 240.0f, 160.0f, 70.0f);

        // for creating a Group
        Group group = new Group(quad_curve);

        // for translating quad_curve to a position
        quad_curve.setTranslateX(100);
        quad_curve.setTranslateY(100);

        // Creating scene
        Scene scene = new Scene(group, 500, 300);

        // setting the scene
        stage.setScene(scene);

        stage.show();
    }

    public static void main(String args[])
    {
        // launching the application
        launch(args);
    }
}
Output:

Program Code to Create a Quad Curve and set a fill for Quad Curve
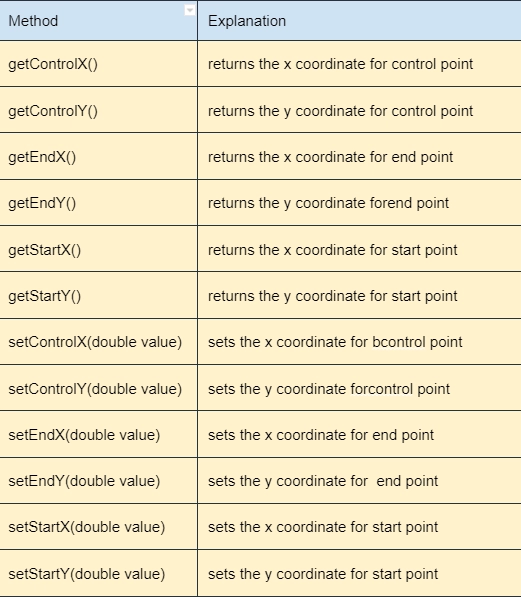
The below-given code generates a quad curve. The control point, start point, and end point are specified using the setControlX(), setControlY(), setStartX(), setStartY(), setEndX(), and setEndY() methods. The QuadCurve will be produced within a scene, housed within a stage. The function setTitle() is used to give the stage a title. The quad curve is then added to the group. The group is involved in the scene. The show() function is then used to display the final findings. Set the fill for the quad curve using the method setFill().
Code:
import javafx.application.Application;
import javafx.scene.Scene;
import javafx.scene.shape.DrawMode;
import javafx.scene.layout.*;
import javafx.event.ActionEvent;
import javafx.scene.shape.QuadCurve;
import javafx.scene.control.*;
import javafx.stage.Stage;
import javafx.scene.Group;
import javafx.scene.paint.Color;
public class quad_curve_1 extends Application {

    // launch the application
    public void start(Stage stage)
    {
        // set title for the stage
        stage.setTitle("creating quad_curve");

        // create a quad_curve
        QuadCurve quad_curve = new QuadCurve();

        // set start
        quad_curve.setStartX(10.0f);
        quad_curve.setStartY(10.0f);

        // set control coordinates
        quad_curve.setControlX(120.0f);
        quad_curve.setControlY(240.0f);

        // set end coordinates
        quad_curve.setEndX(160.0f);
        quad_curve.setEndY(70.0f);

        // create a Group
        Group group = new Group(quad_curve);

        // translate the quad_curve to a position
        quad_curve.setTranslateX(100);
        quad_curve.setTranslateY(100);

        // set fill for the quad curve
        quad_curve.setFill(Color.BLUE);

        // create a scene
        Scene scene = new Scene(group, 500, 300);

        // set the scene
        stage.setScene(scene);

        stage.show();
    }

    public static void main(String args[])
    {
        // launch the application
        launch(args);
    }
}
Output:

Note:
- Save the above given codes as <class_name>.java.
-
compile and execute the above-stored java file from the command prompt using these commands:
javac <class-name>.java
java <class_name>
Conclusion
This article extensively discussed the JavaFX Quad Curve and its methods with the help of examples that are useful in making 2-D shapes. In this article, we have discussed JavaFX Quad Curve in detail. We hope this blog has helped you enhance your knowledge regarding JavaFX 2-D Shapes.
To learn more, check out our JavaFX Arc, JavaFX Circle, and JavaFX Parallel Transition articles. Practice makes a man perfect. To practice and improve yourself for the interviews, you can check out Top 100 SQL problems, Interview experience, Coding interview questions, and the Ultimate guide path for interviews. Do upvote our blog to help other ninjas grow. Happy Coding!


 9+ registered

