Example Test Suit
Now let’s see the step-by-step process of creating and running a test suite. Before that, we will create two classes, namely testClass1 and testClass2, that we will group under the testSuite1 class.
Test Class1
Let’s create a JUnit test class named testClass1. It contains one @Test, which simply prints the class name in the console and implements an assertTrue.
package com.aditya04848.junit.helper;
import static org.junit.Assert.assertTrue;
import  org.junit.Test;
public class testClass1 {
    @Test
    public void test() {
        System.out.println("test class 1");
        assertTrue(true);
    }
}

You can also try this code with Online Java Compiler
Test Class2
Let’s create another JUnit test class called testClass2. It is similar to testClass1.
package com.aditya04848.junit.helper;
import static org.junit.Assert.assertTrue;
import  org.junit.Test;
public class testClass2 {
    @Test
    public void test() {
        System.out.println("test class 2");
        assertTrue(true);
    }
}
You can also try this code with Online Java Compiler
Test Suite Class
Now let’s create a test suite named testSuite1 as a JUnit test. I will group the above two JUnit test classes in a suite.
We will annotate the testSuite1 class with @RunWith and @SuiteClasses annotation, and inside the parentheses, testClass1 and testClass2 are given. Inner implementation of testSuite1 class will be kept empty.
See the below code to understand better.
package com.aditya04848.junit.helper;
import org.junit.runner.RunWith;
import org.junit.runners.Suite;
import org.junit.runners.Suite.SuiteClasses;

@RunWith(Suite.class)
@SuiteClasses({testClass1.class, testClass2.class})
public class testSuite1 {
}
You can also try this code with Online Java Compiler
Output
JUnit output
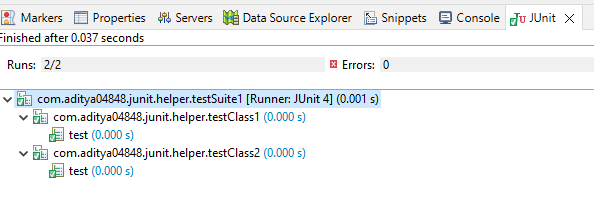
We can see that running testSuite1 class, the two classes testClass1 and testClass2 under testSuite1 Class run successfully.
Console output

Check out JUnit Interview Questions here.
FAQs
-
What is the @suite test In JUnit?
The test suite bundles a few unit test cases and runs them together. In JUnit, both @RunWith and @Suite annotations run the suite tests.
-
What is @selectclasses In the JUnit test?
@SelectClasses @SelectClasses specifies the classes to select when running a test suite via @RunWith (JUnitPlatform.class). Pass ClassName.class as parameter to @SelectClasses annotation. Pass class names in the parameter as array (inside curly braces {}) to @SelectClasses annotation.
-
What is @suitedisplayname annotation in JUnit?
@SuiteDisplayName Use this annotation to give a display name for the annotated test class executed as a test suite on the JUnit Platform.
-
Can we use spaces in the display name In the JUnit report?
We can use spaces, special characters, and even emojis in the display name. By default, JUnit reporting prints the class name and method name in the IDE test report. We can use @DisplayName to specify a custom name that is easy to read and provide information about the test class and method.
Key Takeaways
In this article, we have extensively discussed the JUnit test suites topic; we have learned that it is vital to group test classes in different groups called test suites. We have learned to create a test suite class using @Runwith and @SuiteClasses.
We hope that this blog has helped you enhance your knowledge regarding JUnit Test Suits and if you would like to learn more, check out our articles on Time Test in JUnit, JUnit Error Collector. Do upvote our blog to help other ninjas grow.
Head over to our practice platform Coding Ninjas Studio to practice top problems, attempt mock tests, read interview experiences, and much more.!
Happy Reading!


 9+ registered

