


Introduction
Running tests in the browser can be a very vital tool for developers. Browser support can provide better structure to your tests and make integrating new unit tests to existing applications easier.
Every release of Mocha comes with new builds of ./mocha.js and ./mocha.css for use in the browser. Through this article, we will explore the typical setup of the Mocha test runner in the browser, browser configurations, options, reporting, and implementation with the help of examples.
Setup
Though the implementation of running unit tests using the Mocha framework in the browser varies depending on the project requirements. The basic setup looks similar to the one given below:
Program:
<!DOCTYPE html>
<html>
  <head>
     <!-- styling for the test results -->
     <link
        rel="stylesheet"
        href="https://cdnjs.cloudflare.com/ajax/libs/mocha/3.1.0/mocha.min.css"
     />
  </head>
  <body>
     <!-- container that will display test results -->
     <div id="mocha"></div>

     <!-- mocha (test runner) -->
     <script
     src="https://cdnjs.cloudflare.com/ajax/libs/mocha/3.1.0/mocha.min.js"></script>

     <!-- chai (assertion library) -->
     <script
     src="https://cdnjs.cloudflare.com/ajax/libs/chai/3.5.0/chai.min.js"></script>

     <!-- You can load the test from source file or write the code-->
     <!-- <script src="test.js"></script>-->>
     <script>
        // setup test helpers
        mocha.setup("bdd");

        // your tests here
        describe("test suite", function () {
           it("should work", function () {
              chai.assert(true);
           });
        });

        // run tests
        mocha.run();
     </script>
  </body>
</html>
Output:
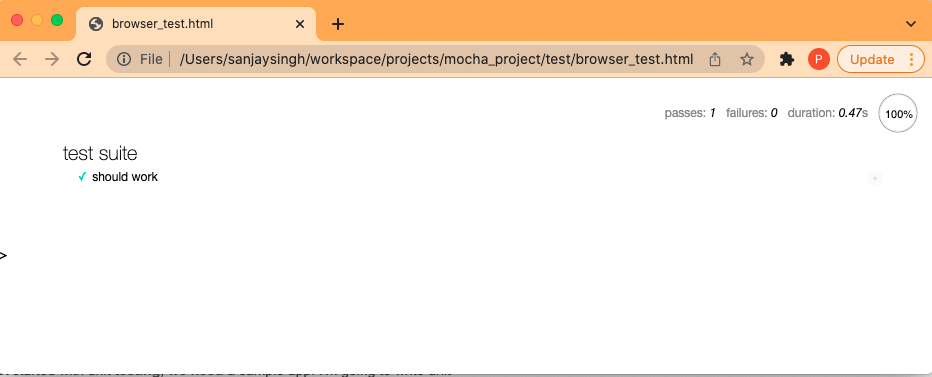
Here we are calling mocha.setup('bdd') to use the Behavior Driven Development(BDD) interface before loading the test script, running it onload with mocha.run().
The Output is the HTML Reporter, the default reporter while running the Mocha framework in the browser. You can also use alternative reporters like Mochawesome.

 9+ registered

