Do you think IIT Guwahati certified course can help you in your career?
Introduction
Securing sensitive data of your project is critical. In your test projects, you might need to keep private information like usernames, passwords, linking strings, or other values. For this, you often use project properties.
This article discusses how you can use security assertions to safeguard the data for your projects. These assertions mainly check the data stored in response does not contain vulnerable contents that will hamper your system.
Types of Security Assertions
The main security assertions in Ready API are as follows:
🧩 Basic Authorization.
🧩 Cross-site scripting.
🧩 Sensitive Files Exposure.
🧩 Sensitive Information Exposure.
🧩 Weak Password.
Let’s discuss all of them one by one.
Basic Authorization
An HTTP user agent can utilize basic access authorization to send a username and password along with a request.
HTTP headers that are static and industry-standard are used for HTTP Basic authorization. The Basic Authorization assertion verifies the use of the basic authorization.
It is only possible to use the assertion in security tests. Use this claim in association with the security scan for weak authentication.
Create an Assertion
Follow the given steps to create an assertion:
⚡ Step 1: Select and open a Security Test.
⚡ Step 2: Select Response Assertion in the box next to the Weak Authentication scan.
⚡ Step 3: Select + in the Assertions panel.
Search for the Basic Authorization assertion in the New Assertions dialogue or choose it manually under the Security category.
Cross-Site Scripting Assertion
The response is examined for material that discloses system information by the Cross-Site Scripting assertion. It looks for injection strings in the response that resemble the parameter strings.
It also enables you to develop a script that will generate a list of URLs to validate each token separately.
Create an Assertion
Follow the given steps to create an assertion:
⚡ Step 1: Select a security test.
⚡ Step 2: Select Response Assertion in the box next to the Cross-Site Scripting scan.
⚡ Step 3: Select + in the Assertions panel.
Search for the CrossSite Scripting assertion in the Security category of the New Assertions window or choose it manually.
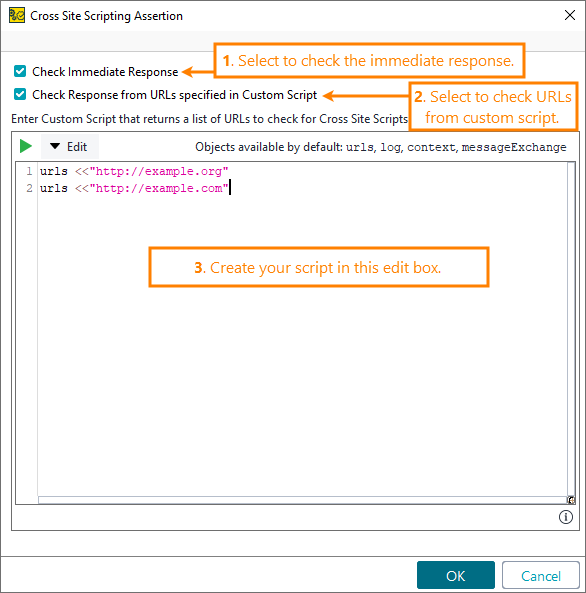
Setting Up Properties
To check the response as soon as the script is launched, choose to Check Immediate Response.
To check responses from the URL list that you can define in a custom script, select Check Response from URLs specified in Custom Script. Then, develop a custom script to examine REST and SOAP individual pages that prevent you from viewing the instant responses in a browser for XSS vulnerabilities.
Sensitive Files Exposure
By examining the HTTP status code it received from the server, the Sensitive Files Exposure assertion determines whether ReadyAPI can access sensitive files. The Sensitive Files Exposure security scan setting includes a list of the sensitive files.
The resource path is partially replaced by the file paths supplied in the scan configuration to perform the security scan. Results depend on the status codes supplied as a list of comma-separated values in the assertion configuration.
Create an Assertion
Follow the given steps to create an assertion:
⚡ Step 1: Select a security test.
⚡ Step 2: Select Response Assertion in the box next to the Sensitive File Exposure scan.
⚡ Step 3: Select + in the Assertions panel.
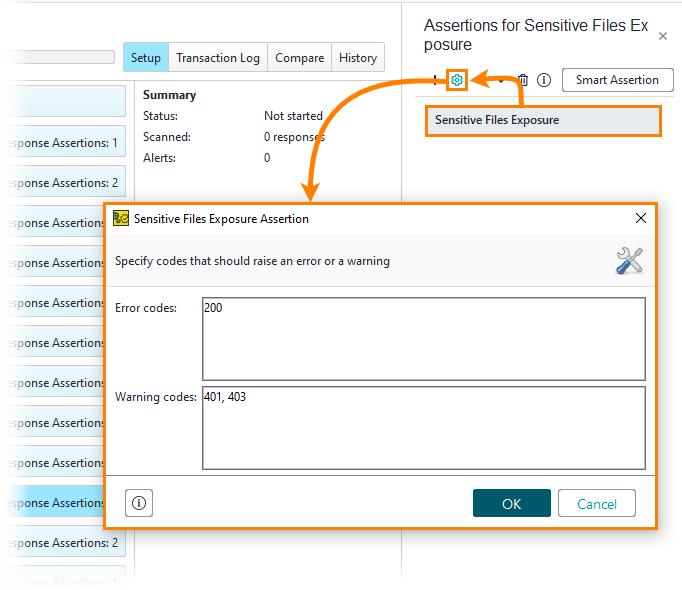
Configuration
If the server returns one of the status codes listed in the Error codes column, the assertion is invalid (default value: 200).
If the server returns one of the status codes listed in the Warning codes column, the assertion will issue a warning (default value: 401,403).
Sensitive Information Exposure
The assertion for sensitive information exposure verifies if the most recent message received exposed sensitive data about the intended system. For instance, if the error message discloses the database version in the response, a hacker can utilise this knowledge to take advantage of well-known database security flaws.
This assertion is available for both functional tests and security tests.
Create an Assertion in Functional Tests
Follow the given steps to create an assertion:
⚡ Step 1: Select a test step.
⚡ Step 2: Select the Add Assertion.
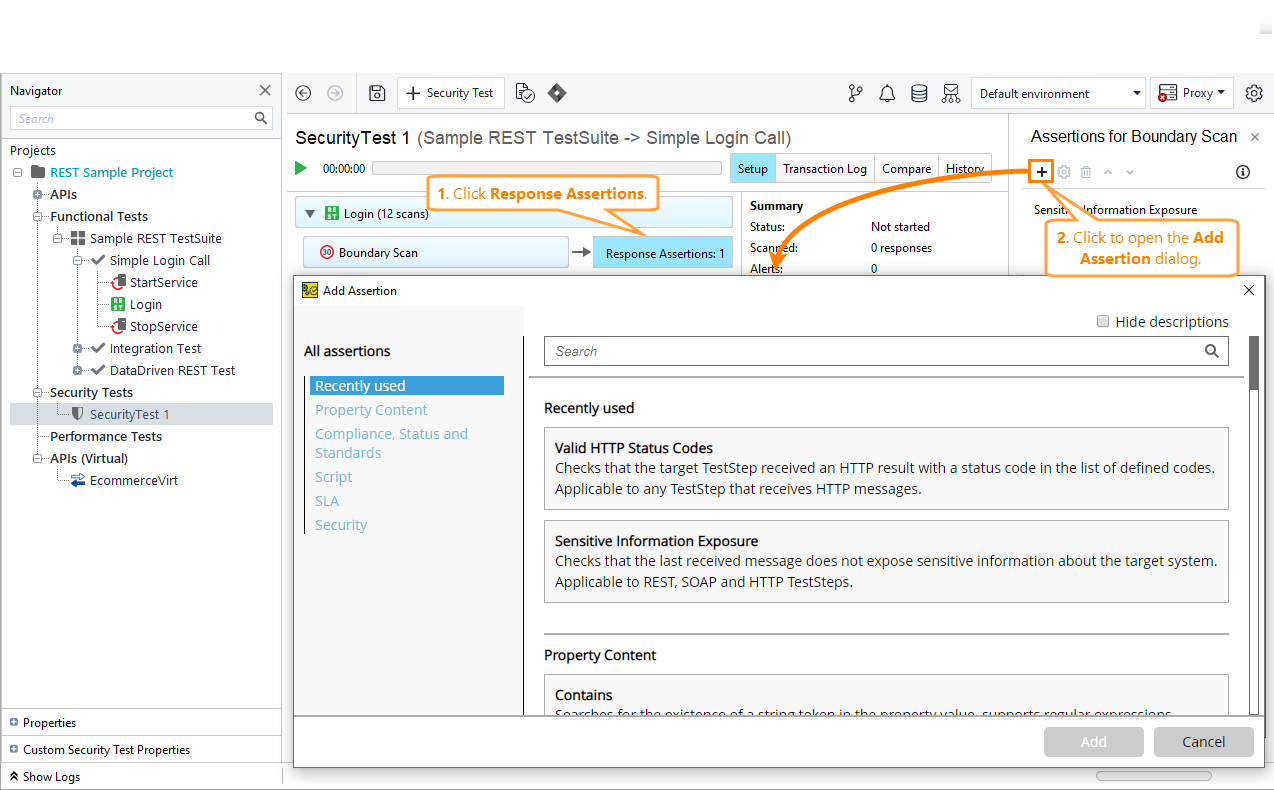
Create an Assertion
Follow the given steps to create an assertion:
⚡ Step 1: Select a security test.
⚡ Step 2: Select Response Assertion in the box next to any scan.
⚡ Step 3: Select + in the Assertions panel.
Weak Password
The Weak Password assertion verifies that your password complies with industry standards for password security.
We can create an assertion by following the steps:
⚡ Step 1: Select a security test.
⚡ Step 2: Select Response Assertion in the box next to the weak authentication scan.
⚡ Step 3: Select + in the Assertions panel.
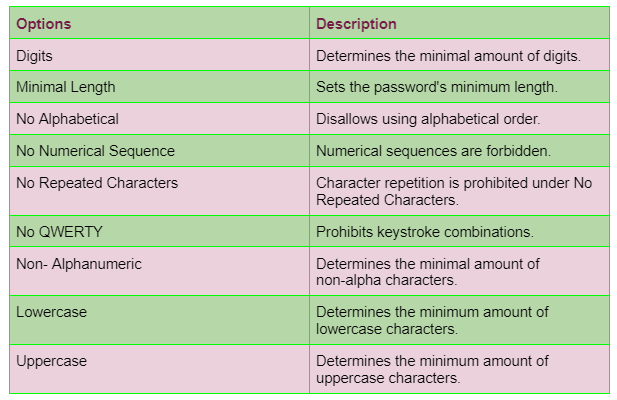
You can specify the requirements for password complexity.
Here are the options we can set:
Frequently Asked Questions
How is an API assertion used?
API endpoint monitors can use assertions to confirm the contents of the response. Without assertions, the monitor merely verifies that the endpoint is HTTP-accessible; the actual data given by your API is not tested. If assertions are defined, a test is only deemed successful if every one of the defined assertions is true.
How can an API response be verified?
You can use assertions to verify HTTP responses in your API tests. For instance, a fundamental assertion would guarantee that every request to assertible.com produces a Status code of 200 or that the word Assertible appears on the webpage. Every time a test is executed, assertions are verified.
What do you mean by API validation error?
The API will return a 400 validation error message (JSON or XML) if it cannot validate the request. The most frequent validation problems are shown below, and they will provide some information in response, including a list of validation messages.
Conclusion
We have discussed the security assertions in Ready API. We have discussed various Security Assertions like Basic Authorization, Cross Site Scripting, Sensitive File Exposure, etc.
If you are beginning with ReadyAPI, refer to these articles to proceed:


 9+ registered

