Do you think IIT Guwahati certified course can help you in your career?
Introduction
Servers can be considered high-powered computers built to store, process, and manage network data, devices, and systems. A safe server ensures that only a specified set of people can access or make changes to the application. It also means the sensitive data transmitted to and from the server is encrypted for the user's protection.
We will talk about the steps required to create a fully functional, safe server that we could use to produce our application. To set up the production server, we must constantly search for better resources and continuous improvements. We may use Amazon EC2, Amazon LightSail, Digital Ocean, Vultr, or any other provider to run the tests.
Important terms discussed in the blog
SSH: SSH stands for Secure Shell. It is a network communication protocol that allows two computers to communicate.
AWS: AWS stands for Amazon web services. It is a popular cloud platform.
Instance: An instance can be considered as a virtual server that we can use to run AWS infrastructure applications.
Public key: A large numerical value used to encrypt and decrypt data.
Private key: It is similar to the public key, but we will not share it with anyone other than the receiver or the sender.
EC2: EC2 stands for Amazon Elastic Compute Cloud. It gives users scalable computing capacity in AWS.
AMI: AMI stands for Amazon Machine Image. It is a master image for the creation of virtual servers.
HVM: HVM stands for hardware virtual machine. It is a type of virtualization in Amazon. HVM provides the ability to run an OS(operating system) directly on top of a VM(virtual machine) without any modification.
Creating Public and Private SSH Keys
Secure Shell (SSH) manages networks, operating systems, and configurations. SSH keys are access credentials in SSH protocol. First, we have to create a pair of keys that some hosts ask during the server's installation process.
If we launch a machine instance with Amazon, we can skip this step and the next step.
To create an SSH key pair using the ssh-keygen tool:
$ ssh-keygen -t rsa -b 4096
Creating SSH key pair
When we run this command, the system will create two files. The private key will be in "id_rsa", and the public key will be in "id_rsa.pub", as shown in the image below. We should not share the private key with anyone.
Folder with the public and private keys.
Import The Public Key On Amazon
The next step in setting up the production server is to import the public key that we created on the Amazon Platform. To do this, we must:
The first step is to access the Amazon Management Console. To do this, log in on AWS Console - Amazon.com.
Next, click on AWS services > Compute > EC2
Then go to the menu on the left and click on Network & Security > Key Pairs.
Click on “Import Key Pair” and upload our public key (id_rsa.pub).
Creating the Instance
We will install a Linux instance on Amazon EC2 in the AWS Management Console. Amazon EC2 stands for Amazon Elastic Computing Cloud. Amazon EC2 is used to launch virtual servers, configure security and networking, and manage storage. These steps will help us launch our first instance quickly. Follow the procedure mentioned below to install an Ubuntu server on Amazon EC2.
To open Amazon EC2, click on AWS services > Compute > EC2.
From the console dashboard, choose Launch Instance.
Choose an Amazon Machine Image (AMI) is the page we will land on choosing Launch Instance. This page shows a list of basic configurations called AMIs (Amazon Machine Images). These AMIs serve as templates for our instance. We use Ubuntu Server 20.04 LTS (HVM), but we may choose an HVM(Hardware Virtual Machine) version according to our needs.
In the Choose an Instance Type page, we can select the hardware configuration of our instance. The “t2.micro” instance is selected by default. We may choose the instance based on our requirements. Then click on Review and Launch.
Open a new tab and then import the created public key on Amazon.
After step 5, the system will prompt us to "Select an existing pair or create a new key pair". Click on Choose an existing key pair. Then choose the public key that we uploaded in the previous step.
Select the acknowledgment checkbox and then click on Launch Instances.
Click on the link to the instance we just created.
Connect To Our Server
In setting up the production server, we will be accessing the machine with SSH. To access the Ubuntu server we created, we must type the following command on our terminal as root.
<USER>: As the name suggests, it is the user on the Linux system. For Amazon, use ubuntu; for others, use root.
<IP-ADDRESS>: It is the machine's IP address we just created and wished to connect. We could find the device's IP Address by checking our instance’s "Description" tab. IP Address will be mentioned in the field Public DNS (IPv4).
<PATH-TO-PRIVATE-KEY>. It is the absolute path required to locate the private key that we generated in the first step.
-i <PATH-TO-PRIVATE-KEY>. We need not write this part in the command if we have already added the key to our SSH agent. In this part, we must mention the complete path to the private key generated before.
The next step in setting up the production server is to give our new user access. To do this, type the following commands in the terminal. The commands are:
First, we are creating a new user account named “test”.
$ sudo adduser test
Next, we are permitting the user “test” to sudo.
Open the file
$ sudo nano /etc/sudoers
Add the following file to the bottom of the file:
test ALL=(ALL:ALL) NOPASSWD:ALL
Then we create directories as mentioned below as root.
$ mkdir /home/test/.ssh
Now, create an authorized_keys file and copy our public key here.
$ nano /home/test/.ssh/authorized_keys
$ chown test /home/test/.ssh
$ chown test /home/test/.ssh/authorized_keys
The public key contents are to be copied and pasted on the remote instance on the /home/test/.ssh/authorized_keys. Then set the permissions:
One of the main goals while setting up the production server is to create a safe and secure system. To apply this to our system, we have to follow the procedure mentioned below:
Update all the currently installed packages. We can do this by running the following command.
$ sudo apt update
$ sudo apt upgrade
Change the SSH port from 22 to 2201. Configure the firewall (Uncomplicated Firewall, UFW) to permit it. Then open the file /etc/ssh/sshd_config
$ sudo nano /etc/ssh/sshd_config
Then uncomment and change the following lines:
Port 2201
PermitRootLogin no
PasswordAuthentication no
Change the following lines to avoid problems with multiple sshd processes:
ClientAliveInterval 600
ClientAliveMax 3
Restart the ssh service by typing the command:
$ sudo systemctl restart ssh
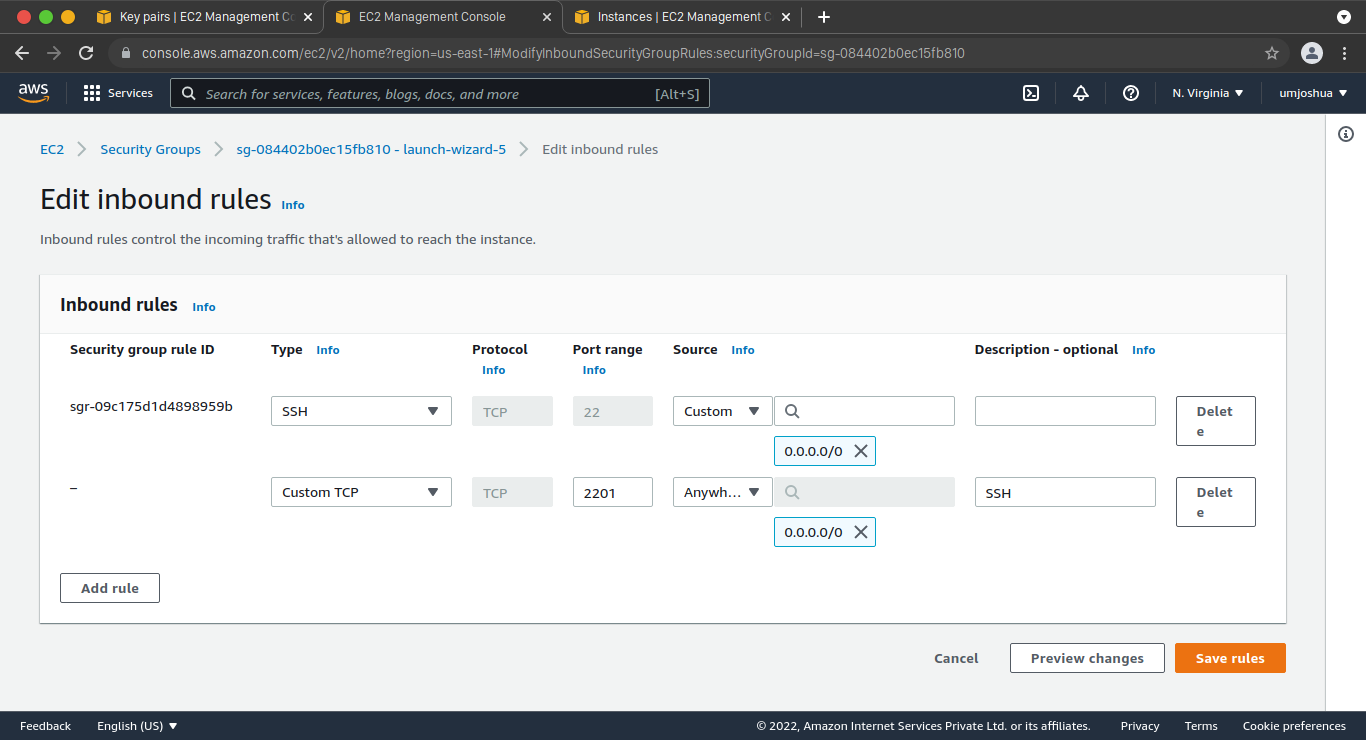
Configure the Uncomplicated Firewall (UFW) only to allow incoming connections for SSH (port 2201), HTTP (port 80), and NTP (port 123).
First, we close all incoming ports.
$ sudo ufw default deny incoming
Open all outgoing ports.
$ sudo ufw default allow outgoing
Open SSH port
$ sudo ufw allow 2201/tcp
Open HTTP port
$ sudo ufw allow http
To sync the clock of our machine, open the NTP port.
$ sudo ufw allow 123/udp
Now, we turn on the firewall.
$ sudo ufw enable
Configure the Server Clock
Configure the local timezone to UTC:
$ sudo dpkg-reconfigure tzdata
Select the “None of the above” option and then select UTC.
Disconnect And Add Key To Our SSH Agent
The next step in setting up the production server is disconnecting from our server and doing the following on our machine.
To disconnect, type the command written below.
$ exit
The next step is to add our key to the SSH agent, elaborated next.
Adding the Access Port Permission on Amazon is the next stage of setting up the production server. We will have to visit the AWS Management Console. Also, we will be setting the SSH port that we want to use on Amazon. The procedure to complete the second last step of setting up the production server is listed below.
How to deal with privilege error while executing ssh? We can switch to the superuser by giving the ‘su’ command and reattempt ssh.
What are the two types of virtualization used in Linux Amazon machines? The two types of virtualization used in Linux Amazon machines are PV(Paravirtual) and HVM(HArdware Virtual machine).
Key Takeaways
We discussed the best practices to be followed while setting up the production server for our application. We went through the steps required to create a fully functional, safe server.
We used Amazon EC2, an AWS service, to set up the production server. First, we generated public and private SSH keys. Then, we visited the AWS Management Console to import the public key on Amazon and created an Ubuntu HVM instance. This step is followed by connecting to the server, creating a new user, and giving access to the user. Then we enhanced the security of the system by executing certain commands. We then configured the server clock, disconnected it from the server, and added the access port permissions on Amazon. Finally, we connected the machine with the user using the new port.


 9+ registered

