Shallow
The Shallow rendering method in enzyme renders all the children components. It lets us render elements only "one level deep"(first level) and assert facts about the returns from the render method without worrying about the not instantiated or rendered child components' behavior.
We mainly use the shallow method for testing presentational components(dumbs), and it does not require DOM.
Simple Shallow
The simple shallow method has the following two calls.
Shallow + setProps
The Shallow method with the setProps methods has these calls
- componentWillReceiveProps
- shouldComponentUpdate
- componentWillUpdate
- render
Shallow + unmount
The Shallow method with the unmount has the following call.
Render
The enzyme Render function can render react components into static HTML and JSX and analyze the resulting HTML structure. It mainly tests render react components to static HTML and analyzes the resulting HTML structure.
The Render function only calls render, but it renders all the children components.
Example
For the example that we are going to use in this article to understand the implementation of all three of the rendering methods in Enzyme, we will create an application with react components to test.
Firstly we will write the code for the Bar.js file through which we will set the state for the component that we are going to test.
Program
import React from 'react';

function Bar() {
 return (
   <div>
     Hello world,
     <span>
       we're not testing Bar so this would ideally not executed
       through either shallow rendering.
     </span>
   </div>
 );
}

export default Bar;

You can also try this code with Online Javascript Compiler
Next, we are going to write the code for our react component that we will test and on which we will use enzyme rendering methods.
Program
//Foo.js
import React, { Component } from 'react';
import Bar from './Bar';

// create react component and set its state.
class Foo extends Component {
 constructor(props) {
   super(props);
   this.state = {
     foo: 'bar',
   };
 }

 // to test componentDidMount.
 componentDidMount() {}

 render() {
   console.log('render');
   return (
     <div>
       Hello Foo
       <Bar foo="bar"></Bar>
     </div>
   );
 }
}

export default Foo;
You can also try this code with Online Javascript Compiler
Finally, we can write our test code that will use all three rendering methods on our Foo.js component above.
Program
import React from 'react';
import { shallow, mount, render } from 'enzyme';
import Foo from './Foo';
import sinon from 'sinon';

describe('components/Foo', () => {
 describe('rendering methods', () => {
   it('Shallow Rendering - shallow', () => {
     console.log('Shallow Rendering - shallow');

     // shallow + setprops rendering .
     const wrapper = shallow(<Foo />);
     console.log('setProps()');
     wrapper.setProps({
       foo: 'bar',
     });
     console.log(wrapper.debug());
   });

   it('Full DOM Rendering - mount', () => {
     console.log('Full DOM Rendering - mount');
     sinon.spy(Foo.prototype, 'componentDidMount');

     // Simple mount rendering
     const wrapper = mount(<Foo />);
     expect(Foo.prototype.componentDidMount.calledOnce).to.equal(
       true
     );
     console.log(wrapper.debug());
   });

   it('Static Rendering API - render', () => {
     console.log('Static Rendering API - render');

     // Render Function.
     const wrapper = render(<Foo />);
     console.log(wrapper.html()); // wrapper === Cheerio instance
   });
 });
});
You can also try this code with Online Javascript Compiler
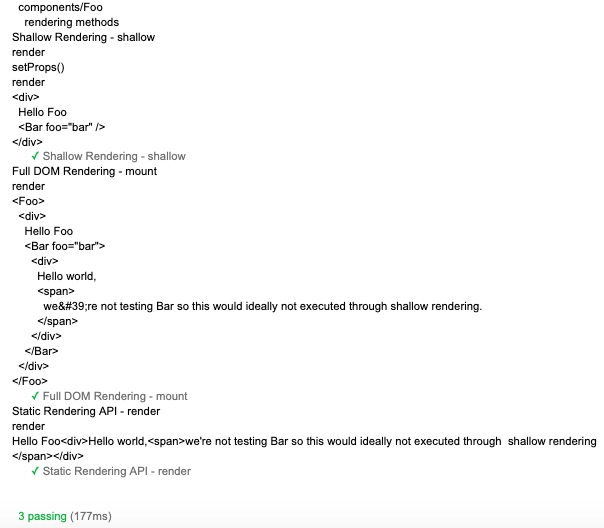
Output
FAQs
1. What is snapshot testing?
Ans: Snapshot tests are a vital tool to make sure your UI doesn't change unexpectedly. The general example of a snapshot test case for a mobile app will render a UI component, take a screenshot, and finally compare it to a reference image stored along with the test.
2. Why is Shallow preferred over Mount?
Ans: Shallow rendering is fruitful when you want to constrain yourself to test a component as a unit and ensure that your tests do not indirectly assert the behavior of child components. On the contrary, you use render to render react components to static HTML and analyze the resulting HTML structure.
3. What is a Wrapper object?
Ans: A Wrapper object contains a mounted component and methods to test that component. These components are called wrapper components which surround unknown components, providing a default structure to display the child components. This pattern helps create UI elements that come to use repeatedly throughout a design, like models, template pages, and information tiles.
4. What is Unmounting?
Ans: In the unmounting (also known as deletion or cleanup) phase, you have only one lifecycle method to help you out, which is the componentWillUnmount. componentWillUnmount is the last function called immediately before removing the component from the DOM. We generally use it to clean up any DOM elements or timers that componentWillMount creates.
Key Takeaways
This article extensively discussed the Shallow, Mount, and Render methods for rendering in Enzyme and their implementation in React. We have learned the concepts and implementations of all three of these methods. Knowing the critical differences in the working and usage of these methods is essential to working with Enzyme in React.
There is a lot more to explore here. If you are interested in testing with Mocha and React JS, check out our introductory articles like Introduction to Mocha, Getting Started with Jest and Basics of React. We hope that this blog has helped you enhance your knowledge regarding Mocha and Chai.
If you would like to learn more, head over to our practice platform Coding Ninjas Studio to practice top problems, attempt mock tests, read interview experiences, and much more. Do upvote our blog to help other ninjas grow. Happy Coding!


 9+ registered

