Do you think IIT Guwahati certified course can help you in your career?
Introduction
This article will utilize Entity Framework in an ASP.NET MVC application to execute CRUD operations on a SQL Server database. The controller in an ASP.NET MVC application reacts to an incoming HTTP request, retrieves data from a model, and passes it to the view. The view subsequently renders the data. Entities or business items can be used as models. In this ASP.NET MVC application, we will learn how to get data from a SQL Server database using the Entity Framework Database First Approach.
Entity Framework
An ORM (Object Relational Mapping) tool is Entity Framework. ORM stands for Object Relational Mapping and is a method of accessing a relational database. We interface with databases in class, method, and property of the object format for everything that includes tables and store procedures.
Support a clean separation of concerns and independent development that allows parallel, simultaneous development of application
Avoid repetitive data access codes.
Access code automatically based on the data model class -Support a clean separation of concerns and independent development that allows parallel, simultaneous application development.
Easy reuse of the data object -Maintenance of the application
Practical example
We'll look at how to create a prototype application for Contoso University. A simple university website serves as the model application. You may use it to see and change information on students, courses, and instructors. We will look at each step in the following sections one by one.
Creating an MVC Web App
Follow the following steps to create an MVC web application: 1. Create a C# web project using the ASP.NET Web Application (.Net Framework) template in Visual Studio. Select OK and give the project the name ContosoUniversity. 2. Select MVC in New ASP.NET Web Application - ContosoUniversity. 3. To start the project, click OK.
Site Style
The site menu, layout, and home page may all be set up with a few easy modifications. 1. Make the following modifications to Views\Shared\_Layout.cshtml:
Replace "My ASP.NET Application" and "Application name" with "Contoso University" in each instance.
Remove the Contact option from the menu and replace it with entries for Students, Courses, Instructors, and Departments.
2. Change the contents of Views\Home\Index.cshtml with the following code:
@{
ViewBag.Title = "Home Page";
}
<div class="jumbotron">
<h1>Contoso University</h1>
</div>
<div class="row">
<div class="col-md-4">
<h2>Welcome to Contoso University</h2>
<p>Contoso University is a sample application that
demonstrates how to use Entity Framework 6 in an
ASP.NET MVC 5 web application.</p>
</div>
<div class="col-md-4">
<h2>Build it from scratch</h2>
<p>You can build the application by following the steps in the tutorial series on the ASP.NET site.</p>
<p><a class="btn btn-default" href="http://www.asp.net/mvc/tutorials/getting-started-with-ef-using-mvc/">See the tutorial »</a></p>
</div>
<div class="col-md-4">
<h2>Download it</h2>
<p>You can download the completed project.</p>
<p><a class="btn btn-default" href="https://webpifeed.blob.core.windows.net/webpifeed/Partners/ASP.NET%20MVC%20Application%20Using%20Entity%20Framework%20Code%20First.zip">Download »</a></p>
</div>
</div>
3. To run the website, use Ctrl+F5. The primary menu is seen on the home page.
Install Entity Framework 6
1. Choose NuGet Package Manager from the Tools menu, then Package Manager Console from the Package Manager menu. 2. Enter the command in the Package Manager Console window:
Install-Package EntityFramework
Creating data model
We will create entity classes for the Contoso University application.
Student entity
Create a class file named Student.cs in the Models folder by right-clicking the folder in Solution Explorer and selecting Add > Class. Substitute the following code for the template code: C#
using System;
using System.Collections.Generic;

namespace ContosoUniversity.Models
{
    public class Student
    {
        public int ID { get; set; }
        public string LastName { get; set; }
        public string FirstMidName { get; set; }
        public DateTime EnrollmentDate { get; set; }

        public virtual ICollection<Enrollment> Enrollments { get; set; }
    }
}
The primary key column of the database table that corresponds to this class will be the ID property. Entity Framework considers a property called ID or classname ID to be the primary key by default. The Enrollments attribute is used for navigation. Other entities connected to this object are stored in the navigation properties. In this example, a Student entity's Enrollments property will include all of the Enrollment entities associated with that Student entity. In other words, if a database record contains two related Enrollment rows (rows with that student's primary key value in their StudentID foreign key field), the Enrollments navigation property of that Student entity will have those two Enrollment entities.
Enrollment entity
Create Enrollment.cs in the Models folder and replace the existing code with the following: C#
namespace ContosoUniversity.Models
{
    public enum Grade
    {
        A, B, C, D, F
    }

    public class Enrollment
    {
        public int EnrollmentID { get; set; }
        public int CourseID { get; set; }
        public int StudentID { get; set; }
        public Grade? Grade { get; set; }

        public virtual Course Course { get; set; }
        public virtual Student Student { get; set; }
    }
}
The primary key will be the EnrollmentID field; unlike the Student entity, it employs the classname ID pattern instead of ID by itself. Usually, you'd pick one pattern and stick with it across your data model. The modification here demonstrates that any pattern may be used. You'll see how using ID without a classname makes it easier to implement inheritance in the data model in subsequent sessions. The Grade property is a list of values. The Grade property is nullable, as indicated by the question mark after the Grade type definition. A null grade differs from a zero grade in that it means that a grade is unknown or has yet to be issued. StudentID is a foreign key, while Student is the equivalent navigation property. Because an Enrollment entity is linked to a single Student entity, the property can only store one Student entity (unlike the Student. Enrollments navigation property you saw earlier, which can hold multiple Enrollment entities). CourseID is a foreign key, while Course is the equivalent navigation property. One Course is connected with an Enrollment object. If a property is named (for example, StudentID for the Student navigation property since the Student entity's primary key is ID), Entity Framework treats it as a foreign key property. Foreign key attributes can also be called the same as the primary key (for example, CourseID, because the primary key of the Course object is CourseID).
Course entity
Create Course.cs in the Models folder, replacing the template code with the following: C#
using System.Collections.Generic;
using System.ComponentModel.DataAnnotations.Schema;

namespace ContosoUniversity.Models
{
    public class Course
    {
        [DatabaseGenerated(DatabaseGeneratedOption.None)]
        public int CourseID { get; set; }
        public string Title { get; set; }
        public int Credits { get; set; }

        public virtual ICollection<Enrollment> Enrollments { get; set; }
    }
}
Creating the database context
The database context class is the main class that organizes Entity Framework capabilities for a specific data model. Create a folder in the ContosoUniversity project by right-clicking it in Solution Explorer and selecting Add, then New Folder. DAL is the new folder's name (for Data Access Layer). Create a new class file called SchoolContext.cs in that folder, and replace the template code with the following:
using ContosoUniversity.Models;
using System.Data.Entity;
using System.Data.Entity.ModelConfiguration.Conventions;

namespace ContosoUniversity.DAL
{
    public class SchoolContext : DbContext
    {

        public SchoolContext() : base("SchoolContext")
        {
        }

        public DbSet<Student> Students { get; set; }
        public DbSet<Enrollment> Enrollments { get; set; }
        public DbSet<Course> Courses { get; set; }

        protected override void OnModelCreating(DbModelBuilder modelBuilder)
        {
            modelBuilder.Conventions.Remove<PluralizingTableNameConvention>();
        }
    }
}
As you can see, we have specified entity sets, connection string, and singular table names.
Initialize DB with test data
When the application runs, Entity Framework can create (or drop and re-create) a database for you. You may choose whether this should happen every time your app runs or only when the model is out of sync with the database. You can also create a Seed method that Entity Framework uses to populate the database with test data when it is created. 1. Create a new class file called SchoolInitializer.cs in the DAL folder and replace the template code with the following code, creating a database when needed and loading test data into it. C#
using System;
using System.Collections.Generic;
using System.Linq;
using System.Web;
using System.Data.Entity;
using ContosoUniversity.Models;

namespace ContosoUniversity.DAL
{
    public class SchoolInitializer : System.Data.Entity. DropCreateDatabaseIfModelChanges<SchoolContext>
    {
        protected override void Seed(SchoolContext context)
        {
            var students = new List<Student>
            {
            new Student{FirstMidName="Carson",LastName="Alexander",EnrollmentDate=DateTime.Parse("2005-09-01")},
            new Student{FirstMidName="Meredith",LastName="Alonso",EnrollmentDate=DateTime.Parse("2002-09-01")},
            new Student{FirstMidName="Arturo",LastName="Anand",EnrollmentDate=DateTime.Parse("2003-09-01")},
            new Student{FirstMidName="Gytis",LastName="Barzdukas",EnrollmentDate=DateTime.Parse("2002-09-01")},
            new Student{FirstMidName="Yan",LastName="Li",EnrollmentDate=DateTime.Parse("2002-09-01")},
            new Student{FirstMidName="Peggy",LastName="Justice",EnrollmentDate=DateTime.Parse("2001-09-01")},
            new Student{FirstMidName="Laura",LastName="Norman",EnrollmentDate=DateTime.Parse("2003-09-01")},
            new Student{FirstMidName="Nino",LastName="Olivetto",EnrollmentDate=DateTime.Parse("2005-09-01")}
            };

            students.ForEach(s => context.Students.Add(s));
            context.SaveChanges();
            var courses = new List<Course>
            {
            new Course{CourseID=1050,Title="Chemistry",Credits=3,},
            new Course{CourseID=4022,Title="Microeconomics",Credits=3,},
            new Course{CourseID=4041,Title="Macroeconomics",Credits=3,},
            new Course{CourseID=1045,Title="Calculus",Credits=4,},
            new Course{CourseID=3141,Title="Trigonometry",Credits=4,},
            new Course{CourseID=2021,Title="Composition",Credits=3,},
            new Course{CourseID=2042,Title="Literature",Credits=4,}
            };
            courses.ForEach(s => context.Courses.Add(s));
            context.SaveChanges();
            var enrollments = new List<Enrollment>
            {
            new Enrollment{StudentID=1,CourseID=1050,Grade=Grade.A},
            new Enrollment{StudentID=1,CourseID=4022,Grade=Grade.C},
            new Enrollment{StudentID=1,CourseID=4041,Grade=Grade.B},
            new Enrollment{StudentID=2,CourseID=1045,Grade=Grade.B},
            new Enrollment{StudentID=2,CourseID=3141,Grade=Grade.F},
            new Enrollment{StudentID=2,CourseID=2021,Grade=Grade.F},
            new Enrollment{StudentID=3,CourseID=1050},
            new Enrollment{StudentID=4,CourseID=1050,},
            new Enrollment{StudentID=4,CourseID=4022,Grade=Grade.F},
            new Enrollment{StudentID=5,CourseID=4041,Grade=Grade.C},
            new Enrollment{StudentID=6,CourseID=1045},
            new Enrollment{StudentID=7,CourseID=3141,Grade=Grade.A},
            };
            enrollments.ForEach(s => context.Enrollments.Add(s));
            context.SaveChanges();
        }
    }
}
The database context object is passed as an input argument to the Seed function, and the logic in the method utilizes that object to add new entities to the database. The code produces a collection of new entities for each entity type, adds them to the relevant DbSet property, and saves the modifications to the database. It's not required to use the SaveChanges function after each set of entities, but doing so aids in locating the source of a problem if an error arises while the code is writing to the database. 2. Add an element to the entityFramework element in the application Web.config file (the one in the root project folder) to inform Entity Framework to use your initializer class, as demonstrated in the following example: XML
The databaseinitializer type specifies the completely qualified name of the initializer class and the assembly it's in. In contrast, the context type specifies the fully qualified name of the context class and the assembly it's in.
Set up EF 6 to use LocalDB
We'll be using LocalDB. As illustrated in the below example, open the application Web.config file and add a connectionStrings element before the appSettings element. (Make sure the Web.config file in the root project folder is updated.) You also don't need to alter the Web.config file in the Views subdirectory. XML
According to the connection string you specified, the entity Framework will utilize a LocalDB database named ContosoUniversity1.mdf. (EF will construct the database if it doesn't already exist.) Add AttachDBFilename=|DataDirectory|\ContosoUniversity1.mdf to the connection string if you wish to build the database in your App Data folder.
Create controller and views
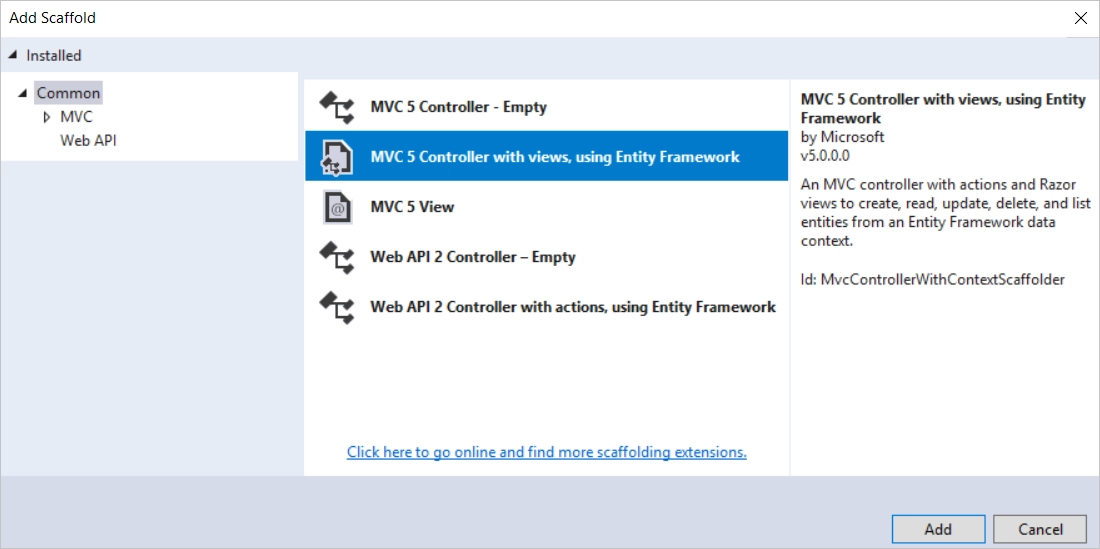
You'll now develop a web page to display the information. The database is created automatically as a result of the data request procedure. To get started, make a new controller. But first, create the project so that MVC controller scaffolding may access the model and context classes. 1. In Solution Explorer, right-click the Controllers folder, pick Add, and then New Scaffolded Item. 2. Select MVC 5 Controller with views, using Entity Framework, in the Add Scaffold dialogue box, and click Add.
3. Make the following selections in the Add Controller dialogue box, then click Add:
Student as a model class (ContosoUniversity.Models). (Build the project and try again if you don't see this option in the drop-down list.)
SchoolContext is a data context class (ContosoUniversity.DAL).
StudentController is the name of the controller (not StudentsController).
For the remaining fields, use the default values.
The scaffolder produces a StudentController.cs file and a collection of views (.cshtml files) that operate with the controller when you click Add. When you construct projects that utilize Entity Framework in the future, you may also leverage the scaffolder's extra functionality: Create your first model class without a connection string, and then pick the Add button next to the Data context class in the Add Controller box to specify New data context. Your DbContext class and connection string, as well as the controller and views, will be created by the scaffolder.
4. Visual Studio opens the Controllers\StudentController.cs file. You see that a class variable has been created that instantiates a database context object: C#
private SchoolContext db = new SchoolContext();
The Index action method reads the Students property of the database context instance to acquire a list of students from the Students entity set: C#
public ViewResult Index()
{
    return View(db.Students.ToList());
}
This list is displayed in a table in the StudentIndex.cshtml view: CSHTML
5. To execute the project, press Ctrl+F5. (If you get an error message saying "Cannot make Shadow Copy," shut the browser and try again.) To examine the test data that the Seed technique added, go to the Students tab. You'll either see the Student tab link in the top address bar or have to click the upper right corner, depending on how tiny your browser window is.
How are table names in the entity framework? Table names are made up of pluralized forms of entity class names.
How do you name columns in the entity framework? Column names are based on entity property names.
What properties are recognized as the primary key in the entity framework? Primary key attributes are identified as entity properties with the names ID or classname ID.
What properties are interpreted as foreign key properties? A property is interpreted as a foreign key property if it's named <navigation property name><primary key property name> (for example, StudentID for the Student navigation property since the Student entity's primary key is ID). Foreign key properties can also be named the same simply <primary key property name> (for example, EnrollmentID since the Enrollment entity's primary key is EnrollmentID).
What is the entity framework in ASP.NET? Entity Framework (EF) is object-relational mapper for.NET developers that allow them to interact with relational data using domain-specific objects. It removes the majority of the data-access code that developers must typically write.
Key Takeaways
From this article, we learned about the theoretical and practical implementation of the MVC Entity Framework in ASP.NET. But this is not enough; you need something extra to excel in web development truly. If you want to learn more about web development, you can read our articlesor take our highly curated Web Development course.


 9+ registered

