Get a skill gap analysis, personalised roadmap, and AI-powered resume optimisation.
Introduction
Python is one of the most popular programming languages in the world, and it's known for its simplicity and versatility. In this blog post, we'll walk you through the process of building a Bank Management system using Python and Tkinter GUI.
The Bank Management system is essential for managing financial transactions and maintaining customer records.
With this project, you'll get hands-on experience in developing a practical application with Python and learn the basics of Tkinter GUI programming.
Note: This project is not using a Database but instead uses a dictionary to store and save the information of multiple users.
So, whether you're a beginner or an experienced programmer, join us on this exciting journey of building a Bank Management system with Python and Tkinter.
Python is a high-level programming language known for its simple syntax, readability, and versatility. It is widely used in various fields, such as web development, data analysis, machine learning, and scientific computing, to name a few.
What is Tkinter?
Tkinter is a Python library that provides a set of tools for creating graphical user interfaces (GUIs) for desktop applications. It is one of the most commonly used GUI libraries for Python and is included with most Python installations. With Tkinter, you can create windows, buttons, labels, menus, and other graphical elements to build a GUI for your Python application.
To follow this tutorial, you should have the following:
A basic understanding of Python programming and the Tkinter library.
Python and Tkinter are installed on your computer. You can download the latest version of Python from the official website or use a package manager like pip.
If you're a beginner, we recommend starting with a beginner's tutorial to familiarize yourself with the language.
With Python and Tkinter, you'll be able to create powerful and user-friendly applications.
The "import *" statement imports all the modules from the tkinter library, which means that all the classes and functions defined in the library will be available for use in the code.
The "import messagebox" statement imports the messagebox module from the tkinter library, which contains functions to display message boxes in the GUI.
The "import simpledialog" statement imports the simpledialog module from the tkinter library, which contains functions to display simple dialogs in the GUI.
This code defines a class called "BankSystem" with an initializer method called "init." The initializer method takes one parameter "master" which is an instance of the Tkinter class (a Python GUI toolkit) that will be used as the application's main window.
Inside the initializer method, the "master" attribute of the instance is set to the value of the "master" parameter passed in. This is done so that the instance of the BankSystem class can access and manipulate the properties of the main window.
The next two lines of code set the title of the main window to "Bank Management System" using the "title" method of the "master" instance and set the size of the window to 400x300 pixels using the "geometry" method of the "master" instance. These lines of code are used to initialize the appearance of the application's main window.
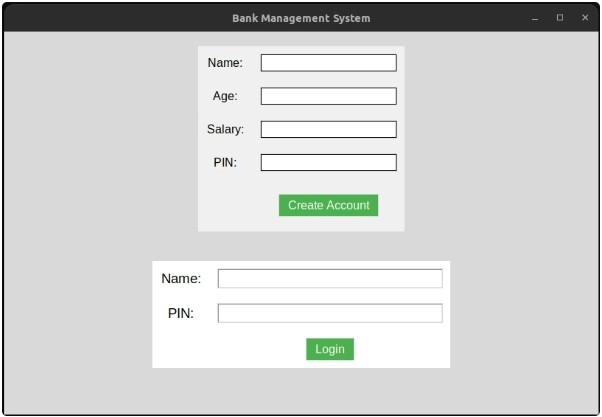
Create Account Frame and its Widgets
This section of the code defines the creation of a frame and several widgets that allow users to create a new bank account.
The "Create Account Frame" is created using the Tkinter "Frame" class and is packed into the "master" window. Inside this frame, several labels, entries, and a button are created using the Tkinter "Label", "Entry", and "Button" classes respectively.
The labels are used to describe the purpose of the corresponding entry boxes, which allow users to input their name, age, salary, and a PIN code for their new bank account. These entry boxes are created using the "Entry" class, which provides a simple way to capture user input.
The "show" option is used when creating the "PIN Entry" widget to hide the input as asterisks to protect the privacy of the user's PIN code.
Finally, a "Create Account" button is created using the "Button" class. When the user clicks this button, it will call the "create_account" method, which will handle creating the new account.
Overall, this section of the code defines the user interface for creating a new bank account and captures the necessary information to create a new account.
Login Frame and its Widgets
This section of the code defines the user interface for logging into an existing bank account. The login frame is created using the Tkinter "Frame" class and is packed into the "master" window. Inside this frame, several widgets are created to allow users to enter their PIN code and log in to their accounts.
The "PIN Entry" widget is created using the Tkinter "Entry" class and is set to show "*" characters instead of the actual input to protect the privacy of the user's PIN code. Additionally, a "Login" button is created using the Tkinter "Button" class, which, when clicked, will call the "login" method to check if the user's entered PIN is valid.
The line of code self.master.bind('<Return>', self.login) allows the user to log in by pressing the "Enter" key instead of clicking the login button. The "bind" method binds a specific event to a specific function, and in this case, the "Return" key press event is bound to the "login" method.
Overall, this section of the code defines the user interface for logging into an existing bank account and captures the necessary information to validate the user's PIN code.
User Details Frame
This part of the code defines the user details frame that is displayed after successful login. The user details frame consists of labels and buttons to display and modify the user's details and perform banking operations.
The code first creates a frame named user_details_frame. It then adds labels to display the user's name, age, salary, and current balance. It also adds buttons to view the transaction log, deposit, withdraw, and logout.
The view_transaction_log() function is called when the user clicks the "View Transaction Log" button. The deposit() function is called when the user clicks the "Deposit" button, and the withdraw() function is called when the user clicks the "Withdraw" button. The logout() function is called when the user clicks the "Logout" button.
Overall, this section of the code defines the interface for the user details frame and specifies the functions that are executed when the user interacts with the buttons in the frame.
User Data Initialization
The code initializes various variables related to the user data. These variables are used to store the user's personal information, such as their name, age, salary, and PIN, as well as their current balance and transaction log.
The variables are initialized with default values. The user's name, age, salary, and PIN are initialized as empty strings, while the current balance is set to 0. The transaction log is initialized as an empty list, which will be used to store the user's transaction history.
These variables are used throughout the program to manage user accounts and transactions. When a user creates an account or logs in, their personal information is stored in these variables. When they deposit or withdraw money, their current balance is updated and the transaction is recorded in the transaction log. The user data initialization is an important step in the program's execution, as it sets up the framework for managing user accounts and transactions.
Account Creation
This part of the code defines a method create_account that gets called when the user submits the account creation form. It starts by getting the user input from the entry fields for name, age, salary, and PIN. Then it validates the input to ensure that all fields are filled out and in the correct format. If any of the input fields are invalid, it displays an error message and returns without creating the account.
If the input is valid, it saves the user's data to instance variables name, age, salary, pin, current_balance, and transaction_log. It then clears the input fields and displays the user details on the user details frame, which replaces the account creation and login frames.
  def create_account(self):
      # Get user input
      name = self.name_entry.get()
      age = self.age_entry.get()
      salary = self.salary_entry.get()
      pin = self.pin_entry.get()

      # Create a dictionary to store the user's data
      user_data = {'name': name, 'age': age, 'salary': salary, 'pin': pin, 'balance': 0}

      # Add the user's data to the users dictionary
      self.users[pin] = user_data

      # Validate input
      if not name or not age or not salary or not pin:
          messagebox.showerror("Error", "All fields are required!")
          return
      if not age.isdigit():
          messagebox.showerror("Error", "Age must be a number!")
          return
      if not salary.isdigit():
          messagebox.showerror("Error", "Salary must be a number!")
          return
      if not pin.isdigit() or len(pin) != 4:
          messagebox.showerror("Error", "PIN must be a 4-digit number!")
          return

      # Save user data
      self.name = name
      self.age = age
      self.salary = salary
      self.pin = pin
      self.current_balance = 0
      self.transaction_log = []

      # Clear input fields
      self.name_entry.delete(0, END)
      self.age_entry.delete(0, END)
      self.salary_entry.delete(0, END)
      self.pin_entry.delete(0, END)

      # Show user details
      self.name_label2.config(text="Name: " + self.name)
      self.age_label2.config(text="Age: " + self.age)
      self.salary_label2.config(text="Salary: " + self.salary)
      self.current_balance_label.config(text="Current Balance: " + str(self.current_balance))

      # Show user details frame
      self.create_account_frame.pack_forget()
      self.login_frame.pack_forget()
      self.user_details_frame.pack()
You can also try this code with Online Python Compiler
The config method is used to update the labels in the user details frame with the user's data. The destroy method is used to remove the account creation frame from the window, and pack_forget is used to hide the login frame. Finally, the user details frame is displayed using the pack method.
Login Function
The login function checks if the user's inputted PIN matches the saved PIN. The PIN displays the user's account details on the user details frame if it is valid.
def login(self, event=None):
# Get the user's PIN from the login entry widget
pin = self.login_pin_entry.get()
# Check if the user exists in the users dictionary
if pin in self.users:
# Set the current user data to the user's dictionary
self.current_user_data = self.users[pin]
# Show the user details frame and update the labels
self.user_details_frame.pack(pady=20)
self.name_label2['text'] = f"Name: {self.current_user_data['name']}"
self.age_label2['text'] = f"Age: {self.current_user_data['age']}"
self.salary_label2['text'] = f"Salary: {self.current_user_data['salary']}"
self.current_balance_label['text'] = f"Current Balance: {self.current_user_data['balance']}"
# pack forget login frame
self.login_frame.pack_forget()
self.create_account_frame.pack_forget()
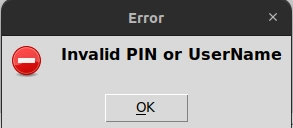
else:
# Show an error message box if the user does not exist
messagebox.showerror("Error", "Invalid PIN or UserName")
You can also try this code with Online Python Compiler
The first line of the function retrieves the user-inputted PIN. The next block of code validates the input. The PIN must be a 4-digit number, so an error message is displayed if the input is invalid and the function exits.
If the PIN is valid, the function checks if it matches the saved PIN and UserName.
If the PINs match, the user's account details are displayed on the user details frame. The pack_forget() method hides the login frame and displays the user details frame.
Deposit Function
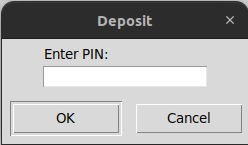
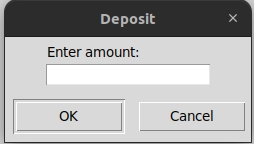
This part of the code defines the deposit function, which allows the user to deposit funds into their account. When the user clicks the "Deposit" button, the function is called.
The function first prompts the user to enter the pin, then the deposit amount, and then validates the input. If the input is invalid, the function displays an error message and returns. If the input is valid, the amount is added to the user's current balance, and the current balance label is updated.
def deposit(self):
      # Get user input
      pin = simpledialog.askstring("Deposit", "Enter PIN:")
      amount = simpledialog.askstring("Deposit", "Enter amount:")

      # Validate input
      if not pin:
          return
      if not amount or not amount.isdigit() or int(amount) <= 0:
          messagebox.showerror("Error", "Invalid input!")
          return
      if pin not in self.users:
          messagebox.showerror("Error", "Invalid PIN!")
          return

      # Add amount to current balance
      self.users[pin]['balance'] += int(amount)

      # Update current balance label
      self.current_balance_label.config(text="Current Balance: " + str(self.users[pin]['balance']))

      # Add transaction to transaction log
      transaction = "Deposit: +" + amount + ", New Balance: " + str(self.users[pin]['balance'])
      self.transaction_log.append(transaction)
      self.users[pin]['transactions'] = self.transaction_log
You can also try this code with Online Python Compiler
Finally, a transaction is added to the transaction log. The transaction string is formatted to indicate that it is a deposit and includes the amount deposited and the new balance. The transaction log is stored as a list, with each transaction string as an element.
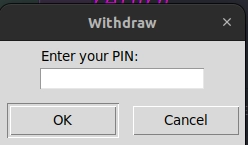
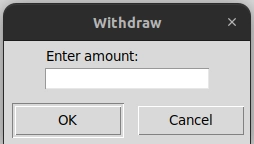
Withdrawal Function
This part of the code defines the function for withdrawing money from the user's account. It starts by getting the user's input for the PIN and the amount to be withdrawn using a dialog box. The input is then validated to ensure that it is a positive integer.
If the amount is not valid, an error message is displayed using a message box. If the amount is valid, the function checks if the account has enough balance to complete the transaction. If the balance is insufficient, an error message is displayed using a message box.
  def withdraw(self):
      # Get user input
      pin = simpledialog.askstring("Withdraw", "Enter your PIN:")
      amount = simpledialog.askstring("Withdraw", "Enter amount:")

      # Validate input
      if not (pin and amount):
          return
      if not amount.isdigit() or int(amount) <= 0:
          messagebox.showerror("Error", "Invalid amount!")
          return

      # Check if PIN is valid
      if pin not in self.users:
          messagebox.showerror("Error", "Invalid PIN!")
          return

      # Check if there is enough balance
      current_balance = self.users[pin]['balance']
      if int(amount) > current_balance:
          messagebox.showerror("Error", "Insufficient balance!")
          Return
       # Subtract amount from current balance
      current_balance -= int(amount)
      self.users[pin]['balance'] = current_balance

      # Update current balance label
      self.current_balance_label.config(text="Current Balance: " + str(current_balance))

      # Add transaction to transaction log
      transaction = "Withdraw: -" + amount + ", New Balance: " + str(current_balance)
      self.transaction_log.append(transaction)
      self.users[pin]['transactions'] = self.transaction_log
You can also try this code with Online Python Compiler
If the account has enough balance, the amount is subtracted from the current balance, and the new balance is displayed on the GUI. The transaction is also added to the transaction log with a description of the transaction, including the amount withdrawn and the new balance.
View Transaction Log Method
This part of the code creates a window to display the transaction log of the user.
The function creates a new window using the Toplevel() method with a title "Transaction Log". It also creates a transaction log frame with padding.
The function then creates a transaction log label, which is added to the transaction log frame with padding. A listbox is created to hold the transactions, and the transactions are inserted into the listbox using the insert() method.
  def view_transaction_log(self):
      # Create transaction log window
      transaction_log_window = Toplevel(self.master)
      transaction_log_window.title("Transaction Log")

      # Get current user's PIN
      pin = self.login_pin_entry.get()

      # Append transactions to user's transaction log
      if pin in self.users:
          self.users[pin]['transactions'].extend(self.transaction_log)

      # Create transaction log frame
      transaction_log_frame = Frame(transaction_log_window)
      transaction_log_frame.pack(padx=10, pady=10)

      # Create transaction log label
      transaction_log_label = Label(transaction_log_frame, text="Transaction Log:")
      transaction_log_label.grid(row=0, column=0, padx=10, pady=10)

      # Create transaction log listbox
      transaction_log_listbox = Listbox(transaction_log_frame, width=50)
      transaction_log_listbox.grid(row=1, column=0, padx=10, pady=10)

      # Fetch and insert all transactions into listbox
      if pin in self.users:
          for transaction in self.users[pin]['transactions']:
              transaction_log_listbox.insert(END, transaction)
      else:
          # Insert transactions into listbox
          for transaction in self.transaction_log:
              transaction_log_listbox.insert(END, transaction)
You can also try this code with Online Python Compiler
The for loop iterates through the transaction log list and inserts each transaction into the listbox. Finally, the listbox is added to the transaction log frame with padding.
Overall, this function provides a convenient way for users to view their transaction history.
Logout Method
This method is used to log out the current user from the banking application. It clears the user data such as name, age, salary, PIN, current balance, and transaction log. The input fields are also cleared, and the user is taken back to the login frame.
Firstly, the user data is cleared by setting all the related instance variables to their default values. The transaction_log list is also emptied.
Next, the login_pin_entry field is cleared by calling delete() method with the arguments 0 and END. This method deletes the characters in the input field starting from index 0 (i.e., the first character) up to index END (i.e., the end of the input field).
Finally, the user_details_frame is removed from the application window by calling the pack_forget() method, and the login_frame is displayed by calling the pack() method. This will take the user back to the login screen.
Starting the Program
This code defines the main function of the program, which creates a Tk object and an instance of the BankSystem class, and starts the mainloop of the Tk object. The main function is only executed if this module is run directly, not if it is imported as a module into another program.
def main():
  # Create a Tk object
  root = Tk()

  # Create an instance of the BankSystem class
  bank_system = BankSystem(root)

  # Start the mainloop
  root.mainloop()

if __name__ == '__main__':
  main()
You can also try this code with Online Python Compiler
The main function is the entry point of the program, where the control starts executing. It creates the GUI window using the Tk object, and then creates an instance of the BankSystem class, passing the Tk object as an argument. Finally, it starts the mainloop of the Tk object, which runs the event loop and handles user input and GUI events.
What are some popular Python libraries that can be used with Tkinter for building GUI applications?
There are several popular Python libraries that can be used in conjunction with Tkinter for building GUI applications, including Pillow for image manipulation, Pygame for gaming applications, OpenCV for computer vision applications, and Matplotlib for data visualization.
How can I create responsive and scalable user interfaces with Python and Tkinter?
To create responsive and scalable user interfaces with Python and Tkinter, it's important to use appropriate layout managers such as pack, grid, and place to ensure that your GUI elements are arranged and sized correctly. Additionally, it's important to use appropriate event bindings and threading to ensure that your application responds quickly and efficiently to user input.
What are some strategies for designing visually appealing and user-friendly GUIs with Python and Tkinter?
Some strategies for designing visually appealing and user-friendly GUIs with Python and Tkinter include using appropriate color schemes, fonts, and icons to create a cohesive and professional look. Additionally, it's important to keep your GUI simple and intuitive, with clear labels and easy-to-use controls.
How can I incorporate multimedia elements such as images, audio, and video into my Python and Tkinter applications?
To incorporate multimedia elements such as images, audio, and video into your Python and Tkinter application, you can use appropriate libraries such as Pillow for image manipulation, Pygame for audio and gaming applications, and OpenCV for video processing. Additionally, you can use appropriate Tkinter widgets such as PhotoImage for displaying images, Canvas for drawing graphics, and ttk.Progressbar for displaying progress bars.
Conclusion
In conclusion, we have successfully built a Bank Management System using Python and Tkinter. We used various Tkinter widgets and frames to design the user interface.
The system allows the user to perform basic banking operations like creating an account, depositing and withdrawing money, and checking the account balance. We also implemented authentication features to ensure the security of user data.
This project provides a great opportunity to improve your Python skills and gain experience in building GUI applications. You can further expand this system by adding new features such as transaction history, transfer of funds, and user profile management.
Here's the link to the GitHub repository for this Bank Management System project:Bank Management System in Python. It contains the complete source code for the system as well as detailed instructions on how to run it on your local machine. Feel free to clone the repository, explore the code, and make any changes or improvements you see fit.


 8+ registered

