Do you think IIT Guwahati certified course can help you in your career?
🔥 Introduction
Modern websites, in today's world, follow a standard template. To support easy navigation, almost all of them contain a header with multiple options showing the various operations the user can do. This is now a standard practice to include a header and menu to support full routing and navigation and then the content below it.
These headers are responsive to the screen sizes as well. This combination of header, menu and the content is called a Main View in websites. In this article, we will discuss how to develop a Main View in websites using Vaadin's AppLayout.
🔥 The Main View
For creating a Main View, the AppLayout is used. It enables creating a typical main view. A typical main view contains a header, a menu, and a content area. It functions with full navigation and routing, which makes it easier to set these up than connecting them individually one by one. It is responsive to screen orientation and size changes and adapts to mobile and desktop browsers.
The AppLayout is highly flexible. Different types of main view layouts can be created, and also it enables a range of main view layouts that can have menus- either vertical or horizontal. These can be displayed in a static manner or get opened when clicked if it is a customizable element.
The Main View utilizes AppLayout extensively. It does that by extending it and setting up the elements in the constructor. For this, the header and drawer content needs to be set up. The menu lies either horizontally or vertically in the drawer.
In this article, we will try to create a Main view with a vertical menu in the drawer and a button that opens and closes in the navigation bar.
Main_View.java
public class Main_View extends Layout
{
    private final tabs menu;
    private H2 titles;


    public Main_View()
    {
        // Using the drawer for the menu
        setPrimarySection(Section.DRAWER);


        // Making the navigation bar a header
        addToNavbar(true, creatingHeaderContent());


        // Putting the menu tab in the drawer
        sidemenu=creatingMenu();
        addToDrawer(creatingDrawerContent(sidemenu));
    }
}
You can also try this code with Online Java Compiler
👉Note: The CSS and other JS modules have to be added to what colors and design you want on the web page.
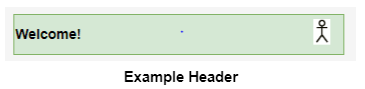
🔥 Creating the Header
For this article, the navigation bar is a horizontal element that will have any component, like The tagline and the logo. It can also contain a menu toggle, title, user image, and stuff like this.
The following example makes a header with the viewTitle member in the main view class:
Main_View.java
private Component creatingHeaderComponent()
{
    horizontalLayout layout = new horizontalLayout();


    // Configuring style for the header
    layout.settId("Header");
    layout.getThemeList().set("dark", false);
    layout.setWidthFull();
    layout.setSpacing(true);
    layout.setAlignItems(FlexComponent.Alignment.CENTER);


    // Putting the toggle button
    layout.add(new DrawerToggle());


   //Header placeholder
    viewTitle = new H2();
    layout.add(viewTitle);


    //An icon
    layout.add(new Image("user.png", "Example"));


    return layout;
}
You can also try this code with Online Java Compiler
Similarly, as above, the menu bar can be developed utilizing similar functions.
Let us now move to the section where we handle the navigation.
🔥 Managing the Navigation
Whenever the user navigates to a view, the view tab should be highlighted as it is selected by setting. The view can also be set in the header.
Both these things can be done by overriding afterNavigation() in AppLayout, as done following:
Main_View.java
@Override
protected void afterNavigation()
{
    super.afterNavigation();


    // Selecting the tab corresponding to currently shown view
    getTabForComponent(getContent()).ifPresent(menu::setSelectedTab);


    // Setting the view title in the header
    viewTitle.setText(getCurrentPageTitle());
}
You can also try this code with Online Java Compiler
The exact title is automatically set as the page title in the browser, so it gets handled automatically.
🔥 Creating a View
A view displayed in an AppLayout requires a route defined with the @Route annotation, similar to any other view. The route should be linked to the main view via the layout parameter to pass the class object of the main view.
The main view does not have a route itself. For an entry point to the main view, and usually to the entire application, a default view needs to be defined. This is done using a route alias.
⚡ Page Title
The page title in the browser tab or window can be set using the @PageTitle annotation as follows:
Welcome_View.java
@PageTitle("Welcome")
You can also try this code with Online Java Compiler
An entry point is required in most applications. A view can be defined as a default view via the route of the main view with @RouteAlias. The value that defines the route has to be empty for the root route.
The enclosing main view also needs to be defined with the layout parameter, similar to what was done for the earlier route.
Web development is creating, building, and maintaining websites. It contains aspects such as web publishing, web design, web programming, and database management.
What are the two classifications of web development?
It can be classified as:
👉 Frontend Development
👉 Backend Development
Name a few Web Development frameworks.
Some Web Development frameworks include Express, Django, Rails, Laravel, etc.
🔥 Conclusion
This article extensively discusses Creating a Main View. It goes on to explain its components and the code involved for each component.
We hope that this blog has helped you enhance your knowledge regarding Creating a Main View, and if you would like to learn more, check out our articles on Coding Ninjas Blogs.
If you want to test your competency in coding, you may check out the Mock Test Series and participate in the Contests organized on Coding Ninjas Studio! But if you have just started your learning process and are looking for questions asked by tech giants like Amazon, Microsoft, Uber, etc.; you must look at the Problems, Interview Experiences, and Interview Bundle for placement preparations.
Nevertheless, you may consider our Courses to give your career an edge over others!


 8+ registered

