JUnit Test Runner Implementation
A JUnit Runner is a class extending the abstract Runner class in JUnit and is responsible for running JUnit tests.
To start off working with the JUnit Test Runner, you need to add the standard JUnit dependency into your pom.xml file.
Program
<dependency>
   <groupId>junit</groupId>
   <artifactId>junit</artifactId>
   <version>4.12</version>
</dependency>
If you want to implement a custom test runner, you have to annotate your test class with the @RunWith annotation and set the type of the test runner as the value of the @RunWith annotation’s value attribute. Like this:
Program
@RunWith(CustomRunner.class)
public FooBarTest {
}

You can also try this code with Online Java Compiler
We start JUnit tests using the JUnitCore class, either by running it from the command line or using one of its many run() methods similar to what your IDE does for you press the run test button.
JUnitCore will then use reflection to find an appropriate Runner for the passed test classes. One of the steps here is to look for a @RunWith annotation on the test class. If JUnit does not find any other Runner, it will use the default BlockJUnit4ClassRunner. The Runner will then instantiate, and the test class will pass to the Runner. Now it is the job of the Runner to instantiate and run the passed test class.
Example
Now we can try the implementation technique mentioned above to create our custom test runner to run a test in JUnit.
In our runner, we are implementing the abstract methods of the Runner class.
Program
//src/main/java/MinimalRunner
package com.codingninjas.testrunner;


import org.junit.runner.Description;
import org.junit.runner.Runner;
import org.junit.runner.notification.RunNotifier;
import org.junit.Test;
import java.lang.reflect.Method;


public class MinimalRunner extends Runner {


    private Class testClass;
    public MinimalRunner(Class testClass) {
        super();
        this.testClass = testClass;
    }

    //getDescription method inherited from Describable
    @Override
    public Description getDescription() {
        return Description
          .createTestDescription(testClass, "My runner description");
    }

    //our run implementation
    @Override
    public void run(RunNotifier notifier) {
        System.out.println("running the tests from MyRunner: " + testClass);
        try {
            Object testObject = testClass.newInstance();
            for (Method method : testClass.getMethods()) {
                if (method.isAnnotationPresent(Test.class)) {
                    notifier.fireTestStarted(Description
                      .createTestDescription(testClass, method.getName()));
                    method.invoke(testObject);
                    notifier.fireTestFinished(Description
                      .createTestDescription(testClass, method.getName()));
                }
            }
        } catch (Exception e) {
            throw new RuntimeException(e);
        }
    }
}
You can also try this code with Online Java Compiler
In the code for our Custom Test Runner above, we have started by importing the required dependencies like Description, Runner, and Test.
Here, the getDescription method is inherited from Describable and returns a Description containing the information that later exports and various tools may use.
In our run implementation, we invoke the target test methods using reflection.
We define a constructor that takes a Class argument which is a JUnit requirement. At runtime, JUnit passes the target test class to this constructor.
We use RunNotifier for firing events that have information about the test progress.
Next, we can create a class that we will test using our Test Runner. We will use a simple Calculator class to test.
Program
//src/test/java/Calculator.java
package com.codingninjas.testrunner;


public class Calculator {
    public int add(int a, int b) {
        return a + b;
    }
}
You can also try this code with Online Java Compiler
Finally, we can write the code for our test, which we are running using our Custom Test Runner.
Program
//src/test/java/CalculatorTest.java
package com.codingninjas.testrunner;


import static org.junit.Assert.assertEquals;
import org.junit.Test;
import org.junit.runner.RunWith;


@RunWith(MinimalRunner.class)
public class CalculatorTest {
    Calculator calculator = new Calculator();


    @Test
    public void testAddition() {
        System.out.println("in testAddition");
        assertEquals("addition", 8, calculator.add(5, 3));
    }
}
You can also try this code with Online Java Compiler
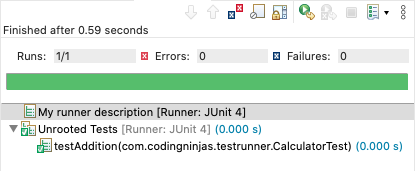
Output
Check out JUnit Interview Questions here.
FAQs
-
Can you have two @RunWith Statements?
While using a Custom Test Runner to run tests in JUnit, you can only use @RunWith Annotation because you cannot put the same annotation twice on the same annotated element. Thus you will need to remove one of the annotations and replace it with something else.
-
What is @RunWith JUnitPlatform class?
Annotating a class with @RunWith(JUnitPlatform.class) in JUnit allows IDEs and build systems that support JUnit 4 but not the JUnit Platform directly yet to run it.
Suppose you don't use configuration annotations from the org.junit.platform.suite.api package, we can use this runner on a test class whose JUnit Platform's programming model supports like a JUnit Jupiter test class. However, note that any test class run with this runner must be public to be picked up by IDEs and build tools.
-
What are Annotations?
Annotations are predefined texts which hold a specific meaning. It lets the compiler or interpreter know what they should do upon execution. Some popular annotations in JUnit include @Test, @Before, @After, etc.
-
What is the JUnit default runner?
The Default Test Runner in JUnit 4 is the BlockJUnit4ClassRunner. If you do not specify any runner in a Test Class, JUnit uses BlockJUnit4ClassRunner to run its tests, and a test class can only use a runner.
Key Takeaways
Custom JUnit Test Runners are highly adaptable and allow the developer to change the test execution procedure and the whole test process. If you want only to make minor changes, then it is a good idea to explore the protected methods of BlockJUnit4Class runner. There is a high chance you find an overridable method at the correct location.
We have learned about the concept, structure, and implementation of Custom Test Runners in JUnit through this article. We also worked with an example of a very elementary Test Runner and its performance. But there is a lot more to learn.
So head over to our practice platform Coding Ninjas Studio to practice top problems, attempt mock tests, read interview experiences, and much more. Till then, Happy Learning!


 8+ registered

