The @TestInstance Annotation
The @TestInstance annotation allows you to configure the lifecycle of JUnit tests.
The @TestInstance has two modes. One is LifeCycle.PER_METHOD is the default, and the other is LifeCycle.PER_CLASS allows asking JUnit to create only one instance of the test class and reuse it between tests.
Test Lifecycle Per Method
The default lifecycle for all the tests in JUnit is the Lifecycle Per-Method mode. JUnit creates a new test instance for each test method, test factory method, or test template method when using this mode.
In the following example, we will test the java.lang.Math.class using the @TestInstance(Lifecycle.PER_METHOD)
Program:
package testinstance;


import static org.junit.jupiter.api.Assertions.*;


import org.junit.jupiter.api.Test;
import org.junit.jupiter.api.TestInstance;


@TestInstance(TestInstance.Lifecycle.PER_METHOD)
public class testinstance {

  private int result = 5;

  @Test
  void test_Add() {
    result = Math.addExact(result, 5);
    System.out.println("test_Add(5,5) => "+result);
    assertEquals(10, result);
  }

  @Test
  void test_Multiply() {
    result = Math.multiplyExact(result, 5);
    System.out.println("test_Multiply(5,5) => "+result);
    assertEquals(25, result);
  }

}

You can also try this code with Online Java Compiler
Output:

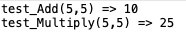
These tests in this example pass because a new instance of testinstance creates before calling each test method. That means that the value of the variable result is always set to 5 before the execution of each test.
Test Lifecycle Per Class
A new test instance is created once per test class when using the Lifecycle Per Method mode. This mode shares the test instance state between test methods in a given test class and between non-static @BeforeAll and @AfterAll.
When instantiating a class before every test is quite expensive, this annotation is functional. A similar example for testing java.lang.Math.class will give different results here.
Program:
package testinstance;


import static org.junit.jupiter.api.Assertions.*;


import org.junit.jupiter.api.Test;
import org.junit.jupiter.api.TestInstance;


@TestInstance(TestInstance.Lifecycle.PER_CLASS)
public class testinstance {

  private int result = 5;

  @Test
  void test_Add() {
    result = Math.addExact(result, 5);
    System.out.println("test_Add(5,5) => "+result);
    assertEquals(10, result);
  }

  @Test
  void test_Multiply() {
    result = Math.multiplyExact(result, 5);
    System.out.println("test_Multiply(5,5) => "+result);
    assertEquals(50, result);
  }

}
You can also try this code with Online Java Compiler
Output:

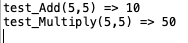
The output on running the test in the Per Class mode demonstrates the concept of this lifecycle mode.
@BeforeAll and @AfterAll Annotations
You can use the @BeforeAll annotations when you need an object to exist across multiple tests while using JUnit 5.
In the Default PER_METHOD mode of test instance lifecycle, @BeforeAll and @AfterAll callback methods must be static; otherwise, you will get a compile-time error as Mocha currently does not support these methods to be non-static in PER-METHOD. if you specify Lifecycle.PER_CLASS as your lifecycle mode, you can make @BeforeAll and @AfterAll methods non-static.
JUnit 4 addresses this with the @BeforeClass annotation.
In the following example, we can see the non-static implementation of the @BefoeAll and @AfterAll annotations.
Program:
package testinstance;


import static org.junit.jupiter.api.Assertions.*;


import org.junit.jupiter.api.AfterAll;
import org.junit.jupiter.api.AfterEach;
import org.junit.jupiter.api.BeforeAll;
import org.junit.jupiter.api.BeforeEach;
import org.junit.jupiter.api.Test;
import org.junit.jupiter.api.TestInfo;
import org.junit.jupiter.api.TestInstance;


@TestInstance(TestInstance.Lifecycle.PER_CLASS)
public class testinstance {

 @BeforeAll
  void beforeAll() {
    // here common setup for all tests
    System.out.println("--- Before starting tests --- ");
  }

  @BeforeEach
  void beforeEach(TestInfo testInfo) {
    // here initialize setup for each test
    System.out.println("Before Strat test >>>> "+testInfo.getTestMethod().get().getName());
  }
  @Test
  void test_Add() {
    System.out.println("MathUtil.add(5, 5) => "+Math.addExact(5, 5));
    assertEquals(10, Math.addExact(5, 5));
  }

  @Test
  void test_Multiply() {
    System.out.println("MathUtil.multiple(5, 5) => "+Math.multiplyExact(5, 5));
    assertEquals(25, Math.multiplyExact(5, 5));
  }

  @AfterEach
  void afetrEach(TestInfo testInfo) {
    // here cleanup setup after each test completes
    System.out.println("After complete test >>>> "+testInfo.getTestMethod().get().getName());
  }

  @AfterAll
  void afetrAll() {
    // here cleanup setup after all tests completes
    System.out.println("--- After tests completed ---");
  }
}
You can also try this code with Online Java Compiler
Output:


Check out JUnit Interview Questions here.
FAQs
-
How do you test instance methods?
To test an instance method, you must create an instance to call the method. Further, you may need to make more instances of the class.
-
Why does JUnit creates a new instance for each test?
Creating a new instance of the test class before invoking each @Test method helps provide independence between test methods and avoids unintentional side effects in the test code in JUnit. We can't reuse instance variable values across test methods because each test method runs on a new test class instance.
-
Do JUnit test methods must compulsorily return a value?
If a JUnit test method is declared to return anything, the file will compile successfully. But the execution will fail because JUnit requires you to declare all test methods to return void.
-
How do you assert Exceptions in JUnit?
The JUnit 5 Jupiter assertions API includes the assertThrows method for asserting exceptions. That takes the expected exception type and an Executable functional interface where you can pass the code under test through a lambda expression. If the test throws the expected exception, assertThrows returns the exception, enabling you to assert the message.
In JUnit 4, you can use the expected attribute of the @Test annotation to declare that you expect the test to throw an exception anywhere in the annotated test method.
-
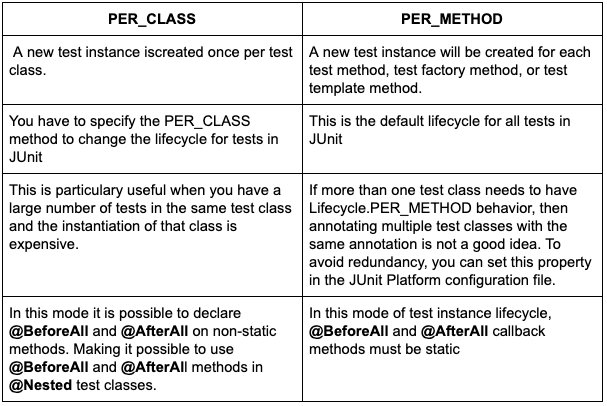
What is the difference between Lifecycle.PER_CLASS and Lifecycle.PER_METHOD ?
Refer to the table below:
Key Takeaways
Through this article, we have learned about the Test Lifecycle and how we can use the @TestInstance Annotations to configure the lifecycle of JUnit 5 tests. We also introduced the @BeforeAll and @BeforeClass implementations to configure the lifecycle of tests.
A good understanding of the concept of Test Lifecycle, its configuration, and implementation is critical while using JUnit 4 and JUnit 5 to perform Unit Tests. You can also learn about JUnit Vintage Engine compatibility between JUnit 4 and JUnit 5.
Hence the learning never stops, so be sure to check the Modules article on Coding Ninjas and head over to our practice platform Coding Ninjas Studio to practice top problems, attempt mock tests, read interview experiences, and much more. Till then, Happy Learning!


 9+ registered

