Do you think IIT Guwahati certified course can help you in your career?
Introduction🎯
Puppet is emerging these days as a deployment tool. Many people have gathered knowledge about puppet because of their ease in various software configuration domains.
In this blog, we will learn about developing modules in puppet. We will first learn about puppet and puppet modules to get acquainted with the base of the concept of developing modules in puppet. Let us start learning about developing modules in puppet!🤷♀️
Puppet🎯
Puppet was founded by Luke Kanies back in 2005. Puppet is a system management tool. It is used in DevOps. The task of puppet is to deploy and manage the servers. Microsoft Windows and Ubuntu, which we commonly use, are controlled by puppet. It can pull strings at once on various application servers. Puppet is based on the client-server model. The system working as the server is called the puppet master. The system that works as a client is known as the slave. In puppet, you can also run the exact configuration instructions on the same system.
Modules 📌
Before moving on to the discussion of developing modules in puppet, let us have a basic overview of the modules.
About Modules
The puppet code is kept in the modules. There is a specific module for specific tasks. The developer can reuse and share the modules, also. The module comprises functions, classes, different tasks, and plans. The modules can easily be installed from puppet forge. It contains a library of modules.
There are numerous classes and functions defined in the module. The puppet finds the desired data using the directory system of the modules.
One important thing to note is that the names of the modules cannot contain the namespace separator(::).
Managing Modules
You can use the puppet module command to upgrade or install the puppet forge modules from the command line.
Setting Up the Puppet Module Using a Proxy
You first need to set the IP address of the proxy to set up the puppet modules behind it. To do this you can run the commands mentioned below.
export http_proxy=http://<PROXY IP>:<PROXY PORT>
export https_proxy=http://<PROXY IP>:<PROXY PORT
Installing Modules From Command Line
To use a module you first have to install it and all its dependencies. To do this you can use the puppet module install command.
Installing Modules From Puppet Forge
To install a module from the puppet forge, run the puppet module install command. You also have to mention the name of the module along. The command is given below.
puppet module install puppetlabs-<nameofmodule>
Upgrading Modules💻
You can simply use the puppet module upgrade to upgrade the modules. You can upgrade the module with a specific version. The command for this is given below.
You can simply uninstall the modules using the puppet module uninstall command. The proper command to remove a module is given below.
puppet module uninstall puppetlabs-apache
The command to uninstall the dependencies forcibly is as follows.
puppet module uninstall --force
Writing Modules📍
In this section we will define the basic design of a module. A great module contains small classes. These classes are like functions. This is used to perform tasks. Some of the main classes in a module are as follows.
⭕<module> class
This has the name of the module.
⭕Install class
It has information about the resources managing the installation of software.
⭕Service class
It has information about resources and the running state of the software.
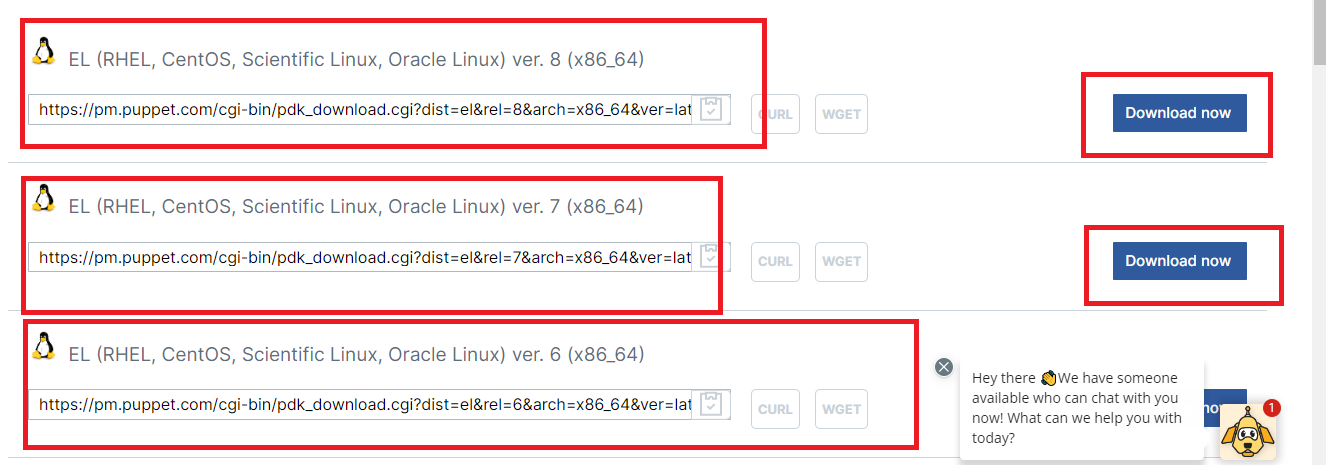
Puppet Development Kit💻
This part of the blog will form the basis for developing modules in puppet. Puppet development kit is the framework that lets you write your puppet module. You can also test your module using puppet development kit. You can also modify the current modules according to the puppet development kit.
The official site of puppet development kit looks like this.
Steps To Follow While Developing Modules In Puppet📃
The steps involved in working with the puppet development kit are as follows.
📌Create a module.
📌Test and validate your module.
📌Make sure that the dependencies required are already present.
📌Start with writing the classes.
📌 Every time you add a new feature, ensure that the module functions appropriately.
Puppet Development Kit Package✅
The tools that are included in the puppet development kit package are shown in a tabular manner below.
Tool
Definition
pdk
It is used to create and test modules.
puppet-syntax
It is used to validate the syntax of puppet.
puppet-lint
Validates the code of puppet by comparing it with the standard style of puppet.
metadata-json-lint
Checks the metadata.json files by comparing it with the standard style of puppet.
rspec-puppet-facts
Using this tool, you can also add rspec-puppet tests for certain systems.
The table lists out the tools and their definition.
Puppet and VS Code💻
Interestingly, the puppet has an extension in the VSCode( Visual Studio Code). This extension is developed exclusively for making the puppet code writing more quickly. It works with all operating systems like windows, linux, etc.
Starting with VSCode Extension🎯
📌Download the puppet development kit on your system.
📌Install the VS Code extension for puppet. You can refer to the link given below.
📌Create a puppet file. The file must have .pp extension.
📌Search for the puppet-vscode extension from the extension option. Click on install. The extension will be installed in your system.
DSC Resources Powershell💻
DSC stands for Desired State Configuration. DSC is useful in managing configuration as code. The DSC resources can be small or large. You can directly install the DSC resources using puppet forge. You have to then deploy it to the code base.
Let us understand the DSC resources through an example.
If you deploy the xinternetexplorerhomepage, you have to declare the resources like mentioned below.
The DSC modules are not like normal modules. They have different policies.The policies are mentioned below.
📌There is a translation layer between DSC and puppet.
📌Puppet does not have a bug-supporting feature.
📌Puppet supports private modules.
Conversion of Private DSC Resources To Puppet Module🎯
A private DSC resource can be converted to a puppet module. Powershell gallery syncs the private DSC resources. The steps for conversion are given below.
📌Install the Puppet.dsc module using the command given below.
Use the puppetlabs-dsc_lite module. This lets you manage your target nodes with arbitrary DSC resources. The following command lets you identify the parameters available.
The puppetlabs-dsc_lite module lets you specify a version of the DSC resource to use for each resource declaration. An example where you can specify a version of DSC resource is as follows.
dsc {'iis_server':
  resource_name => 'xyz',
  module        => {
    name    => 'PSDesiredStateConfiguration',
    version => '1.1'
  },
  properties => {
    ensure => 'present',
    name   => 'xyz',
  }
}
Upgradation of Puppet DSC Modules🎯
You can upgrade the puppet DSC modules too. You can use the puppetlabs-dsc module the same. The steps for the upgradation are given below.
📌Remove the puppetlabs-dsc module from the puppetfile.
📌You should have the declarations that you want to keep. Set these declarations in place of the puppetlabs-dsc module.
📌The list of resources is given below. Choose the ones you want and add them to the puppetfile.
mod 'dsc-xdefender', '0.2.0-0-0'
mod 'dsc-xdhcpserver', '2.0.0-0-0'
mod 'dsc-xdisk', '1.0.0-0-0'
mod 'dsc-xdismfeature', '1.3.0-0-0'
mod 'dsc-xdnsserver', '1.11.0-0-0'
mod 'dsc-xexchange', '1.27.0-0-0'
mod 'dsc-xfailovercluster', '1.12.0-0-0'
mod 'ddsc-xhyper_v', '3.16.0-0-0'
mod 'dsc-xinternetexplorerhomepage', '1.0.0-0-0'
mod 'dsc-xjea', '0.2.16-6-0'
mod 'dsc-xmysql', '2.1.0-0-0'
mod 'dsc-xpendingreboot', '0.4.0-0-0'
mod 'dsc-xphp', '1.2.0-0-0'
mod 'dsc-xpowershellexecutionpolicy', '3.1.0-0-0'
mod 'dsc-xpsdesiredstateconfiguration', '8.5.0-0-0'
mod 'dsc-xremotedesktopadmin', '1.1.0-0-0'
mod 'dsc-xremotedesktopsessionhost', '1.8.0-0-0'
mod 'dsc-xrobocopy', '2.0.0-0-0'
mod 'dsc-xscdpm', '1.2.0-0-0'
mod 'dsc-xscom', '1.3.3-0-0'
mod 'dsc-xscsma', '2.0.0-0-0'
mod 'dsc-xscspf', '1.3.1-0-0'
mod 'dsc-xscsr', '1.3.0-0-0'
mod 'dsc-xscvmm', '1.2.4-0-0'
mod 'dsc-xsmbshare', '2.1.0-0-0'
mod 'dsc-xsqlps', '1.4.0-0-0'
mod 'dsc-xtimezone', '1.8.0-0-0'
mod 'dsc-xwebadministration', '2.5.0-0-0'
mod 'dsc-xwebdeploy', '1.2.0-0-0'
mod 'dsc-xwindowseventforwarding', '1.0.0-0-0'
mod 'dsc-xwindowsrestore', '1.0.0-0-0'
mod 'dsc-xwindowsupdate', '2.7.0-0`0'
mod 'dsc-xwineventlog', '1.2.0-0-0'
mod 'dsc-xwordpress', '1.1.0-0-0'
DSC Resources and Troubleshooting🎯
Validation does not happen in some of the DSC resources on their own. One example where troubleshooting might be useful is as follows. There could be a scenario where a resource accepts an integer value but retrieves the value as a string. One way of the troubleshooting here can be instructing the resource to perform validation at the resource level. We hope you have understood the concept of developing modules in puppet🎯.
Frequently Asked Questions
What is the use of puppet forge?
The puppet forge contains over 6000 modules in a library that can be used.
What language is Puppet built on?
Puppet is built using Ruby domain-specific language.
Is puppet an open-source tool?
Puppet is an open-source tool. Puppet is also available in the enterprise version.
What is the meaning of classes in modules in puppet?
The classes in modules of puppet are basically the codes that are used to be reused further in the code.
How can I see the installed modules in puppet?
You can view all installed modules and their directories using the Puppet Module list command.
Conclusion
This blog discussed the concept of developing modules in puppet. We first started with discussing about puppet. We then proceeded to learning about modules in puppet followed by a discussion on puppet development kit. The blog further explained about puppet vs code extension in detail and DSC resources in powershell.


 6+ registered

