Do you think IIT Guwahati certified course can help you in your career?
Introduction
A Java Web application framework called JavaServer Faces (JSF) is based on UI components. JSF is a server-based framework, and the JSF UI components' state and prescribed life cycles are represented on the server. The instructions in this chapter will help you set up a development environment so that you can begin using the JSF Framework.
JSF Application
Web pages containing JSF UI components make up a JSF application. Additionally, a JSF application needs some configuration files ("faces-config.xml" and web.xml).
Managed Bean: A Java class that will be dynamically constructed when the JSF application is running is represented by the data elements of the JSF application (managed beans and backing beans). Which scope the bean is valid for can be specified (Session, Request, Application, or none) switching between web pages
Data validators: Tools for examining the accuracy of user input
UI and model translation are done using data converters.
Managed beans are straightforward Java objects (POJOs) that can be utilized in JSF applications and are declared in "faces-config.xml." You could, for instance, define the Java object "Person." Once the object has been described in faces-config.xml, you can use the Person attributes in your JSF UI components, for example, by binding the object's value "firstName" to a JSF input field.
System Requirement
The first prerequisite is to have JDK installed on your computer, as JSF requires JDK 1.5 or higher
JDK
1.5 or above
Memory
No minimum requirement
Disk Space
No minimum requirement
Operating System
No minimum requirement
Now you must be thinking how we will setup this?
Environment Setup for JSF Application Development
To set up your environment for JSF application development, follow the provided instructions.
Step 1: Verify Java installation on your machine
Open a console and execute the following Java command.
OS
Task
Command
Windows
Open Command Console
c:\> java -version
Linux
Open Command Terminal
$ java -version
Mac
Open Terminal
machine:~ joseph$ java -version
Step 2: Set Up Java Development Kit (JDK)
The Java Software Development Kit (SDK) can be downloaded from Oracle's Java site at Java SE Downloads if you don't already have Java installed. You can find installation instructions for JDK in the downloaded files; simply follow them to install and configure the setup. Last but not least, configure the environment variables PATH and JAVA_ HOME to point to the appropriate directories containing java and javac, often java_install_dir/bin and java_install_dir.
Set the JAVA_HOME environment variable to the root directory location on your computer where Java is installed.
OS
Output
Windows
Set the environment variable JAVA_HOME to C:\Program Files\Java\jdk1.6.0_21
Linux
Export JAVA_HOME=/usr/local/java-current
Mac
Export JAVA_HOME=/Library/Java/Home
Append Java compiler location to System Path.
OS
Output
Windows
Append the string;%JAVA_HOME%\bin to the end of the system variable, Path.
Linux
Export PATH=$PATH:$JAVA_HOME/bin/
Mac
Not required
Step 3: Set Up Eclipse IDE
Download the most recent Eclipse binaries with WTP support from https://www.eclipse.org/downloads/ to install Eclipse IDE. Unpack the binary distribution into a handy location after downloading the installation.
If everything is in order following a successful starting, the following result will be shown.
Step 7: Add the Maven bin directory location to the system path
Add the M2 variable now to the System Path.
OS
Output
Windows
Append the string;%M2% to the end of the system variable, Path.
Linux
export PATH=$M2:$PATH
Mac
export PATH=$M2:$PATH
Example - Windows
Step 8: Verify Maven installation.
Run the mvn command after opening the console.
OS
Task
Command
Windows
Open Command Console
c:\> mvn --version
Linux
Open Command Console
$ mvn --version
Mac
Open Terminal
machine:~ joseph$ mvn --version
Step 9: Set Up Apache Tomcat
From https://tomcat.apache.org/, you can get the most recent version of Tomcat. Unpack the binary distribution into a handy location after downloading the installation.
On a Windows computer, you can start Tomcat by typing the following commands, or you may just double-click the startup icon.
%CATALINA_HOME%\bin\startup.bat
Or
C:\apache-tomcat-6.0.33\bin\startup.bat
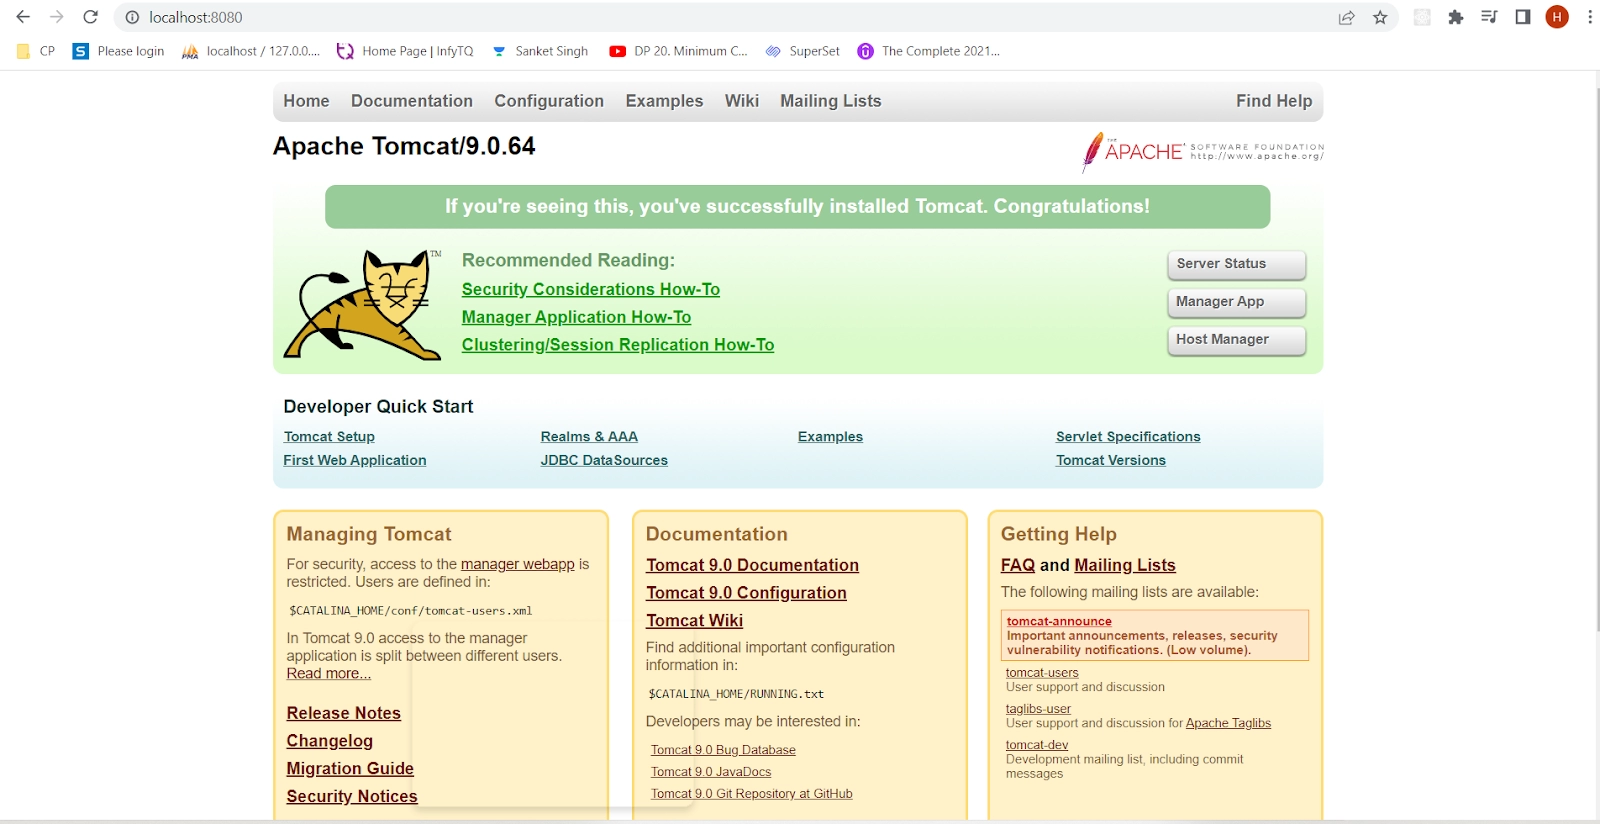
Visit http://localhost:8080/ to access the Tomcat default web applications following a successful launch. The result will be displayed if everything is in order.
When the client sends an HTTP request for a page to the server, the JavaServer Faces application's lifecycle starts, and it ends when the server returns the page. There are two key stages to the JSF lifecycle: The phase of execution Rendering Stage.
What does JSF's managed bean mean?
A normal Java Bean class registered with JSF is the Managed Bean. In other terms, Controlled Beans is a JSF framework managed Java bean. Getter and setter functions, business logic, and even a backing bean are all included in managed beans (a bean contains all the HTML form values).
What is Facelet JSF?
Building component trees and JavaServer Faces views using HTML-style templates requires the usage of Facelets, a robust but lightweight page declaration language.
What does JSF's session scope mean?
You can create and bind objects to a session using the session scope. When this bean is used for the first time in an HTTP request, it is generated, and when the HTTP session is invalidated, it is deleted. Both JSF and CDI provide a request scope that performs similar duties.
Why do we use an action listener?
When a button or link component, such as an h:commandButton or an h:commandLink, is clicked, "Action Events" are triggered in JSF. Therefore, action listeners are used for UI interface logic, and action invokes observation.
Placement Strategy
If you are looking for a perfect video to guide you about placements. Have a look at Parikh's sir video where you can find the complete Roadmap for Product based companies.
Conclusion
In this article, we have discussed the environment setup for JSF.


 9+ registered

