Do you think IIT Guwahati certified course can help you in your career?
Introduction
As a developer, you need to work on so many applications, whether they are browser-based or app-based, and while working with them, there are lots of exceptions and information that he needs to store, so where can he store it.
Here comes the “java.util.logging” file in play as it is very helpful in storing the exceptions, information and much more. This article will discuss GWT Logging Framework, which emulates java.util.logging. GWT Logging Framework has the same syntax and functionality as server-side logging code.
The logging framework emulates java.util.logging, which has the same syntax and functionality as server-side logging code. GWT logging is set using .gwt.xml files. We may enable/disable logging, enable/disable specific handlers, and adjust the default logging level.
Types of Logger
Loggers are arranged in a tree structure, with the Root Logger at the top. If we have two loggers called School.class1 and School.class2, they are siblings, and their father is the logger named School. The Root Logger is the parent of the School Logger (and any other logger with a name that does not begin with a dot ". ").
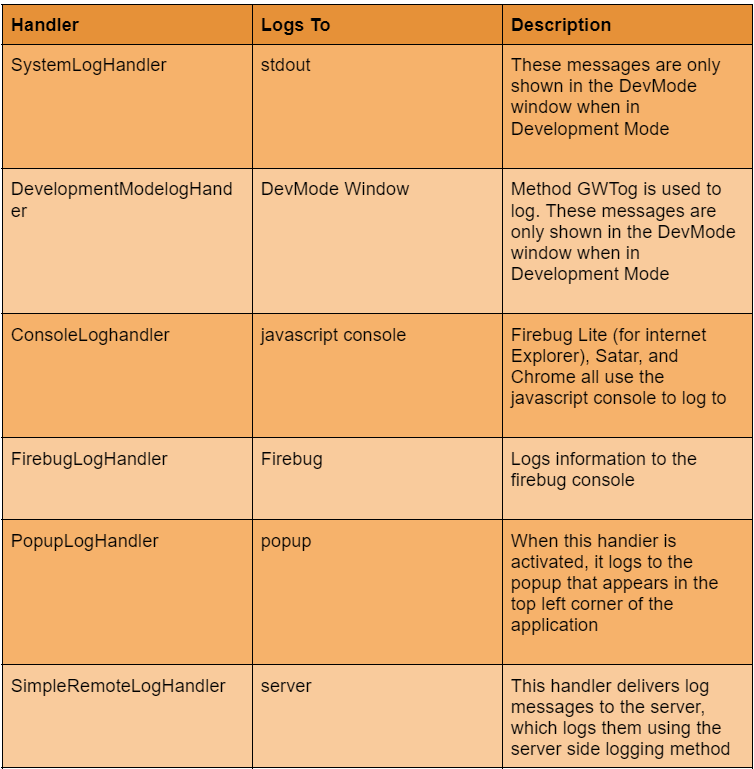
GWT has default handlers that display log entries created with loggers.
Configure Logging in GWT Application
To enable GWT logging, configure the HelloWorld.gwt.xml file as follows.
# add logging module
   <inherits name = "com.google.gwt.logging.Logging"/>
# To change the default logLevel
   <set-property name = "gwt.logging.logLevel" value = "SEVERE"/>
# To enable logging
   <set-property name = "gwt.logging.enabled" value = "TRUE"/>
# To disable a popup Handler
   <set-property name = "gwt.logging.popupHandler" value = "DISABLED" />
Use Logger for User Actions
We can create the root logger by using the following code.
Let's make a java file called HelloWorld.java to show bookmarking in GWT code.
package com.codingninjas.client;


import java.util.logging.Level;
import java.util.logging.Logger;
import com.google.gwt.core.client.EntryPoint;
import com.google.gwt.event.logical.shared.ValueChangeEvent;
import com.google.gwt.event.logical.shared.ValueChangeHandler;
import com.google.gwt.logging.client.HasWidgetsLogHandler;
import com.google.gwt.user.client.History;
import com.google.gwt.user.client.ui.HTML;
import com.google.gwt.user.client.ui.HorizontalPanel;
import com.google.gwt.user.client.ui.Hyperlink;
import com.google.gwt.user.client.ui.RootPanel;
import com.google.gwt.user.client.ui.TabPanel;
import com.google.gwt.user.client.ui.VerticalPanel;


public class HelloWorld implements EntryPoint {

   private TabPanel tabPanel;
   /* Create Root Logger */
   private static Logger rootLogger = Logger.getLogger("");
   private VerticalPanel customLogArea;

   private void selectTab(String historyToken){
      /*  parse the history token */
      try {
         if (historyToken.substring(0, 9).equals("pageIndex")) {
            String tabIndexToken = historyToken.substring(9, 10);
            int tabIndex = Integer.parseInt(tabIndexToken);
            /* Select the specified tab panel */
            tabPanel.selectTab(tabIndex);
         } else {
            tabPanel.selectTab(0);
         }
      } catch (IndexOutOfBoundsException e) {
         tabPanel.selectTab(0);
      }
   }

   /**
    * This is the entry point method.
    */
   public void onModuleLoad() {
      /* create a tab panel to carry multiple pages */
      tabPanel = new TabPanel();

      /* create pages */
      HTML firstPage = new HTML("
We are on first Page.
");
      HTML secondPage = new HTML("
We are on second Page.
");
      HTML thirdPage = new HTML("
We are on third Page.
");

      String firstPageTitle = "First Page";
      String secondPageTitle = "Second Page";
      String thirdPageTitle = "Third Page";

      Hyperlink firstPageLink = new Hyperlink("1", "pageIndex0");
      Hyperlink secondPageLink = new Hyperlink("2", "pageIndex1");
      Hyperlink thirdPageLink = new Hyperlink("3", "pageIndex2");

      HorizontalPanel linksHPanel = new HorizontalPanel();
      linksHPanel.setSpacing(10);
      linksHPanel.add(firstPageLink);
      linksHPanel.add(secondPageLink);
      linksHPanel.add(thirdPageLink);

      /* If the application starts with no history token,
         redirect to a pageIndex0 */
      String initToken = History.getToken();

      if (initToken.length() == 0) {
         History.newItem("pageIndex0");
         initToken = "pageIndex0";
      }

      tabPanel.setWidth("400");
      /* add pages to tabPanel*/
      tabPanel.add(firstPage, firstPageTitle);
      tabPanel.add(secondPage,secondPageTitle);
      tabPanel.add(thirdPage, thirdPageTitle);

      /* add value change handler to History
       * This method will be called when the browser's Back button
       * or Forward button are clicked.
       * and URL of application changes.
       * */
      History.addValueChangeHandler(new ValueChangeHandler() {
         @Override
         public void onValueChange(ValueChangeEvent event) {
            selectTab(event.getValue());
            rootLogger.log(Level.SEVERE, "pageIndex selected: "
            + event.getValue());
         }
      });

      selectTab(initToken);

      VerticalPanel vPanel = new VerticalPanel();

      vPanel.setSpacing(10);
      vPanel.add(tabPanel);
      vPanel.add(linksHPanel);

      customLogArea = new VerticalPanel();
      vPanel.add(customLogArea);

      /* an example of using own custom logging area. */
      rootLogger.addHandler(new HasWidgetsLogHandler(customLogArea));

      /* add controls to RootPanel */
      RootPanel.get().add(vPanel);
   }
}
You can also try this code with Online Java Compiler
In the above example, we have dynamically created three web pages and inserted some content in them to differentiate between the pages. Now when you click on any button from 1,2, or 3, the logs will be updated as the pages change.
Output
Let us compile and execute the program in development mode. If everything is in order with our application, this will get the following result.
Now, select 1, 2, or 3. When you click on 1, 2, or 3, you can see that the log is printed, indicating the pageIndex. In Eclipse, look at the Console output. The log is also being printed in the Eclipse console.
Tue Jul 12 09:44:30 IST 2022
SEVERE: pageIndex selected: pageIndex0
Tue Jul 12 09:44:32 IST 2022
SEVERE: pageIndex selected: pageIndex1
Tue Jul 12 09:44:35 IST 2022
SEVERE: pageIndex selected: pageIndex2
Tue Jul 12 09:44:37 IST 2022
SEVERE: pageIndex selected: pageIndex0
Tue Jul 12 09:44:38 IST 2022
SEVERE: pageIndex selected: pageIndex1
Tue Jul 12 09:44:40 IST 2022
SEVERE: pageIndex selected: pageIndex2
Keeping a record of every data intake, process, data output, and outcome in a program is known as logging. However, because this is part of a much larger, more complex process, you should program with a specific aim rather than attempting to accomplish many programming disciplines simultaneously.
What is GWT Logging Framework?
The logging framework emulates java.util.logging, which has the same syntax and functionality as server-side logging code. GWT logging is set using .gwt.xml files. We may enable/disable logging, enable/disable specific handlers, and adjust the default logging level.
How do we use GWT logs?
GWT logging is set up with. gwt.xml files. We may activate or disable logging, enable or disable specific handlers, and adjust the default logging level.
What is a GWT client?
GWT has many HTTP client classes that make creating custom HTTP queries to your server easier and optionally parse a JSON or XML-formatted response. GWT has a collection of HTTP client classes that enable your application to send generic HTTP requests.
What is RPC in GWT?
RPC, or Remote Procedure Call, is a mechanism used by GWT that allows client code to run server-side operations directly. GWT RPC is a servlet-based application. Because GWT RPC is asynchronous, the client is never blocked while communicating.
Conclusion
In this article, we have extensively discussed the GWT Logging Framework. After giving a quick overview of the GWT Logging Framework, we spoke about how to put it into practice.


 8+ registered

