


Introduction
Hibernate is an Object-Relational Mapping framework in Java Programming Language. It basically maps the object-oriented model to the relational database. It provides a platform that simplifies the interaction of the Java Program with the database.
Hibernate is an Object Relational Mapping(ORM) tool for Java Language. It easily maps the POJO class to the relational database of the system.
So, in this article, we will discuss how to set up the Hibernate Environment which prepares the environment to run Hibernate applications.
Setting Up Hibernate Environment
In order to set up the Hibernate Environment, the following tools are needed in the system:
-
Java Development Kit (JDK)
-
Java Application Server
-
IDE for Java
-
MYSQL database
-
Download Hibernate Framework libraries.
Let us look at them sequentially for setting up Hibernate Environment properly:
Java Development Kit
JDK is basically a development environment. It is used for building applications using Java Programming language. We will use it for Hibernate Environment. It has tools useful for developing and testing programs. You can download JDK from here.
After Downloading JDK, JRE (Java Runtime Environment) needs to be installed. Environment variables can be configured as follows.
Step 1: Go to My Computer >> Right Click on it >> Click Properties.
Step 2: Go to Advanced System Setting
Step 3: Go to Environment Variables
Step 4: In the System Variable, Click on Path and edit it.
Step 5: Add the java installation path to the path variable like “C:\Program Files\jdk1.8.0_20\bin”, in double-quotes.
Step 6: Keep clicking OK.

Step 7: Restart the system >> Open cmd prompt, and type “Java version” to check if it is installed.
Java Application Server
For web applications to run, a Web Server is needed. Let us, for now, use A[ache Tomcat Server. To get Apache Tomcat Server, follow the below steps:
Step 1: Download the Apache Server from here.
Step 2: Unzip the downloaded file.
Step 3: Now click on the Setup, then click Next on the setup, and then ‘I Agree’.
Step 4: Tick the Component button and click Next.
Step 5: Input username and password then click Next.
Step 6: Now verify the JRE path and then click Next.
Step 7: Click Install to install.
Step 8: Eventually, Click the Finish button.
IDE Installation
IDE stands for Integrated Development Environment. It is where Java programs get executed. There are several IDEs available such as NetBeans, IntelliJ IDEA, Eclipse, etc. Here, we will use Eclipse. To get it, use the following steps:
Step 1: You can get Eclipse from here.
Step 2: Download according to the system OS(32 bit or 64 bit).
Step 3: Unzip the file.
Step 4: Click on eclipse.exe.
Step 5: It will get installed and get opened automatically.
Connecting Eclipse IDE with Apache Server
Step 1: Open Eclipse>> Click on the link to create a server.
Step 2: Select the appropriate server from the options given there.
Step 3: Click Next and provide the installation path for tomcat where it is installed.
Step 4: Click Finish.
Step 5: Now you will see the server name by right-clicking on it.
Related Article Apache Server
Download MYSQL Database
Let us look at how to set up MYSQL Database:
Step 1: Download the MySQL database from here and then open it.
Step 2: Clock on the Full radio button to install MYSQL. Move to Next.
Step 3: Click on Execute to install the package.
Step 4: Click on Next for the next two prompts.
Step 5: Now, the Type and the Networking Page will appear. Click Next.
Step 6: Here input username and Password >> Click on Next.
Step 7: Now, on the Windows Service page check the above two options of Configure MySQL server and start the MYSQL and then select the Standard system Account radio button and click Next.
Step 8: When the configuration is finished >> Click Finish.
Downloading the Hibernate Framework libraries
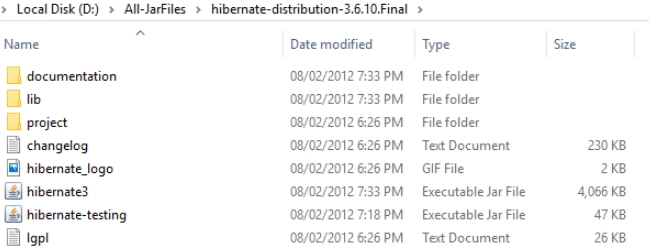
Step 1: There are many Hibernate libraries available over the internet. Download the latest version of Hibernate Framework libraries from here.
Step 2: Unzip it and save it to the directory. It will appear like this. The name of the file is shown in the image below.
Adding Hibernate Library to the project
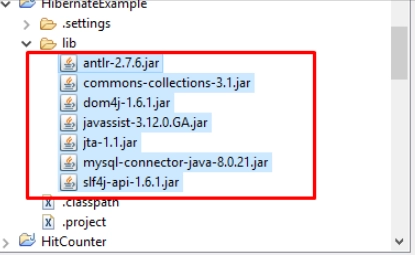
Step 1: Make a simple Java Project and add a lib directory in the project name folder.
Step 2: Copy all the above jar files inside the lib directory together with the MySQL connector jar files. (which is present in C:\Program Files (x86)\MySQL\Connector J 8.0\mysql-connector-java-8.0.21).
Step 3: Right-click on project name > Build path > Configure Build Path
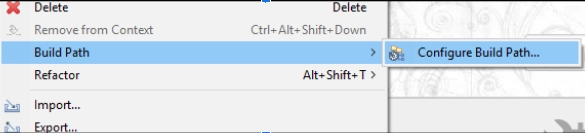
Step 4: Click on Add JARs… then select the project and then select all jar files and click OK and then click Apply.
Thus, this way the libraries have been added to the project and environment set up for Hibernate development.


 8+ registered

