Do you think IIT Guwahati certified course can help you in your career?
Introduction
Nowadays, every business wants a data-driven application and architecture. So that they can make changes in their business accordingly. For these businesses, real-time data processing and message streaming are the two important aspects. This is where Apache Kafka comes into the picture. It is a distributed streaming platform. It helps to handle such situations easily and efficiently.
In this blog, we will discuss about how to use Apache Kafka with Java. Firstly, we will discuss about what Apache Kafka is and why to use it. Then we will discuss the steps required to use Apache Kafka with Java.
So, let's get started.
What is Apache Kafka?
In the world of computer systems, Apache Kafka is an open-source and powerful platform. It acts as a super-efficient message broker. It allows different applications and services to send and receive messages. Suppose we are using a messenger, that messenger will connect the people of the city with us. With Apache Kafka, information flows seamlessly. It helps modern applications work together harmoniously. It makes it a vital tool for creating fast, reliable and connected data-driven systems.
Apache Kafka is like a super-fast messenger. It helps different parts of a big city communicate with each other in real time. It's like a smart postman who delivers messages to various neighborhoods lightning-fast, making sure everyone stays updated and connected.
Now, you might be wondering why to use it.
Why Use Apache Kafka?
There are several reasons to use Apache Kafka for integrating it into our data-driven applications:
Offers real-time data processing: It enables the processing of data in real-time. This allows applications to react instantly to changing data streams
Offers high throughput: It can handle and process a large number of messages per second. This makes it more suitable for high-traffic systems
Highly scalable: Its distributed nature allows easy scaling by adding more brokers and partitions as the data volume grows
Provides fault tolerance ability: It ensures data durability and availability even in the face of hardware failures or network issues
Offers integration flexibility: It supports seamless integration with various data sources and sinks. This makes it more versatile for different use cases
Now, let's move on to our main topic, how to use it.
Steps to Use Apache Kafka with Java
There are several steps to use Apache Kafka with Java. But before it, we need to install and setup the Kafka and server.
Installing Kafka
We need to follow these steps to download and install Kafka.
Step 1: Go to the official website of Apache Kafka and download the latest version.
Step 2: Now, we need to extract the file which we have downloaded in our local machine.
Step 3: Now, we need to start the ZooKeeper server. It comes bundled with Kafka. ZooKeeper is used for coordination and management. So, first, we need to go to the Windows folder under the extracted folder and run the command prompt.
This is the folder path C:\Users\naray\Downloads\kafka_2.12-3.5.1\kafka_2.12-3.5.1\bin\windows
Now, we need to run the following command to start the server:
Now, the installation and setup part is done. Now, we need to create a Kafka topic.
Creating Topic
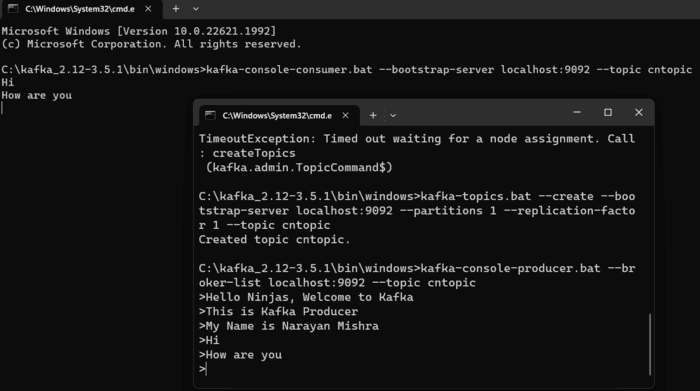
As we are done with the setup, we now need to create a topic. So, creating a Kafka topic means setting up a named category or channel within the Apache Kafka system where messages can be published and consumed. We need to write the following command to create a Kafka topic:
Now, we can send and receive messages using our cntopic. Now, we need to create the Kafka producer.
Creating Kafka Producer
As we are done with creating a Kafka topic, we now need to create a Kafka producer. So, creating a Kafka producer refers to developing a program or component that is responsible for sending data or messages to a Kafka topic. We need to write the following command in the command prompt to create a Kafka producer:
Now, we are ready with the producer. Now, we need to create a consumer.
Creating Kafka Consumer
As we are done with creating a Kafka producer, we now need to create a Kafka consumer. Creating a Kafka consumer refers to developing a program or component that reads and processes data or messages from Kafka topics. We need to write the following command in the command prompt to create a Kafka consumer:
Now, we can see that we have successfully made communication between producer and consumer. Now, we need to do the same thing by creating a Java application.
Creating Java Application and Using Kafka
Now, we need to create a Maven project. We can use any IDE accordingly. Suppose we are using Eclipse. Now, we need to follow the following steps:
Step 1: Create a simple Maven project in Eclipse.
We need to add a dependency of Kafka to our Maven project.
Step 4: Now, we need to write the following code in our ConsumerClass.
Java
Java
package kafkaApplication;


import org.apache.kafka.clients.consumer.*;

import org.apache.kafka.common.serialization.StringDeserializer;


import java.util.Collections;

import java.util.Properties;


public class ConsumerClass {

    public static void main(String[] args) {

        // Kafka configuration properties

        Properties props = new Properties();

        props.put("bootstrap.servers", "localhost:9092");

        props.put("key.deserializer", "org.apache.kafka.common.serialization.StringDeserializer");

        props.put("value.deserializer", "org.apache.kafka.common.serialization.StringDeserializer");

        props.put("group.id", "my_consumer_group");


        // Creating KafkaConsumer instance

        Consumer consumer = new KafkaConsumer<>(props);


        // Topic to subscribe for consuming messages

        String topic = "cntopic";

        consumer.subscribe(Collections.singletonList(topic));


        // Starting consuming the messages

        while (true) {

            // Providing poll for new records from Kafka topic

            ConsumerRecords records = consumer.poll(100);


            // Processing the received records

            for (ConsumerRecord record : records) {

                // Printing the received message

                System.out.println("Received message: " + record.value());

            }

        }

    }

}
You can also try this code with Online Java Compiler
Step 5: Now, we need to check the communication between our created Java producer and consumer, which we have created by running the command on our command prompt. So, we need to run the ProducerClass code.
Now, we can see in the command prompt that we are getting the message which we have provided in our producer in Java code.
Step 6: Now, we will check the consumer code. We will give message input from our created producer in the command prompt, and we will print the message on the Eclipse console. Now, run the ConsumerClass
Now, we will check whether we are getting messages or not.
Now, as you can see, we have sent a message to the consumer, and it is printing on the console successfully. So, we have successfully done the communication between producer and consumer in Java, and we successfully understood the implementation of how to use Apache Kafka with Java.
Frequently Asked Questions
Is Apache Kafka suitable only for Java applications?
No, we can use Apache Kafka with applications written in various programming languages such as Python, Scala, Rust, etc.
Can Apache Kafka replace traditional message brokers?
Yes, Kafka's distributed and scalable nature makes it a compelling alternative to traditional message brokers.
Does Apache Kafka require advanced programming skills?
While some level of programming knowledge is helpful, there are user-friendly libraries and APIs available to simplify Kafka integration.
What are the alternatives to Apache Kafka for message streaming?
There are other message streaming platforms like Apache ActiveMQ, RabbitMQ, and Apache Pulsar. Each of one them has its strengths and use cases. The choice of using them depends on specific project requirements.
Conclusion
In this blog, we have discussed about how to use Apache Kafka with Java. We covered what Apache Kafka is. Then we explained the steps to use it with Java. If you want to learn more about Apache Kafka, then you can check out our blogs:


 9+ registered

