


Introduction
Welcome readers! In this blog, we will learn how to configure Jest for different purposes, like code coverage, test timeout and mock related, etc. if you are unfamiliar with Jest, please go through Getting started with Jest blog. we will see step by step process to configure Jest, we will see different ways to achieve the same result. We will see some of the many configuration options provided by Jest. I hope you learn a lot from this tutorial.
Configuring Jest
We can start writing our unit test in Jest with very minimal configurations, we have to add the following in the package.json file, and we are good to go.
"scripts": {
      "test": "jest"
  },
But Jest also provides many different configuration options to achieve a specific result, for example, collectCoverage, coverageThreshold, coverageDirectory, coverageReporters, autoMocks, clearMocks, testTimeout, globals, watchman, watchPlugins, testRunner, verbose, watchman, snapshotFormat, snapshotResolver, snapshotSerializer, etc. to name a few.
These configuration options allow Jest to be very efficient and save a lot of testing time and effort.
Different ways to configure.
Jest allows you to do configurations in three ways, ensuring flexibility in its usage.
- We can make a new JSON file specific to the configuration.
- We can configure it in the package.json file itself.
- We can also configure through the jest.config.js file.
Next, we will see the step-by-step process of configuration using these ways.
New JSON file
Create a new JSON file called jestConfig.json file in the folder containing package.json, and write all your configurations in the jestConfig.json file itself. In the package.json file, we have to specify the config property, as shown below.
"scripts": {
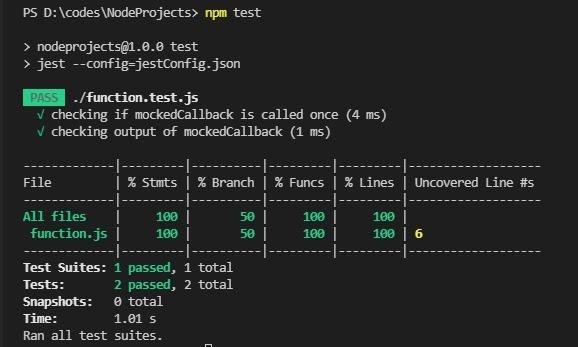
"test": "jest --config=jestConfig.json"
}Now open the jestConfig.json file and start writing configurations. An example configuration is shown below.
Example configuration
{
    "collectCoverage" : true,
    "coverageThreshold": {
      "global": {
                  "branches":75,
                  "functions":100,
                  "lines":85
           }
    },
    "testTimeout": 300,
    "globals": {
          "globalVar": "a global variable"
      },
      "snapshotFormat": {
            "printBasicPrototype": false
      }
}
Package.json file
We can also write and save all our Jest configurations in the package.json file without creating a new one. For this, open package.json, make a new property called Jest and write all your configurations there. This is what your package.json will look like.
{
  "name": "nodeprojects",
  "version": "1.0.0",
  "description": "",
  "main": "index.js",
  "scripts": {
    "test": "jest --config=jestConfig.json"
  },
  "keywords": [],
  "author": "",
  "license": "ISC",
  "devDependencies": {
      "jest": "^27.4.7"
  },
  "jest":{
    // write your configurations here
  }
}
Now simply copy-paste all the configurations which we have written in the previous method.
Example configuration
"jest":{
    "collectCoverage" : true,
    "coverageThreshold": {
        "global": {
            "branches":75,
          "functions":100,
          "lines":85
      }
  },
  "testTimeout": 300,
  "globals": {
        "globalVar": "a global variable"
    },
    "snapshotFormat": {
          "printBasicPrototype": false
    }
}
jest.config.js file
You can also configure Jest using the jest.config.js file, create a new file jest.config.js, in the same folder containing package.json, and start writing your configurations.
module.exports = {
    // Write all your configurations here.
};


 8+ registered

