


Introduction
A Java-based web application framework called Java Server Faces (JSF) was created to make it easier to construct and integrate web-based user interfaces. A standardized display technology known as JavaServer Faces was defined in a specification by the Java Community Process.
JSF gives you:
- Basic library
- UI foundation components consist of typical HTML input elements
- To create new UI component libraries or to expand already existing components by extending the foundation UI components
- JSF UI components can render themselves in a variety of ways depending on the sorts of clients due to multiple rendering capabilities.
Now, coming to this tag is an HTML input element with the type "text" shown by the h:inputText tag. We will further discuss it in detail later.
JSF h:inputTextarea
This is displayed by JSF as an HTML "textarea" element. A multi-line string can be entered by the user using it.
Tag
JSF Tag:
<h:inputTextarea rows=”6” cols=”12” value=" Welcome to Coding Ninjas" />Rendered HTML tag:
<textarea name="random value" rows=”6” cols=”12” value=" Welcome to Coding Ninjas" />Attribute Table


Example

index.xhtml
<?xml version='1.0' encoding='UTF-8' ?>
< !DOCTYPE html PUBLIC "-//W3C//DTD XHTML 1.0 Transitional//EN" "http://www.w3.org/TR/xhtml1/DTD/xhtml1-transitional.dtd ">
<html xmlns="http://www.w3.org/1999/xhtml"
      xmlns:h="http://xmlns.jcp.org/jsf/html">
    <h:head>
        <title>Facelet Title</title>
    </h:head>
    <h:body>
        <h:form>
            <h:inputTextarea rows="4" cols="12" value="${controlDemo.address}"/><br/><br/>
        <h:commandButton value="Click Me"/> <br/><br/>
        <h:outputText value="${controlDemo.address}"/>
        </h:form>
    </h:body>
</html>
ControlDemo.java
package com.codingninjas;
import javax.faces.bean.ManagedBean;
import javax.faces.bean.RequestScoped;
@ManagedBean
@RequestScoped
public class ControlDemo {
    // address used as string
    private String address;
    // to return the address value
    public String getAddress()
    {
        return address;
    }
    // to set the address value
    public void setAddress(String address){
        this.address = address;
    }
}
web.xml
<?xml version="1.0" encoding="UTF-8"?>
<web-app version="3.1" xmlns="http://xmlns.jcp.org/xml/ns/javaee" xmlns:xsi="http://www.w3.org/2001/XMLSchema-instance" xsi:schemaLocation="http://xmlns.jcp.org/xml/ns/javaee http://xmlns.jcp.org/xml/ns/javaee/web-app_3_1.xsd">
    <context-param>
        <param-name>javax.faces.PROJECT_STAGE</param-name>
        <param-value>Development</param-value>
    </context-param>
    <servlet>
        <servlet-name>Faces Servlet</servlet-name>
        <servlet-class>javax.faces.webapp.FacesServlet</servlet-class>
        <load-on-startup>1</load-on-startup>
    </servlet>
    <servlet-mapping>
        <servlet-name>Faces Servlet</servlet-name>
        <url-pattern>/faces/*</url-pattern>
    </servlet-mapping>
    <session-config>
        <session-timeout>
            30
        </session-timeout>
    </session-config>
    <welcome-file-list>
        <welcome-file>faces/index.xhtml</welcome-file>
    </welcome-file-list>
</web-app>
faces-config.xml
<?xml version='1.0' encoding='UTF-8'?>
<faces-config version="2.2"
              xmlns="http://xmlns.jcp.org/xml/ns/javaee"
              xmlns:xsi="http://www.w3.org/2001/XMLSchema-instance"
              xsi:schemaLocation="http://xmlns.jcp.org/xml/ns/javaee http://xmlns.jcp.org/xml/ns/javaee/web-facesconfig_2_2.xsd">
    <managed-bean>
        <managed-bean-name>test</managed-bean-name>
        <managed-bean-class>com.codingninjas.Test</managed-bean-class>
        <managed-bean-scope>request</managed-bean-scope>
    </managed-bean>
</faces-config>
Output
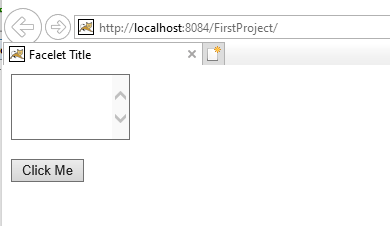
The textarea looks like this:
Enter some text as shown:

After clicking the button, the output is:


 6+ registered

