Do you think IIT Guwahati certified course can help you in your career?
Introduction
The Java Layout managers allow us to control the arrangement of visual components in GUI forms by controlling the size and position of components inside containers. There is a layout manager associated with each Container object. A layout manager is an instance of a class that implements the LayoutManager interface.
What is a layout manager in Java?
A layout manager in Java is an object that uses layout guidelines or rules to decide how big and where components should be placed inside a container, like a JFrame or a JPanel. When designing user interfaces that are responsive, resizable, and adjustable to various screen sizes and resolutions, layout managers are essential.
The java.awt and javax.swing packages in Java come with multiple built-in layout managers that each have various approaches to ordering and structuring elements inside a container. Among the Java layout managers that are frequently used are:
Layout managers are available for general use in several AWT and Swing classes:
BorderLayout
BoxLayout
CardLayout
FlowLayout
GridBagLayout
GridLayout
GroupLayout
ScrollPaneLayout
SpringLayout
Border Layout
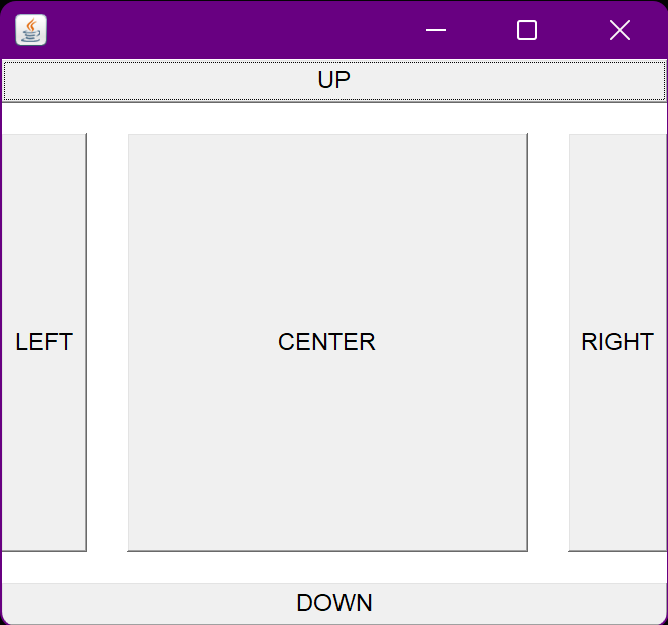
This arrangement will show the components along the container's border. The component can be presented in five different places on this layout: North, South, East, West, and Center are the locations. The center is the default region. The border regions shown above are the BorderLayout class's preset static constants.
Additionally, the components added to the east or west get their preferred width, but the height will be the remaining height of the container. Components added to the north and south get their preferred height, but the container's width will be their width. The center-added components are not given their appropriate height or width. It wraps around the remainder of the container.
Note: BorderLayout is the default layout manager for a JFrame's content pane.
Constructors of BorderLayout
BorderLayout(): It forms a border layout without any spaces between the components.
BorderLayout(int hgap, int vgap): builds a border layout using the specified horizontal and vertical gaps between the components.
Example:
Using BorderLayout()
import java.awt.*;
public class BorderLayoutDemo
{
    public static void main (String[]args)
    {
        Frame f1 = new Frame (); // creating frame
        f1.setSize (250, 250);
        //  creating buttons
        Button b1 = new Button ("UP");
        Button b2 = new Button ("RIGHT");
        Button b3 = new Button ("LEFT");
        Button b4 = new Button ("DOWN");
        Button b5 = new Button ("CENTER");
        f1.add (b1, BorderLayout.NORTH); //placing b1 in north direction
        f1.add (b2, BorderLayout.EAST); //placing b2 in east direction
        f1.add (b3, BorderLayout.WEST); //placing b3 in west direction
        f1.add (b4, BorderLayout.SOUTH); //placing b4 in south direction
        f1.add (b5); // b5 will be placed in center by default
        f1.setVisible (true);
    }
}
Output:
Using BorderLayout(int hgap, int vgap):
import java.awt.*;
public class BorderLayoutDemo
{
    public static void main (String[]args)
    {
        Frame f1 = new Frame (); // creating frame
        f1.setSize (250, 250);
        //  creating buttons
        Button b1 = new Button ("UP");
        Button b2 = new Button ("RIGHT");
        Button b3 = new Button ("LEFT");
        Button b4 = new Button ("DOWN");
        Button b5 = new Button ("CENTER");
        f1.setLayout(new BorderLayout(20, 15)); //vgap=20, hgap=15
        f1.add (b1, BorderLayout.NORTH); //placing b1 in north direction
        f1.add (b2, BorderLayout.EAST); //placing b2 in east direction
        f1.add (b3, BorderLayout.WEST); //placing b3 in west direction
        f1.add (b4, BorderLayout.SOUTH); //placing b4 in south direction
        f1.add (b5); // b5 will be placed in center by default
        f1.setVisible (true);
    }
}
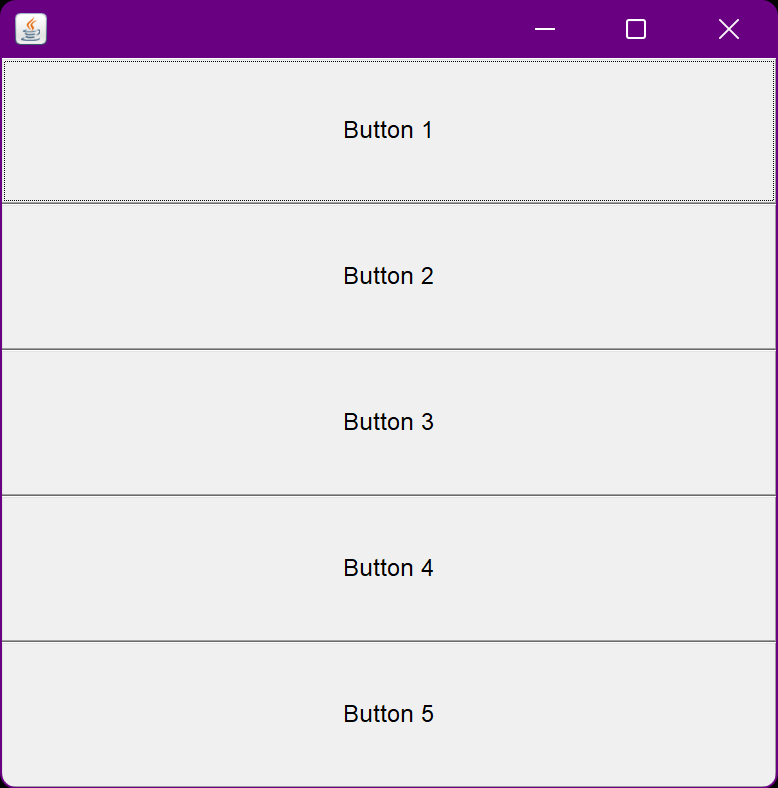
The BoxLayout places elements in a container either vertically in a single column or horizontally in a single row. The components are assembled either top to bottom or left to right. The height of each component will be the same and equal to the largest size component if the components are horizontally aligned. The width of each component will be the same and equivalent to the greatest width component if the components are vertically aligned.
X_Axis, Y_Axis, Line_Axis, and Page_Axis are the four constants that comprise the class. The horizontal BoxLayout that the constant X_AXIS generates arranges each component from left to right. All components are arranged vertically in a BoxLayout using the constant Y_AXIS, from top to bottom.
The other two constants, LINE_AXIS and PAGE_AXIS, use the container orientation to layout the components.
Constructor of Box Layout
BoxLayout(Container c, int axis): generates a box layout using the specified axis to organize the components.
Example:
import java.awt.*;
import javax.swing.*;

public class BoxLayoutDemo extends Frame {
    private static final long serialVersionUID = 1L;
    Button buttons[];
 public BoxLayoutDemo () {
   buttons = new Button [5];
   for (int i = 0;i<5;i++) {
      buttons[i] = new Button ("Button " + (i + 1));
      // adding the buttons
      add (buttons[i]);
    }
  // placing the buttons horizontally
setLayout (new BoxLayout (this, BoxLayout.Y_AXIS));
/* replace above line with
setLayout (new BoxLayout(this, BoxLayout.X_AXIS));
To arrange the buttons vertically */
setSize(500,500);
setVisible(true);
}
public static void main(String args[]){
BoxLayoutDemo b=new BoxLayoutDemo();
}
}
Output:
Card Layout
The CardLayout arranges elements as a stack of cards. In a CardLayout, just the top card is visible. CardLayout only shows one component at a time.
The top of the deck will be reserved for the first component to be inserted into the container. The card components are presented horizontally or vertically, with a default gap of zero at the left, right, top, and bottom edges.
Constructors of Card Layout
CardLayout(): generates a card layout with no gaps in the horizontal or vertical directions.
CardLayout(int hgap, int vgap): constructs a card layout with the specified vertical and horizontal gaps.
There are numerous ways to iterate through components in the CardLayout class. The container is used as a parameter in all show-related methods.
It displays the first component that was added to it by default.
Thefirst() and last() functions, respectively, display the first and last card.
The previous() and next() methods display the prior and following cards from the presently displayed card.
Calling the next() method displays the first card if the last card is currently visible.
Calling the previous() method displays the last card if the first card is currently visible.
The show(Container, cardname) turns to the designated card with the supplied card name.
Example:
Using CardLayout()
import java.awt.BorderLayout;
import java.awt.CardLayout;
import java.awt.Container;
import java.awt.Dimension;
import javax.swing.JButton;
import javax.swing.JFrame;
import javax.swing.JPanel;
public class CardLayoutDemo {
  public static void main(String[] args) {
    JFrame frame = new JFrame("Card Layout");
    frame.setDefaultCloseOperation(JFrame.EXIT_ON_CLOSE);
    Container contentPane = frame.getContentPane();
    JPanel buttonPanel = new JPanel();
    JButton nextButton = new JButton("Next");// creating next button through which we will move to next card.
    buttonPanel.add(nextButton);
    contentPane.add(buttonPanel, BorderLayout.SOUTH);// placing the next button in bottom of the layout
    final JPanel cardPanel = new JPanel();
    final CardLayout cardLayout = new CardLayout(); // creating card layout
    /* final CardLayout cardLayout = new CardLayout(30,30); creating card layout with     vertical gap= 30 and horizontal gap= 30. */
    cardPanel.setLayout(cardLayout);
    for (int i = 1; i <= 5; i++) { // craeting 5 cards
      JButton card = new JButton("Card " + i);
      card.setPreferredSize(new Dimension(500, 500));
      String cardName = "card" + 1;
      cardPanel.add(card, cardName);
    }
    contentPane.add(cardPanel, BorderLayout.CENTER);
    nextButton.addActionListener(e -> cardLayout.next(cardPanel)); //adding action to next button.
    frame.pack();
    frame.setVisible(true);
  }
}
Output:
Using CardLayout(int hgap, int vgap):
Change the following line in the above code:
final CardLayout cardLayout = new CardLayout(30,30); // creating card layout with vertical gap= 30 and horizontal gap= 30.
Like words on a page, it puts the elements in a container. It completely occupies the top line from top to bottom and left to right. If the container is not broad enough to display all the components, they are wrapped around the line in the order that they are inserted, with the first component appearing at the top left. Component spacing can be adjusted both vertically and horizontally. The components may be positioned to the left, center, or right.
Note: Every JPanel uses FlowLayout as its default layout manager.
The FlowLayout class defines the following five constants to represent the five various alignments:
LEFT
RIGHT
CENTER
LEADING
TRAILING
Constructors of Flow Layout
FlowLayout(): generates a flow pattern with centered alignment and a preset horizontal and vertical gap of 5 units.
FlowLayout(int align): a flow arrangement is created using the specified alignment and a five-unit default horizontal and vertical gap.
FlowLayout(int align, int hgap, int vgap): builds a flow arrangement with the specified alignment and vertical and horizontal gaps.
Example:
Using FlowLayout():
import java.awt.*;
import javax.swing.*;
import java.awt.*;
import javax.swing.*;
public class FlowLayoutDemo extends Frame {
    private static final long serialVersionUID = 1L;
    Button buttons[];
 public FlowLayoutDemo () {
   buttons = new Button [5];
   for (int i = 0;i<5;i++) {
      buttons[i] = new Button ("Button " + (i + 1));
      // adding the buttons so that it can be displayed
      add (buttons[i]);
    }
    // parameter less constructor is used
    // therefore, alignment is center
    // horizontal as well as the vertical gap is 5 units.
    setLayout(new FlowLayout());
     /* setting flow layout of right alignment
    setLayout(new FlowLayout(FlowLayout.RIGHT)); */
    setSize(300, 200);
    setVisible(true);
}
public static void main(String argvs[])
{
    new FlowLayoutDemo();
}
}
Output:
Using FlowLayout(int align):
//setting flow layout of right alignment
 setLayout(new FlowLayout(FlowLayout.RIGHT));
The code fragment that follows creates a FlowLayout object and the components it controls. To configure the component's orientation, choose either the Left to Right or Right to Left option, and then click the Apply orientation button.:
import java.awt.*;
import java.awt.event.*;
import javax.swing.*;
import java.util.*;
public class FlowLayoutDemo extends JFrame{
    private static final long serialVersionUID = 1L;
    JRadioButton RtoLbutton;
    JRadioButton LtoRbutton;
    FlowLayout experimentLayout = new FlowLayout();
    final String RtoL = "Right to left";
    final String LtoR = "Left to right";
    JButton applyButton = new JButton("Apply component orientation");
    public FlowLayoutDemo(final String name) {
        super(name);
    }
    public void addComponentsToPane(final Container pane) {
        final JPanel compsToExperiment = new JPanel();
        compsToExperiment.setLayout(experimentLayout);
        experimentLayout.setAlignment(FlowLayout.TRAILING);
        final JPanel controls = new JPanel();
        controls.setLayout(new FlowLayout());
        LtoRbutton = new JRadioButton(LtoR);
        LtoRbutton.setActionCommand(LtoR);
        LtoRbutton.setSelected(true);
        RtoLbutton = new JRadioButton(RtoL);
        RtoLbutton.setActionCommand(RtoL);
        // Add buttons to the experiment layout
        compsToExperiment.add(new JButton("Button 1"));
        compsToExperiment.add(new JButton("Button 2"));
        compsToExperiment.add(new JButton("Button 3"));
        compsToExperiment.add(new JButton("Button 4"));
        compsToExperiment.add(new JButton("Button 5"));
        // Left to right component orientation is selected by default
        compsToExperiment.setComponentOrientation(ComponentOrientation.LEFT_TO_RIGHT);
        // Add controls to set up the component orientation in the experiment layout
        final ButtonGroup group = new ButtonGroup();
        group.add(LtoRbutton);
        group.add(RtoLbutton);
        controls.add(LtoRbutton);
        controls.add(RtoLbutton);
        controls.add(applyButton);
        // Process the Apply component orientation button press
        applyButton.addActionListener(new ActionListener() {
            public void actionPerformed(final ActionEvent e) {
                final String command = group.getSelection().getActionCommand();
                // Check the selection
                if (command.equals("Left to right")) {
                    compsToExperiment.setComponentOrientation(ComponentOrientation.LEFT_TO_RIGHT);
                } else {
                    compsToExperiment.setComponentOrientation(ComponentOrientation.RIGHT_TO_LEFT);
                }
                // update the experiment layout
                compsToExperiment.validate();
                compsToExperiment.repaint();
            }
        });
        pane.add(compsToExperiment, BorderLayout.CENTER);
        pane.add(controls, BorderLayout.SOUTH);
        ;
    }
    /**
     * Create the GUI and show it.
     */
    private static void createAndShowGUI() {
        // Create and set up the window.
        final FlowLayoutDemo frame = new FlowLayoutDemo("FlowLayoutDemo");
        frame.setDefaultCloseOperation(JFrame.EXIT_ON_CLOSE);
        // Set up the content pane.
        frame.addComponentsToPane(frame.getContentPane());
        // Display the window.
        frame.pack();
        frame.setVisible(true);
    }
    public static void main(final String[] args) {
        /* Use an appropriate Look and Feel */
        try {
            // UIManager.setLookAndFeel("com.sun.java.swing.plaf.windows.WindowsLookAndFeel");
            UIManager.setLookAndFeel("javax.swing.plaf.metal.MetalLookAndFeel");
        } catch (final UnsupportedLookAndFeelException ex) {
            ex.printStackTrace();
        } catch (final IllegalAccessException ex) {
            ex.printStackTrace();
        } catch (final InstantiationException ex) {
            ex.printStackTrace();
        } catch (final ClassNotFoundException ex) {
            ex.printStackTrace();
        }
        /* Turn off metal's use of bold fonts */
        UIManager.put("swing.boldMetal", Boolean.FALSE);
        //Schedule a job for the event dispatchi thread:
        //creating and showing this application's GUI.
        javax.swing.SwingUtilities.invokeLater(new Runnable() {
            public void run() {
                createAndShowGUI();
            }
        });
    }
}
Output:
Gridbag Layout
It is a strong layout that organizes all the components into a grid of cells and keeps the object's aspect ratio even when the container is modified. The size of the cells in this arrangement may vary. It allocates components with a constant horizontal and vertical spacing. Using this feature, we can set a default alignment for elements inside the columns or rows.
Constructors of Gridbag Layout
GridBagLayout(): A grid bag layout manager is made using the parameterless constructor.
Together, GridBagLayout and GridBagConstraints are employed. The package java.awt contains both classes.
A layout manager for GridBagLayout is defined by the GridBagLayout class. A component in a GridBagLayout has restrictions stipulated by the GridBagConstraints class.
Properties of GridBag Constraints:
gridx, gridy: to provide the grid position and define the x and y coordinate values.
gridwidth, gridheight: for specifying how many grids should span a document.
fill: used whenever the component's size exceeds the area (i.e., VERTICAL or HORIZONTAL).
ipadx, ipady: to specify the components' width and height, i.e., to increase component size.
insets: For establishing the component's surrounding space, specifically it's top, left, right, and bottom.
anchor: used to determine where to position components in a grid when their size is smaller than their area.
weightx, weighty: These indicate how to distribute space across rows and columns and are crucial for defining resizing behavior.
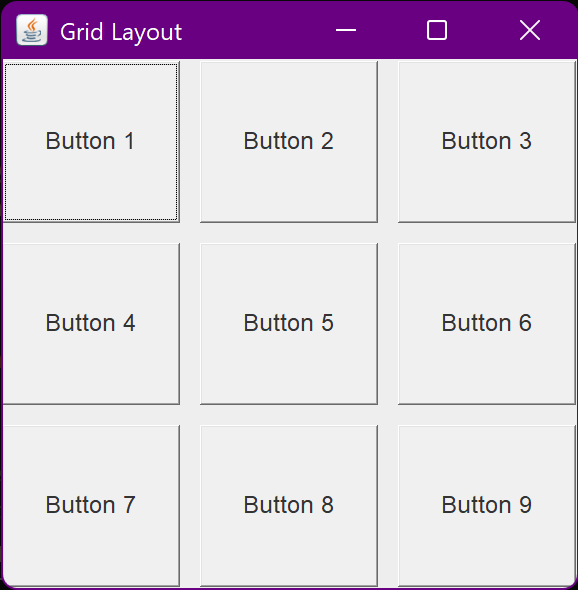
It arranges each element in a grid of cells that are all the same size, adding each element from left to right and top to bottom. Each grid area will be the same size, and each cell can only hold one component. All cells are automatically adjusted when the container is changed in size. As the elements are added, the order in which they should be placed in a cell is decided.
The grid's number of rows or columns is specified when constructing a GridLayout.
Constructors of Grid Layout
GridLayout(): A single-row grid is produced via the no-args constructor. The number of components added to the container equals the number of columns.
GridLayout(int rows, int cols)
GridLayout(int rows, int cols, int hgap, int vgap): The grid's constructors allow us to specify the grid's number of rows, columns, horizontal gaps between cells, and vertical gaps.
Example:
import java.awt.Button;
import java.awt.GridLayout;
import javax.swing.JFrame;
public class GridLayoutDemo
{
JFrame frame;
Button buttons[];
// constructor
GridLayoutDemo()
{
frame = new JFrame(“Grid Layout”);
frame.setDefaultCloseOperation(JFrame.EXIT_ON_CLOSE);
buttons = new Button [9];
// adding the buttons.
for (int i = 0;i<9;i++) {
   buttons[i] = new Button ("Button " + (i + 1));
   frame.add (buttons[i]);
}
// since, we are using the non parameterized constructor, therefore;
// the number of columns is equal to the number of buttons we
// are adding to the frame. The row count remains one.
// setting the grid layout
// a 3 * 3 grid is created with the horizontal gap 10
// and vertical gap 10 ( all these customizations are optional)
//you can create grid layout simply using
// frame.setLayout(new GridLayout());
frame.setLayout(new GridLayout(3, 3, 10, 10));
frame.setSize(300, 300);
frame.setVisible(true);
}
public static void main(String argvs[])
{
new GridLayoutDemo();
}
}
GroupLayout is a layout manager in Java that groups components and places them in a grid, allowing precise control over component positioning and sizing.
Constructors of GroupLayout
GroupLayout(Container host) - Creates a GroupLayout for the specified container.
GroupLayout() - Creates a GroupLayout.
Example:
import javax.swing.*;
import java.awt.*;

public class GroupLayoutExample {
    public static void main(String[] args) {
        SwingUtilities.invokeLater(() -> {
            JFrame frame = new JFrame("GroupLayout Example");
            frame.setDefaultCloseOperation(JFrame.EXIT_ON_CLOSE);

            JPanel panel = new JPanel();
            GroupLayout layout = new GroupLayout(panel);
            panel.setLayout(layout);

            // Create components
            JLabel label1 = new JLabel("Label 1");
            JTextField textField1 = new JTextField();
            JLabel label2 = new JLabel("Label 2");
            JTextField textField2 = new JTextField();
            JButton button = new JButton("Submit");

            // Set horizontal group
            GroupLayout.SequentialGroup hGroup = layout.createSequentialGroup();
            hGroup.addGroup(layout.createParallelGroup()
                    .addComponent(label1)
                    .addComponent(label2));
            hGroup.addGroup(layout.createParallelGroup()
                    .addComponent(textField1)
                    .addComponent(textField2)
                    .addComponent(button));
            layout.setHorizontalGroup(hGroup);

            // Set vertical group
            GroupLayout.SequentialGroup vGroup = layout.createSequentialGroup();
            vGroup.addGroup(layout.createParallelGroup(GroupLayout.Alignment.BASELINE)
                    .addComponent(label1)
                    .addComponent(textField1));
            vGroup.addGroup(layout.createParallelGroup(GroupLayout.Alignment.BASELINE)
                    .addComponent(label2)
                    .addComponent(textField2));
            vGroup.addGroup(layout.createParallelGroup(GroupLayout.Alignment.BASELINE)
                    .addComponent(button));
            layout.setVerticalGroup(vGroup);

            frame.add(panel);
            frame.pack();
            frame.setLocationRelativeTo(null);
            frame.setVisible(true);
        });
    }
}
Output:
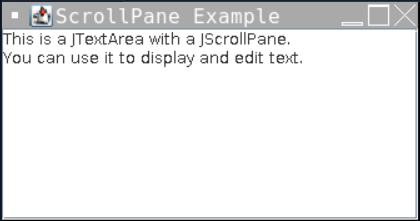
ScrollPaneLayout
ScrollPaneLayout is a layout manager that manages the layout of components in a JScrollPane.
Constructors of ScrollPaneLayout
ScrollPaneLayout() - Creates a new ScrollPaneLayout.
Example:
import javax.swing.*;
import java.awt.*;

public class ScrollPaneExample {
    public static void main(String[] args) {
        SwingUtilities.invokeLater(() -> {
            JFrame frame = new JFrame("ScrollPane Example");
            frame.setDefaultCloseOperation(JFrame.EXIT_ON_CLOSE);

            // Create a JTextArea with dummy text
            JTextArea textArea = new JTextArea(10, 30);
            textArea.setText("This is a JTextArea with a JScrollPane.\n"
                    + "You can use it to display and edit text.");

            // Create a JScrollPane and add the JTextArea to it
            JScrollPane scrollPane = new JScrollPane(textArea);

            // Add the JScrollPane to the frame
            frame.add(scrollPane);

            frame.pack();
            frame.setLocationRelativeTo(null);
            frame.setVisible(true);
        });
    }
}
Output:
SpringLayout
SpringLayout is a layout manager that arranges components based on a set of constraints and springs.
Constructor of SpringLayout
SpringLayout() - Creates a new SpringLayout.
Example:
import javax.swing.*;
import javax.swing.SpringLayout;

public class SpringLayoutExample {
    public static void main(String[] args) {
        SwingUtilities.invokeLater(() -> {
            JFrame frame = new JFrame("SpringLayout Example");
            frame.setDefaultCloseOperation(JFrame.EXIT_ON_CLOSE);

            // Create components
            JButton button1 = new JButton("Button 1");
            JButton button2 = new JButton("Button 2");

            // Create a SpringLayout for the frame's content pane
            SpringLayout layout = new SpringLayout();
            frame.setLayout(layout);

            // Add buttons to the frame
            frame.add(button1);
            frame.add(button2);

            // Set constraints for Button 1
            layout.putConstraint(SpringLayout.WEST, button1, 10, SpringLayout.WEST, frame.getContentPane());
            layout.putConstraint(SpringLayout.NORTH, button1, 10, SpringLayout.NORTH, frame.getContentPane());

            // Set constraints for Button 2 relative to Button 1
            layout.putConstraint(SpringLayout.WEST, button2, 10, SpringLayout.EAST, button1);
            layout.putConstraint(SpringLayout.NORTH, button2, 0, SpringLayout.NORTH, button1);

            // Set size and make the frame visible
            frame.setSize(300, 100);
            frame.setLocationRelativeTo(null);
            frame.setVisible(true);
        });
    }
}
Output:
Frequently Asked Questions
What is a layout manager in Java?
A layout manager in Java controls the arrangement and positioning of components within a container.
What are the 5 layout managers in Java?
The 5 layout managers in Java are BorderLayout, FlowLayout, GridLayout, CardLayout, and GridBagLayout.
What are the benefits of using Java layout manager?
Java layout managers allow resizable and responsive user interfaces, offer automatic component positioning, flexibility to various screen sizes, and consistent, platform-independent UI layouts.
What is use of Gridlayout manager in Java?
It arranges each element in a grid of cells that are all the same size, adding each element from left to right and top to bottom. Each grid area will be the same size, and each cell can only hold one component.
What is default layout manager?
For the majority of Swing components, including JFrame and JPanel, BorderLayout is the default layout manager in Java. The container is divided into five zones, each of which can only hold one component: the north, south, east, west, and center.
Conclusion
In this article, we have discussed Layout Manager in Java. We have discussed different types of layout managers n Java. We have explained each of the layout manager with the help of examples. Read more, Abstract class in java


 8+ registered

