


Introduction
Hello there!
Did you know that back in the day, punched cards with holes were used to represent digital data and patches made out of magnetic tape were used to cut out certain parts? The patches we use today for fixes or updates have surely come a long way.
Patching is extremely important for vulnerability management. Puppet offers its users the facility to configure patching node groups according to their needs and view the patches available for their nodes in the console. Let us discuss how to configure patch management and patch nodes in Puppet.

Configuring patch management
To patch, the user must create a node group for the required nodes and add the node group to the PE Patch Management parent node group. Patch management can then be enabled depending on OS compatibility. It is compatible with Microsoft Windows and the current Linux OS using YUM, APT, and Zypper package management.
The user needs to manage the configuration of their package manager, to allow search for updates. The pe_patch module uses security metadata to find security updates. The process of Patching involves a cron job that scans new patches and uploads their details to PuppetDB. Users can schedule the cron jobs using parameters in the pe_patch class. The pe_patch::patch_server task applies patches to the nodes.
Creating a node group
Step 1: In the console, click on Node groups, and select Add group.
Step 2: Specify the options for the node group. Give the Parent name, Group name, and Environment and unselect the Environment group. Click on Add.
Step 3: Select the created patching node group.
Step 4: Go to the Rules tab on the Node group details page and add nodes to the group by pinning them individually or adding a rule to add nodes that meet certain specifications.
Step 5: Select Run > Puppet.
Specify Patching parameters
Parameters for node groups under Patch Management can be set using the pe_patch class.
Step 1: Select the patching node group to add parameters.
Step 2: Add the pe_patch class to the node group from the Classes tab and Commit changes.
Step 3: Add the patch_group parameter and specify a value to describe the nodes in the node group. Specify additional parameters, if any, in the pe_patch class.
Users can disable patch management by setting the value of the ensure parameter to absent in the patch management node group or by deleting the patch node group. The Patch Management section will remain active even after disabling patch management, but the Patches page will no longer report patch information.
We can prevent PE from applying patches to nodes for a particular duration using a blackout window. Adding the blackout_windows parameter to the pe_patch class can accomplish this. Enter a JSON hash of keys and an ISO-compliant timestamp of the blackout window as its value. Here is an example.
{
  "End of year change freeze": {
          "start": "2021-12-09T00:00:00+15:00",
          "end": "2022-01-09T23:59:59+15:00"
    }
}
Patch management parameters
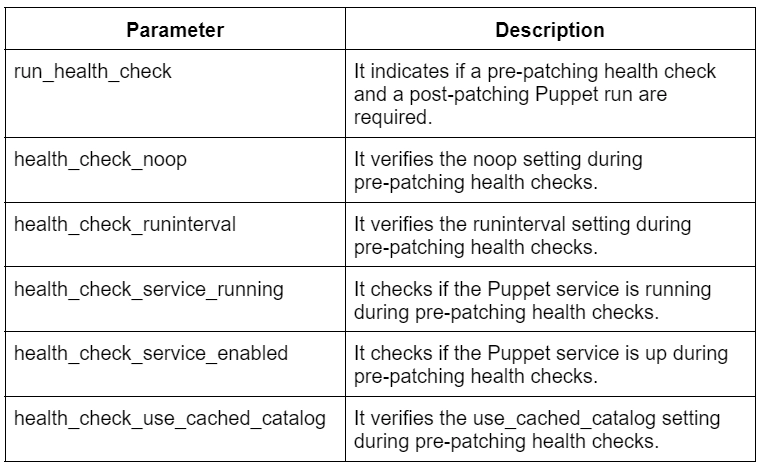
Following are some of the Patch Management parameters of the pe_patch class.


 8+ registered

