Do you think IIT Guwahati certified course can help you in your career?
Introduction
Do you know about any such tool which eliminates the need for paperwork and whiteboards and which can help you to boost your business by managing projects, scheduling, and estimating? Yes you guessed it right! Today we will discuss about Bolt.
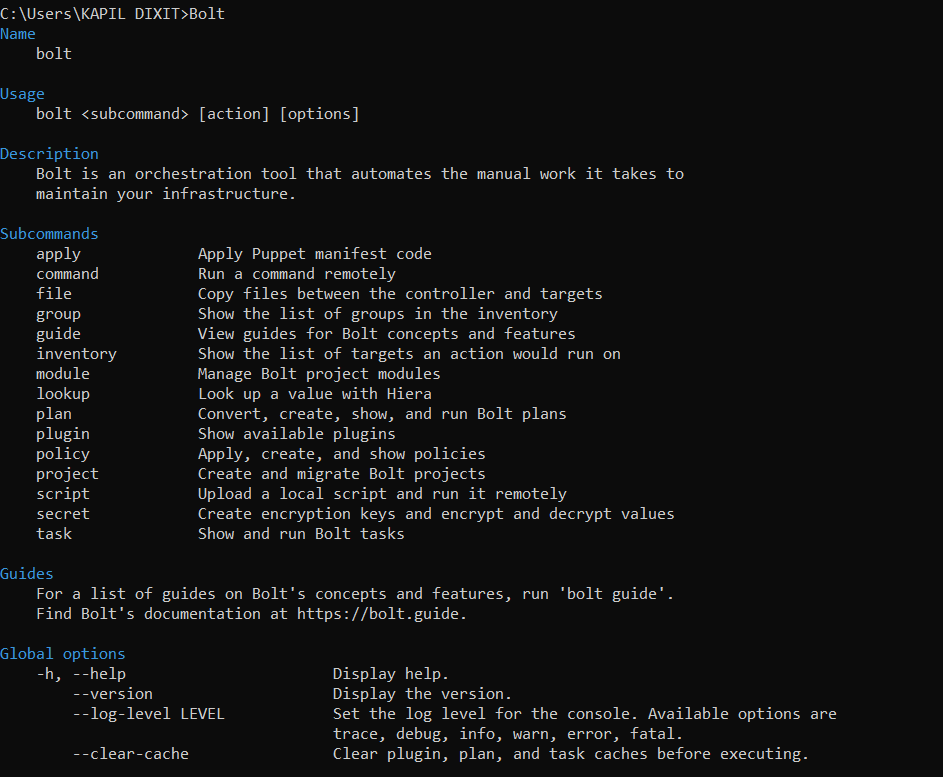
An open-source orchestration tool called Bolt automates the maintenance of software infrastructure. You can use Bolt to automate tasks as part of a larger orchestration workflow. Bolt can be used to patch and update systems, deploy applications, troubleshoot servers, or start and stop services. In particular, Bolt provides monitoring functionality and checks at short intervals whether the services in question are still available or whether infrastructure elements have gone missing.
Bolt can be installed on our local workstation, which connects directly to remote targets using SSH or WinRM, so no agent software needs to be installed. Secure shell (SSH), secure copy (SCP), Windows Distant Management (WinRM), and other well-liked authentication methods (password, public key) connect to the remote node. At the same time, it runs on a typical workstation (Linux, Windows, macOS).
Bolt Plans
Plans can use Puppet's built-in functions and data types because the Bolt Plan language is based on Puppet language functions. Custom functions written in Ruby or Puppet can also be added to the language.
Bolt uses YAML files or its own orchestration script wrapper, called a "plan ." The scripts mostly employ if statements for practical error handling. Administrators can create tasks in this format if they are already familiar with YAML files, and then use a built-in tool in Bolt to convert YAML files into Bolt.
Orchestrating Workflows with Plans in Bolts
Plans are collections of actions that can be combined with other logic. This enables you to perform complex task operations, such as computing values for the input of a task, running multiple tasks with one command, or running specific tasks based on the results of another task. You write plans in the Puppet language. And like tasks, plans are packaged in modules and can be shared on the forge. Bolt comes with a number of modules that contain helpful plans to support common workflows.
Inspecting Plans in Bolt
Before running a plan in your environment, inspect the plan to determine what effect it will have on your targets.
Inspecting Plans
*nix shell command
PowerShell cmdlet
1.
View a list of available plans:
bolt plan show
Get-BoltPlan
2.
View parameters and other details of plans:
bolt plan show <PLAN NAME>
Get-BoltPlan -Name <PLAN NAME>
After running the given commands you will be able to see the plans in bolt-
To get the documentation on a plan you can directly enter-
*nix shell command
bolt plan show <PLAN NAME>
PowerShell cmdlet
Get-BoltPlan -Name <PLAN NAME>
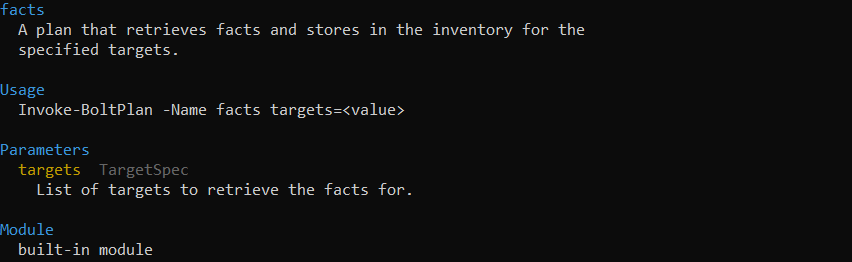
Let say I wanted to get documentation on facts, so in command prompt, I just entered -
As a result I will get everything I need to know about facts-
Running Plans in Bolt
Bolt can run plans, allowing multiple scripts, tasks, and commands to be tied together.
If you want to execute any plan, then run 'bolt plan run' and specify:
The complete name of the plan which follows the given format - <MODULE>::<PLAN>.
Also, specify plan parameters if needed, which should be written as <PARAMETER>=<VALUE>.
Specify the login information to access the target if required. Send these to the command line as --user and --password command-line options.
To understand it better, let's take an example.- Let's say the plan is found at modules/plans/myplan.pp and accepts a parameter called load_balancer that specifies the target on which it will execute its tasks or functions. Use the following command to execute the plan if your load balancer is lb.myorg.com:
*nix shell command
bolt plan run modules::myplan load_balancer=lb.myorg.com
After successfully running these lines you will get the message like this-
For more information on how you can find a plan in a module and pass structured data into a plan, you can visit this link.
Writing Plans in YAML
YAML plans allow you to define simple workflows by running a list of steps sequentially. Expressions from puppet code can be embedded in these steps to add logic as needed.
Creating a New Project Level YAML Plan: Using the bolt command, you can add a new project-level YAML plan to your Bolt project. This command accepts the name of the plan as a single argument. For example-
*nix shell command
bolt plan new <PLAN NAME>
PowerShell cmdlet
New-BoltPlan -Name <PLAN NAME>
After running these lines in command shell you will get this as a result-
Naming Plans
Plan names are given based on the filename of the plan, the name of the module that contains the plan, and the path to the plan within the module.To learn more about top-level keys, read about Plan structure.
Steps Key
An array of step objects, each representing a different action to be taken, are the steps key. When the plan runs, each step is executed sequentially. When a step fails, the plan halts execution and raises an error that contains the outcome of the failed step.
Some of the step keys are listed below for your reference:
Message step
Verbose step
Command step
Task step
Script step
File download step
File upload step
Plan step
Resources step
Eval step
To know more about how strings are evaluated, how to apply Puppet code from Puppet Forge modules, the conversion of YAML plans to Puppet language plans and quirks when converting YAML plans to Puppet language plans, you can follow this link.
Writing Plans in the Puppet Language
Plans enable you to run multiple tasks simultaneously with a single command, compute input values for tasks, process task results, and make decisions based on the outcomes of running tasks.
Compared to YAML plans, plans written in the Puppet language support more complex control flows and better error handling. Blocks of puppet code can also be applied to remote targets using puppet plans.
Plan Location
The directory structure for Bolt content is the same as for Puppet modules. Local plans are loaded by Bolt from site-modules/MODULE_NAME>/plans/ and downloaded module plans are loaded from modules/MODULE_NAME>/plans/. To create a Bolt plan in your module directory and give it the ‘.pp’ extension. Let say a plan is named myplan.pp in a module named mymodule, so the location of the plan would be - site-modules/mymodule/plans/myplan.pp.
Creating a New Project Level Puppet Language Plan
Using the bolt command, you can add a new project-level puppet language plan to your Bolt project. This command accepts the name of the plan as a single argument. For example-
*nix shell command
bolt plan new <PLAN NAME>
PowerShell cmdlet
New-BoltPlan -Name <PLAN NAME>
Naming Plans
The first line of your plan consist of the plan name. Plan names can composed of two or more name segments where each plan name segment must begin with a lowercase letter. You use the plan name to call the plan from the Bolt command line, or from other plans.To enhance your knowledge of defining plan parameters, returning errors and results from plans, about success and failure in plans, and handling plan function results, you can visit this link.
Debugging Plans
By default, we cannot get the result for each step of a plan in Bolt to standard output (stdout). This makes debugging a bit more difficult. But there are several ways to debug a Bolt plan.
To investigate a plan's execution:
Default Debug Log When you run a Bolt command, you can view a debugging message to the default debug log printed by the Bolt. This log is located in the root of your project and includes all messages printed at the debug level or higher.
Setting the Log Level For thorough information on how Bolt is carrying out your plan, including the results returned from each step, you can modify your log level using the given command lines-
*nix shell command
$ bolt plan run example --targets example.org --log-level trace
PowerShell cmdlet
> Invoke-BoltPlan -Name example -Targets example.org -LogLevel trace
Default Action Logging in Bolt Bolt logs actions such as running commands, tasks, or scripts, or downloading or uploading files. When an action begins or ends, Bolt automatically logs an info level message.
Built-in Log Functions- Logs can be printed using built-in plan functions. Some of these functions are given below-
Log level
Plan function
trace
log::trace
info
log::info
error
log::error
debug
log::debug
warn
log::warn
fatal
log::fatal
Running in Verbose Mode While running a plan in verbose mode, Bol prints the results for commands, scripts, tasks, and plans to stdout, by default. You can print verbose output of each steps by running the plan in verbose mode. Follow the given verbose command-lines to run in verbose mode:
*nix shell command
$ bolt plan run example --targets example.org --verbose
PowerShell cmdlet
> Invoke-BoltPlan -Name example -Targets example.org -Verbose
Printing Values Using the built-in plan functions, you can print any value or the output of any step to stdout.
Testing Plans
With the RSpec testing tool, Bolt ships with a library of helpers called BoltSpec that is used to create unit tests for plans. BoltSpec needs additional puppet testing tools, such as rspec-puppet. The Puppet Development Kit (PDK) has commands that can be used to install and set up these tools in new or existing modules. If your plan is a component of a Bolt project, you have the option of moving it to a module built using PDK or manually configuring rspec-puppet in your Bolt project.
To test a plan in Bolt you need to follow these steps-
Set up the test environment
Save the tests to the same module as the plans you are testing in your directory or file structure.
Include BoltSpec functions like spec_helper.rb and in test files
To run tests for your modules, including tests that you write for plans, run the following command:
There is a list of directories where Bolt search for content. It is called the modulepath.
What is the extension for plans in Bolt?
Plans must end in the .pp or .yaml extensions.
What is it about bolt that makes it stands out?
It enables administrators of VMware infrastructure to coordinate changes across that infrastructure. The standard Puppet configuration management technology, which employs the pull mechanism for configuration, has a gap that is filled by this product.
How to install Bolt?
Just get the installer package for Bolt and run; install bolt PowerShell, and now you can run the bolt command in it.
What does puppetlabs/ruby_task_helper do?
The puppetlabs/ruby_task_helper serves as a helper for writing tasks in ruby.
Conclusion
This article discusses everything you need to know about Plans in Bolt. We hope this article has helped you to enhance your knowledge on inspecting and running plans, Writing plans in YAML and in the Puppet language. Further we have also discussed about debugging and testing plans. To explore more on Bolt, here are more articles for rescue.


 9+ registered

