Do you think IIT Guwahati certified course can help you in your career?
Introduction
Microsoft Azure, previously called Windows Azure, is a public cloud computing platform provided by Microsoft. It delivers various cloud services, including analytics, computing, storage, and networking. Users can pick from these services to scale and develop new applications or run existing applications in the public cloud. It offers tools that support almost every industry, such as e-commerce and finance, and is even compatible with many open-source technologies.
About Quickstarts
The Quickstarts are planned to guide you through the steps to connect your dev kit to your development machine, install the software you need, and configure your selected development environment. Getting started with Azure Sphere includes several steps:
Install the SDK and set it up for development.
Claim your device.
Configure networking for application development.
Subscribe to notifications about Azure Sphere services and updates.
Depending on your OS platform, Azure Sphere supports several development environments:
Visual Studio on Windows: After you install the Azure Sphere SDK, you can install the Azure Sphere extension for Visual Studio. The extension helps you to debug and develop Azure Sphere apps using the Visual Studio IDE (integrated development environment).
Visual Studio Code on Windows or Linux: After you install the Azure Sphere SDK, you can install the Azure Sphere extension for Visual Studio Code. The extension helps you to develop and debug Azure Sphere apps on Windows or Linux using the Visual Studio Code IDE.
The command-line interface on Windows or Linux: The Azure Sphere SDK supports the development and debugging of Azure Sphere apps using the Windows or Linux command-line interface.
Install the SDK and setting up for development.
For Windows
Set up your dev kit on a Windows PC
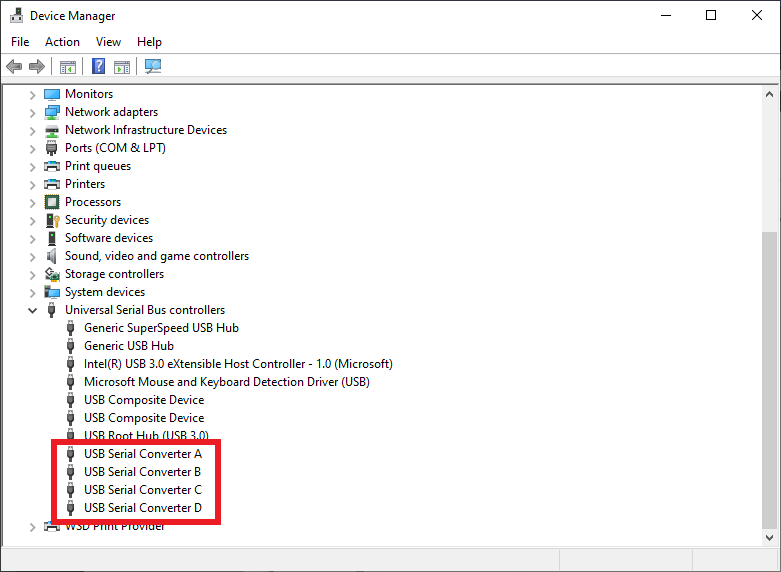
Connect your Azure Sphere dev kit to your computer through USB. When plugged in, the device shows four USB Serial Converters. To verify installation, open Device Manager. Under Universal Serial Bus controllers, search for four USB Serial Converters.
Install the Azure Sphere SDK
First of all, we will download the SDK and save the downloaded file on our PC.
Then, run the downloaded .exe to install the SDK. Click on Agree to the license terms, and then select Next.
Select Install to begin the installation.
Accept the elevation prompt if one appears.
When setup completes, restart your PC if the setup application requests it.
If the installer returns errors, try uninstalling and reinstalling the SDK package.
Install Visual Studio and the Azure Sphere extension
To develop Azure Sphere applications, you can use Visual Studio Enterprise, Professional, or Community 2022 (or 2019 version 16.11 or higher). The Azure Sphere SDK and the Azure Sphere Extension for Visual Studio contain all the tools you need to develop Azure Sphere applications.
Secondly, navigate to the folder into which you downloaded the compressed file.
Then extract the contents of the compressed file. For eg, tar xvfz install_azure_sphere_sdk_<version>.tar.gz. The .tar.gz file contains the install_azure_sphere_sdk.sh file.
At last run the install script using sudo as follows:
sudo ./install_azure_sphere_sdk.sh
During installation, the Script displays messages same as these:
The SDK tarball signature is valid. The fingerprint of the key used is:
Primary key fingerprint: <hexadecimal>
Once the installation is completed, you must log in to your desktop application or login shell to initialize the CLI.
Udev rules
The Azure Sphere SDK sets "udev" rules for your computer's device information. The SDK makes a new group called "azsphere" and has the currently logged-in user in the group. The udev rule grants ownership of USB devices fitting the Azure Sphere device description. The "azsphere" group is added to grant permissions using the "udev" rule. Do not modify the group yourself or manually.
Set up a device connection
The Azure Sphere SDK for Linux sets up the needed networking settings to enable communication with the attached device. Connect your device and your computer by USB and then run the following Script:
azsphere_connect.sh
Install the SDK without an internet connection
Download these 3 files and transfer them to the installation computer:
Install Script: It is a compressed tar file (.tar.gz file) with a name beginning install_azure_sphere_sdk.
Azure sphere SDK for Linux: It is a compressed tar file (.tar.gz file) with a name starting Azure_Sphere_SDK_Bundle.
Microsoft's PGP public key: This is an ASCII text file.
On your personal computer, navigate to the folder where you transferred these files.
Then, extract the contents of the compressed install script file. For eg, tar xvfz install_azure_sphere_sdk_<version>.tar.gz. The .tar.gz file has the install_azure_sphere_sdk.sh file.
Run the install script with the help of sudo. Include the -k parameter to specify the path to the key and the -i parameter to specify the path to the SDK bundle. Your command should be the same to this:
At last, if you see the error command not found when running the Script, enable execution of the install script using the command:
chmod +x install_azure_sphere_sdk.sh
Set up your development environment
You can make Azure Sphere apps on Linux using Visual Studio Code or the command-line interface (CLI). No matter your use, you will need to install CMake and Ninja on your development machine if you don't already have them.
Install CMake and Ninja:
sudo apt install cmake ninja-build
Install the Azure Sphere extension for VS Code.
When the installation is complete, the Readme page for the extension will open. The Readme page provides valuable information about Visual Studio Code configuration and requirements and is updated along with the extension. You can view the Readme page anytime by opening the Extensions pane and selecting Azure Sphere.
Choose a tenant and claim your device
Every device should be "claimed" into an Azure Sphere tenant. Claiming the device associates its particular, immutable device ID with your Azure Sphere tenant. The Azure Sphere Security Service utilizes the device ID to recognize and authenticate the device.
Sign in to Azure Sphere
First, connect your device over USB.
Open a CLI using PowerShell, Linux command shell, or Windows command prompt.
Then, sign in to Azure Sphere using a Microsoft account:
azsphere login
If you have never logged in to Azure Sphere before, use the azsphere register- user command to register a user with the Azure Sphere Security Service:
azsphere register-user --new-user <email-address>
Choose a tenant
After successful login, you must select a default Azure Sphere tenant. To list available tenants, use the azsphere tenant list.
You will need to create a tenant if you don't have access to any tenants.
If you have access to one or more tenants, you must select one. After you select a tenant, move to the next step.
Claim the device
Claim your device. After you claim your device to a tenant, you cannot move it to a different tenant.
azsphere device claim
You should see output like this:
Claiming device.
Successfully claimed device ID '<device ID>' into tenant '<name>' with ID '143adbc9-1bf0-4be2-84a2-084a331d81cb'.
Configure networking and update the device OS
Set up Wi-Fi on your Azure Sphere device
Follow these steps to configure wifi on your Azure Sphere device:
Firstly, connect your Azure Sphere device to your computer.
Then, open Azure sphere explorer.
Next, expand the Device node for the device you are interested in.
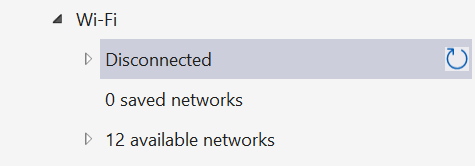
Expand the wifi node. You will see:
5. Expand the Disconnected node and see the device's MAC address. Register the device's MAC address if your network environment needs it. The refresh button at the right; will be needed to view the connectivity information after you have connected to a network.
6. Expand the available networks node, if possible. Right-click the network you want to connect to and select Connect. If your network needs a Pre-Shared Key (PSK), type the network password in the PSK textbox, then press Enter.
7. Return to the node lastly labeled Disconnected, which now reads Connected to: <network>. If you still see Disconnected after a few moments, click the refresh button on this node to see the updated connection status of your device.
8. You shall view the following information:
WPA state
Mode
IP address
Security state
MAC address
Frequency
Key management type
Whether a targeted scan was used
9. This is the same information stated by the CLI command azsphere device wifi show-status.9.You should also see the network you have connected to appear on your Saved networks node.
Enable or disable Wi-Fi networks
To enable a configured wifi network in Visual Studio's Azure Sphere Explorer, we follow the given steps::
Expand the Saved networks node.
Then, Find a disabled network; these will have a connection symbol to the right of their names.
Finally, Select the connection symbol, right-click the network name, and select Enable.
To disable a configured wifi network in Visual Studio Code's Azure Sphere Explorer, we follow the given steps:
Expand the Saved networks node.
Then, find an enabled network; these will have a disconnect symbol to the right of their names.
Finally, select the disconnect symbol, right-click the network name, and select Disable.
Forget a Wi-Fi network
To forget a configured Wi-Fi network in Visual Studio's Azure Sphere Explorer:
Expand the Saved networks node.
Right-click the network you want to forget and then select Forget.
Receive device update
The Azure Sphere device verifies for Azure Sphere OS and application updates each time it boots, when it connects to the Internet, and at 24-hour intervals. If updates are present, download and installation could take as much as 15-20 minutes and might cause the device to restart.
To check on the update status, type the following command:
azsphere device show-deployment-status
Subscribe to Azure Sphere notifications
To subscribe to Azure Updates through the RSS feed:
Go to the Azure Updates website.
In the Search all updates box, enter Azure Sphere.
Right-click the RSS feed button and select the Copy link.
Use the copied URL in any RSS reader to subscribe to the RSS feed.
Frequently Asked Questions
What is Azure?
Microsoft Azure, also called Azure, is a cloud computing service operated by Microsoft for application management via Microsoft-managed data centers.
Where can we use Microsoft Azure?
Azure is commonly used as a platform for hosting databases in the cloud.
In addition, the platform is frequently used for backup and disaster recovery. Microsoft offers serverless relational databases such as Azure SQL and non-relational databases such as NoSQL.
What do you understand by cloud computing?
It is the delivery of computing services—including databases, servers, storage, networking, software, analytics, and intelligence—over the Internet (“the cloud”) to offer flexible resources, foster innovation, and economies of scale.
What is the azure sphere used for?
The Azure Sphere Security Service is used to:
Supports authentication,
Software updates
Error reporting over secured cloud-to-device
Device-to-cloud channels
What are Azure communication services?
Azure Communication Services is a combination of video APIs, communication APIs, and SMS APIs for deploying your applications on any device, or any platform.
Conclusion
I hope this article provided you with insights into the steps required to set up an Azure sphere device.
We hope this blog has helped you increase your knowledge regarding AWS Step functions, and if you liked this blog, check other links. Do upvote our blog to help other ninjas grow. Happy Coding!"


 9+ registered

