Table of contents
1.
Introduction
2.
Steps to Create Project
3.
Creating Hello World Service
4.
Enhancing the Hello World Service to Return a Bean
5.
Frequently Asked Questions
5.1.
What is a spring boot?
5.2.
Is spring boot a backend?
5.3.
What is spring boot REST API?
5.4.
What is the benefit of spring boot?
5.5.
Why is REST architecture important?
6.
Conclusion
Last Updated: Aug 13, 2025
Medium

RESTful Web Services Project with Spring Boot

Author soham Medewar
0 upvote
Career growth poll
Do you think IIT Guwahati certified course can help you in your career?

Introduction

Spring Boot is an open-source framework. It is based on the Java programming language. Spring Boot is used in creating a microservice. Spring Boot is developed by Pivotal Team. It can be used to build standalone spring applications. 

To further enhance your knowledge and gain hands-on experience, you can also consider enrolling in our Spring Boot Course, which covers many of the concepts needed for these interview stages.

In this article, we will be building a simple RESTful web service project.

Steps to Create Project

Step 1: The first thing you need to do is install Spring Tool Suite on your local machine. You can download it from here. After the successful installation, launch Spring Tool Suite. 

step 1

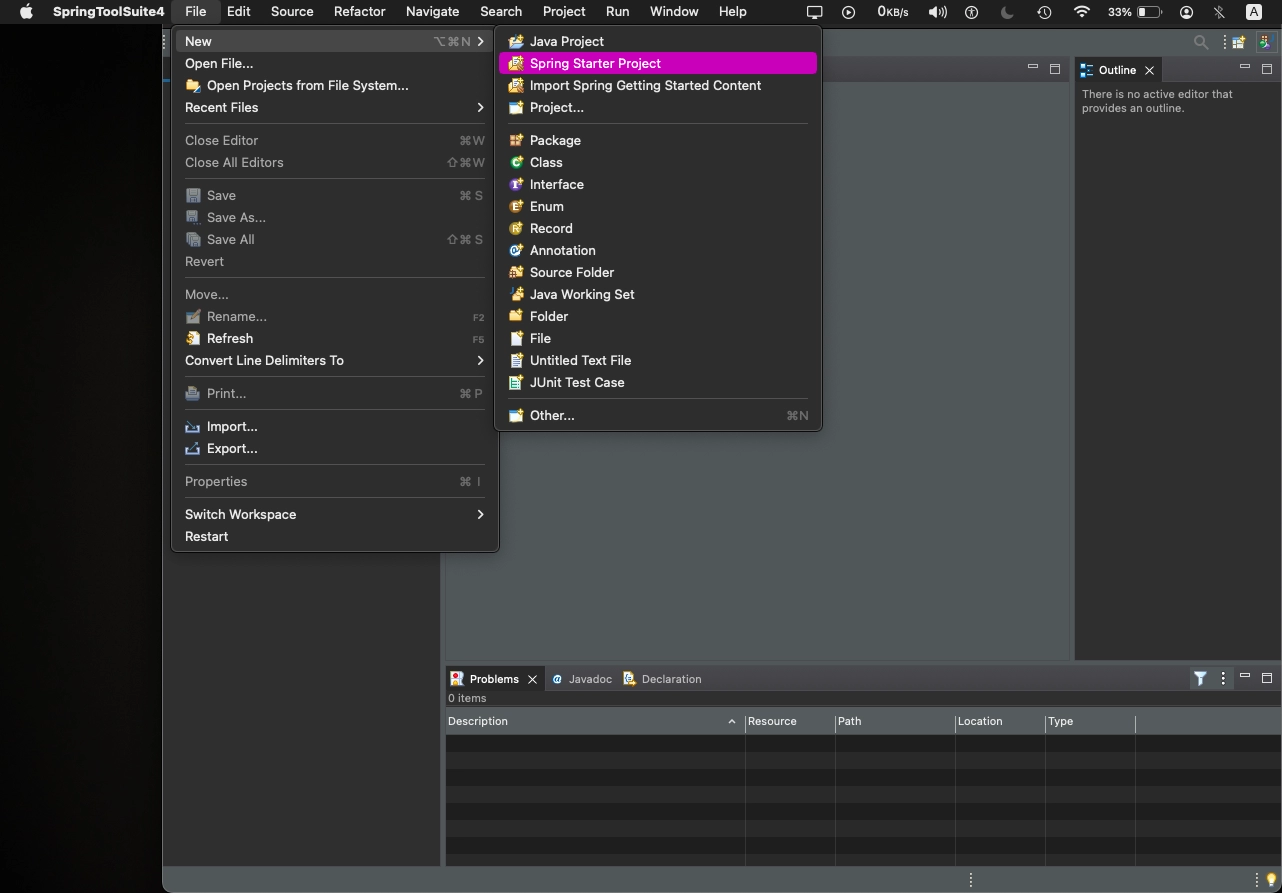
Step 2: Create a new Spring project by going into File->New->Spring Starter Project, as shown below.

step 2

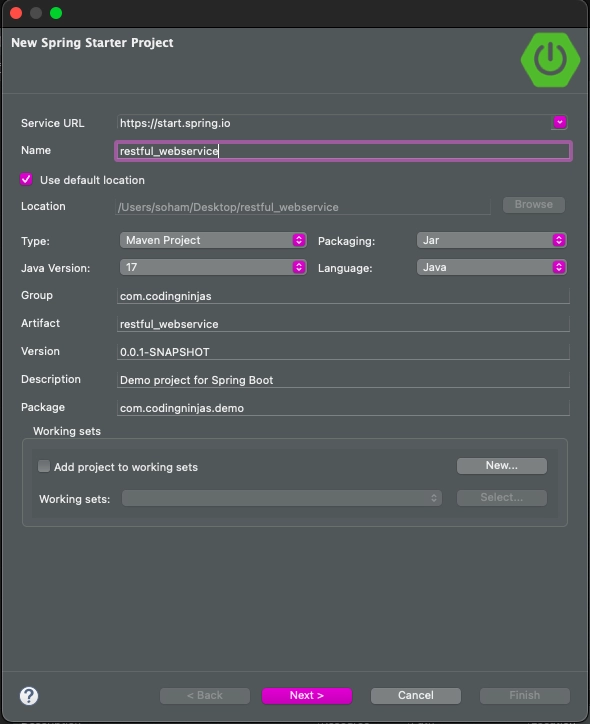
Step 3: Enter the name, group, description, and package of your project, as shown below. After entering the correct details, click on the next button.

step 3

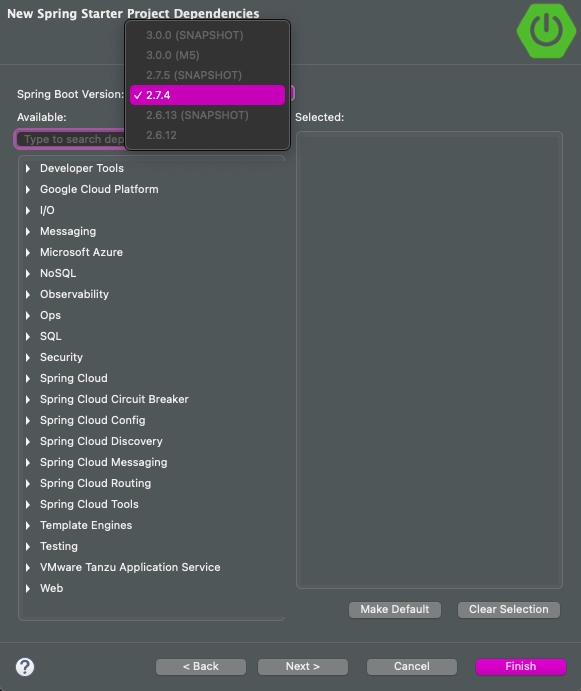
Step 4: Choose the correct version of Spring Boot, as shown below. After selecting the correct version, click on the finish button to initialize the project.

step 4

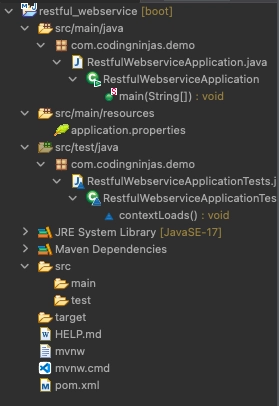
Step 5: Look at the project explorer window to observe the project structure as displayed below.

step 5

Step 6: Now, we need to add some extra dependencies to the pom.xml file in our project. Add the dependencies Maven repository. Spring Web MVCSpring Boot DevToolsJPA, and H2 are the dependencies that we need to add to pom.xml. After adding dependencies, your pom.xml will like the following:

pom.xml

<?xml version="1.0" encoding="UTF-8"?>
<project xmlns="http://maven.apache.org/POM/4.0.0" xmlns:xsi="http://www.w3.org/2001/XMLSchema-instance"
xsi:schemaLocation="http://maven.apache.org/POM/4.0.0 https://maven.apache.org/xsd/maven-4.0.0.xsd">
	<modelVersion>4.0.0</modelVersion>
	<parent>
		<groupId>org.springframework.boot</groupId>
		<artifactId>spring-boot-starter-parent</artifactId>
		<version>2.7.4</version>
		<relativePath/> <!-- lookup parent from repository -->
	</parent>
	<groupId>com.codingninjas</groupId>
	<artifactId>restful_webservice</artifactId>
	<version>0.0.1-SNAPSHOT</version>
	<name>restful_webservice</name>
	<description>RESTFUL Webservice</description>
	<properties>
	<java.version>17</java.version>
	</properties>
	<dependencies>
		<dependency>
		<groupId>org.springframework.boot</groupId>
		<artifactId>spring-boot-starter</artifactId>
		</dependency>


		<dependency>
		<groupId>org.springframework.boot</groupId>
		<artifactId>spring-boot-starter-test</artifactId>
		<scope>test</scope>
		</dependency>

		<!-- https://mvnrepository.com/artifact/org.springframework/spring-webmvc -->
		<dependency>
    		<groupId>org.springframework</groupId>
    		<artifactId>spring-webmvc</artifactId>
    		<version>5.3.23</version>
		</dependency>

		<!-- https://mvnrepository.com/artifact/org.springframework.boot/spring-boot-devtools -->
		<dependency>
    		<groupId>org.springframework.boot</groupId>
    		<artifactId>spring-boot-devtools</artifactId>
    		<version>2.7.3</version>
		</dependency>

		<!-- https://mvnrepository.com/artifact/org.hibernate.javax.persistence/hibernate-jpa-2.1-api -->
		<dependency>
    		<groupId>org.hibernate.javax.persistence</groupId>
    		<artifactId>hibernate-jpa-2.1-api</artifactId>
    		<version>1.0.2.Final</version>
		</dependency>

		<!-- https://mvnrepository.com/artifact/com.h2database/h2 -->
		<dependency>
    		<groupId>com.h2database</groupId>
    		<artifactId>h2</artifactId>
    		<version>2.1.214</version>
    		<scope>test</scope>
		</dependency>
	</dependencies>
	<build>
		<plugins>
			<plugin>
				<groupId>org.springframework.boot</groupId>
				<artifactId>spring-boot-maven-plugin</artifactId>
			</plugin>
		</plugins>
	</build>
</project>


Step 7: Now open the RestfulWebserviceApplication.java file and run the file as a Java application. 

package com.codingninjas.demo;
 

import org.springframework.boot.SpringApplication;
import org.springframework.boot.autoconfigure.SpringBootApplication;

@SpringBootApplication
public class RestfulWebserviceApplication {
	public static void main(String[] args) {
		SpringApplication.run(RestfulWebserviceApplication.class, args);
	}
}
You can also try this code with Online Java Compiler
Run Code


By running the above code, no output will be generated. It ensures that the application is running properly.

Creating Hello World Service

Step 1: Now you need to create a HelloWorldController named class inside the com.codingninjas.server.main package.

Step 2: Now we need to define two things, i.e., Uniform Resource Identifier (URI) and GET method, whenever we create a web service. Create a helloWorld() method that returns the “Hello World!” string. We must add the @RestController annotation to spring MVC in order to instruct it to handle the REST request. It now has the ability to handle Rest requests.
 

package com.codingninjas.server.main;  
import org.springframework.web.bind.annotation.RequestMethod;  
import org.springframework.web.bind.annotation.RequestMapping;  
import org.springframework.web.bind.annotation.RestController;  

//Controller  
@RestController  
public class HelloWorldController   
{  
	// using hello-world as URI and GET method
	@RequestMapping(method=RequestMethod.GET, path="/hello-world")  
	public String helloWorld()  
	{  
		return "Hello World!";  
	}  
}  
You can also try this code with Online Java Compiler
Run Code


Instead of using @RequestMapping, we can use @GetMapping annotation to improve the code.
 

@GetMapping(path="/hello-world")  
You can also try this code with Online Java Compiler
Run Code


Step 3: Run the RestfulWebServiceApplication. It will display “Hello World!” on the browser.

Enhancing the Hello World Service to Return a Bean

In this section, we will generate a bean for helloWorld() method.

Step 1: First, create a helloWorldBean() method inside the HelloWorldController.java file. Return HelloWorldBean after Mapping URI to “/hello-world-bean”.

HelloWorldController.java  

package com.codingninjas.server.main;
import org.springframework.web.bind.annotation.RestController;  
import org.springframework.web.bind.annotation.GetMapping;  
//Controller  
@RestController  
public class HelloWorldController   
{  
	//using get method and hello-world URI  
	@GetMapping(path="/hello-world")  
	public String helloWorld()  
	{  
		return "Hello World!";  
	}  
	@GetMapping(path="/hello-world-bean")  
	public HelloWorldBean helloWorldBean()  
	{  
		return new HelloWorldBean("Hello World!");
	}  
}  
You can also try this code with Online Java Compiler
Run Code


Step 2: Create HelloWorldBean class and generate Getters and Setters. Also, generate toString().

Right-click -> Source -> Generate Getters and Setters -> check the box -> Ok

Right-click -> Source -> Generate toString().. -> Ok

HelloWorldBean.java
 

package com.codingninjas.server.main;  
public class HelloWorldBean   
{  
	public String msg;  
	//constructor of HelloWorldBean  
	public HelloWorldBean(String msg)  
	{  
		this.msg=msg;  
	}  
	//generating getters and setters  
	public String getMessage()  
	{  
		return msg;  
	}  
	public void setMessage(String msg)   
	{  
		this.msg = msg;  
	}  
	@Override  
	//generate toString  
	public String toString()   
	{  
		return String.format ("HelloWorldBean [msg=%s]", msg);  
	}  
}  
You can also try this code with Online Java Compiler
Run Code


Step 3: Launch the HelloWorldController. You will be redirected to localhost:8080/hello-world-bean.

This will return “Hello World!” in JSON format.

Frequently Asked Questions

What is a spring boot?

An open source Java-based framework Spring Boot is used to build micro Services. The Pivotal Team created it, and it's used to create standalone, production-ready spring apps.

Is spring boot a backend?

A backend framework Spring Boot has gained significant traction in the Java enterprise sector. It enables Java developers to easily and quickly begin creating web apps.

What is spring boot REST API?

A Java framework for creating web applications called Spring Boot was created on top of the Spring framework. You can construct REST APIs using only the bare minimum of configurations. Using Spring Boot for your REST APIs has a number of advantages, including No need for intricate XML setups.

What is the benefit of spring boot?

It greatly cuts down on development time and boosts output. It prevents the need to create a tonne of redundant XML configuration, annotations, and code. The Spring Ecosystem, which includes Spring JDBC, Spring ORM, Spring Data, Spring Security, etc., is very simple to integrate with the Spring Boot Application.

Why is REST architecture important?

REST allows us to achieve the architectural properties of performance, scalability, generality, simplicity, modifiability, and extensibility.

Conclusion

In this article, we have learned to build a RESTful web service project from scratch using Spring Boot.

You can also check how to carry out the STS Download.

Refer to our guided paths on Coding Ninjas Studio to learn more about DSA, Competitive Programming, JavaScript, System Design, etc.

Happy Coding!

Live masterclass