Do you think IIT Guwahati certified course can help you in your career?
Introduction
Every IoT hub includes a built-in endpoint compatible with Event Hubs by default. You can also define routing queries to build custom endpoints and route messages to other Azure services. Each message at the IoT hub is routed to all endpoints that match the routing query. A message is routed to the default destination if no routing queries are specified.
In this blog, we will be discussing Message Routing in Azure IoT Hub. We are going to route the device messages to the storage in Azure.
Message routing in Azure IoT Hub is used to send telemetry data from your IoT devices to other Azure services such as blob storage, Service Bus Topics, and Event Hubs.
Prerequisites
A subscription to Azure. If you don't already have an Azure membership, sign up for one before you begin.
Your Azure subscription includes an IoT hub. If you don't already have a hub, you can do so by following the instructions provided. Make an IoT hub.
This tutorial blog employs code from the Azure IoT examples for C#. Install the samples repo on your development system by downloading or cloning it. Your development computer should have .NET Core 3.0.0 or above. Check your version with dotnet -- version and, if required, download .NET.
Check that your firewall has port 8883 open. This tutorial's example uses the MQTT protocol, which connects through port 8883. In some business and educational network contexts, this port may be banned. See Connecting to an IoT Hub for further information and workarounds (MQTT).
Install Azure IoT Explorer if desired. This tool assists you in monitoring messages as they arrive at your IoT hub.
Registering a device and sending messages to IoT Hub
Now, we will be going through the following steps to register a new device in the IoT hub,
Navigate to your IoT hub after logging into the Azure portal.
Devices may be found under the Device management section of the menu.
Choose Add device.
Enter a device ID and click Save.
The new device should now be included in the list of devices. If it isn't, try refreshing the page. To open the device information page, choose the device ID.
Copy and save one of the device keys. This number will be used to set up the sample code that creates simulated device telemetry signals.
With your device ID and key in hand, use the sample code to begin sending device telemetry messages to IoT Hub.
Download/clone the Azure IoT samples for the C# repo from GitHub if you haven't already done so as part of the requirements.
Navigate to the /iot-hub/Tutorials/Routing/SimulatedDevice/ folder in the sample folder.
Open the Program.cs file in your preferred editor.
The variable definitions may be found at the start of the Program class. Replace the following variables with your data:
s_myDeviceId: The device ID that is assigned while registering the device. s_iotHubUri: The hostname of the IoT hub, which takes the format IOTHUB_NAME.azure-devices.net. s_deviceKey: The device key that is copied from the device identity information.
Save and exit the file.
Install the Azure IoT C# SDK and any requirements listed in the SimulatedDevice.csproj file: dotnet restore
Run the sample code: Dotnet run
Messages should begin to print to output as they are transmitted to IoT Hub. Keep this application running throughout the tutorial.
Configure IoT Explorer to view messages
IoT Explorer should be configured to connect to your IoT hub and read messages as they come at the built-in endpoint.
To begin, we will have to retrieve the connection string for your IoT hub.
Navigate to your IoT hub via the Azure portal.
Select Shared access policies from the menu's Security options section.
Decide on the iothubowner policy.
Copy the Primary connection string.
Use that connection string to configure IoT Explorer for your IoT hub.
On your development machine, launch IoT Explorer.
Click Add a connection.
Copy-paste the connection string from your hub into the text field.
Choose Save.
You should see a list of devices after connecting to your IoT hub. Choose the device ID you made for this instruction.
Choose Telemetry.
Choose Start.
Messages from your smartphone should be shown, with the most recent at the top.
For a few seconds, examine the incoming messages to ensure that you observe three different categories of notifications: regular, storage, and critical.
These messages are all coming at your IoT hub's default built-in endpoint. In the next sections, we'll establish a new endpoint and route some of these messages to storage based on their attributes. Those messages will no longer display in IoT Explorer since messages only flow to the built-in endpoint when no other routes in the IoT hub match.
Set up message routing
Messages will be routed to different resources based on the simulated device's attributes connected to the message. Messages and events not specially routed are forwarded to the default destination.
The tutorial's sample app gives a level attribute to each message it delivers to the IoT hub. Each communication is assigned a normal, storage, or critical level at random.
The first step is the configuration of the destination endpoint for the data. The next step is configuring the message route that will use that endpoint. After configuring the routing, you may again observe the message and routes in the portal.
Create a storage account
Create an Azure Storage account and a container within it to store device communications directed to it.
Search for Storage accounts on the Azure site.
Choose Create.
For your storage account, enter the following values:
By clicking Review + create, you can accept all of the additional default options.
When the validation is finished, click Create.
When the deployment is finished, choose Go to the resource.
Select Containers from the Data storage section in the storage account menu.
To make a new container, choose Container.
Give the Container a name and then select Create.
Route to a storage account
Set up the storage account's route now. In this step, you establish a new endpoint that points to the newly formed storage account. Then, design a route that looks for messages with the level attribute set to storage and sends them to the storage endpoint.
Navigate to your IoT hub via the Azure portal.
From the Hub settings section of the menu, choose Message Routing.
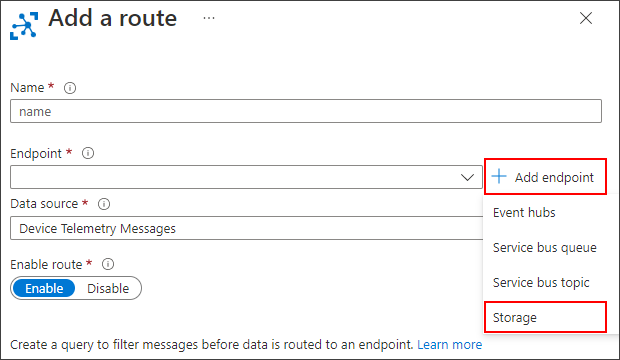
Select Add from the Routes tab.
Choose storage from the dropdown menu after selecting Add endpoint next to the Endpoint field.
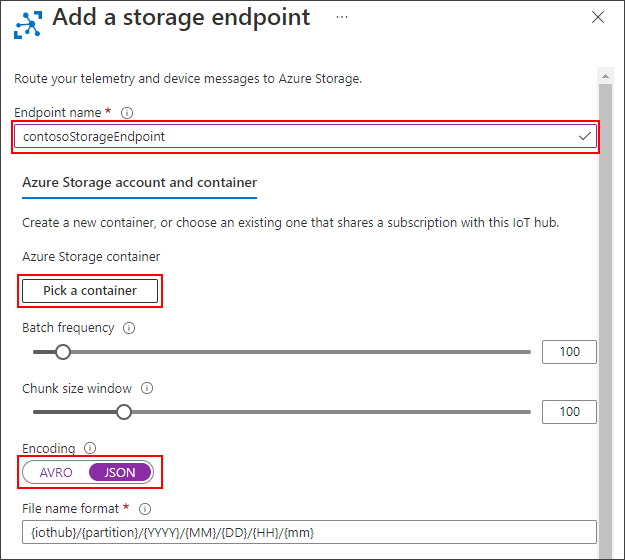
For the new storage endpoint, enter the following information:
Accept the default settings for the remaining options, then click Create.
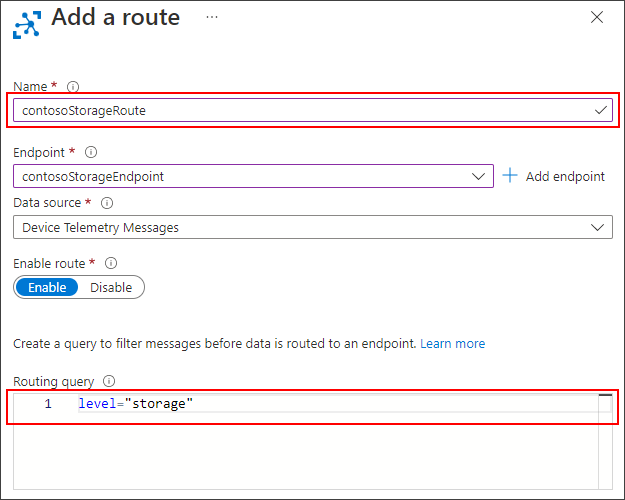
Now that you've added the storage destination continue designing the new route. For the new route, the following information is being provided:
Choose Save.
View routed messages
When the route is built and activated in IoT Hub, it will instantly begin routing messages that fulfil the query criteria to the storage endpoint.
Monitor the built-in endpoint with IoT Explorer
Return to your development machine's IoT Explorer session. Remember that the IoT Explorer watches your IoT hub's built-in endpoint. That means you should only see messages that aren't being routed via the custom route we set up. If you wait a few seconds, you should only get messages with the level set to normal or critical.
View messages in the storage container
Check that the messages are being delivered to the storage container.
Navigate to your storage account in the Azure interface.
Containers may be found under the Data storage section of the menu.
Choose the Container you made for this instruction.
There should be a folder named after your IoT hub. Drill down the file structure until you find a.json file.
Download the JSON file and confirm that it contains messages from your device that have the level property set to storage.
Frequently Asked Questions
Explain the Request-Response model in IoT.
The client (IoT Device) makes requests, and the server responds to those requests in this communication architecture. When a request is received, the server determines what response to offer, retrieves the needed data, prepares the response, and again sends it back to the client.
What is sharding in IoT?
Sharding is the technique of dividing very large databases into smaller, quicker, and easier-to-manage chunks known as data shards. A shard is a tiny part or fragment of a huge data collection. The idea behind sharding is to divide a logical dataset into many databases to store it more effectively.
What are Azure Test Plans?
Azure test plan provides browser-based test management via which we can manage all testing, such as exploratory and manual testing, continuous testing, and unit and functional testing. We can also ask or request feedback from stakeholders.
Conclusion
This article extensively discussed the Message Routing in Azure IoT Hub, its configuration, setting up routing and viewing the routed messages. We hope this blog has helped you enhance your knowledge relating to Azure IoT Hub.


 8+ registered

